

1. Introduction
The new Ubuntu releases feature the addition of Wayland, which is now its default display server. So, this change is significant because it replaces the traditional Xorg Server, which was the longstanding default before Wayland.
In a nutshell, the graphical desktop environment uses X11, or the X Window System, to display and control windows. However, Wayland replaces X11, and notably, designers created Wayland to be faster and more secure.
In this tutorial, we’ll delve into fully understanding Wayland in Ubuntu and how to enable and disable it.
2. Understanding Wayland
To begin, let’s highlight the reasons for the development of Wayland.
2.1. Reasons for the Development of Wayland
It’s important that we quickly highlight the key X11 problems that Wayland was created to solve:
- X11 requires a lot of back-and-forth messaging
- X server sits between the clients and the Window Manager
- Its server is a mediator for everything via the kernel and graphics hardware
So, the volume of messaging and other factors sometimes lead to latency, jumpy visuals, and lagging. Moreover, there’s an issue of inextensibility with X11, which hinders developers from improving it.
In contrast to the drawbacks of X11, Wayland provides simpler architecture, and it has modernized and streamlined the code base, thereby providing performance benefits and improved security.
2.2. How Wayland Works
Wayland improves upon its predecessors by offloading functionality to the kernel and streamlining its architecture. It eliminates redundant code by relying on the kernel for tasks it can handle more efficiently. Additionally, Wayland consolidates the roles of the display server and window manager into a single application, enhancing performance and simplifying the overall system. With this knowledge, we have a better understanding of how it works.
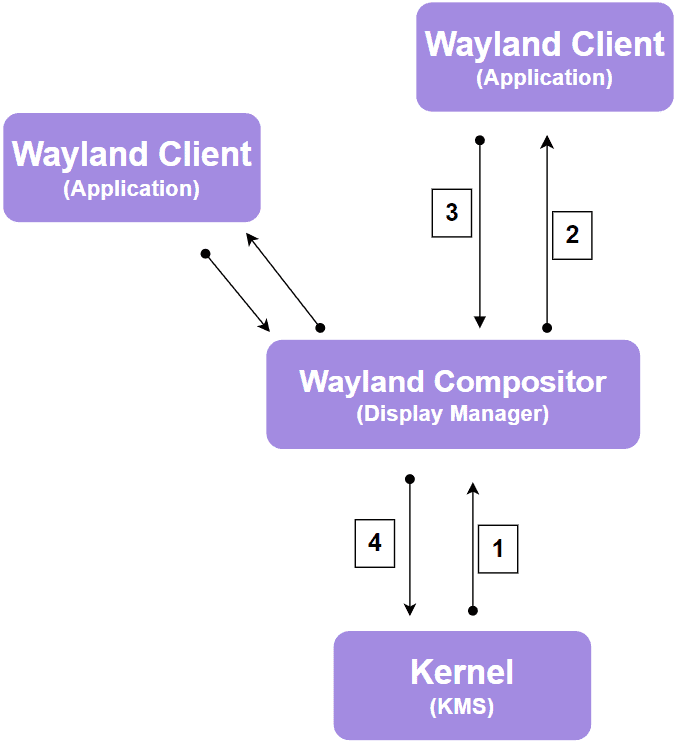
With Wayland, the compositor and the client application communicate directly. The compositor maintains its internal mapping of window locations, sizes, and states on the desktop. Additionally, it brokers keyboard, mouse, and window change events, sending them to the respective applications.
Meanwhile, the applications update the user interface accordingly. A major difference is that the applications render themselves using the linked Wayland libraries.
During this process, two things are possible: Either the application updates the buffer used to hold the window, or it creates a new buffer and discards the old one. Afterward, the client application then notifies the compositor, instructing it to update its window mapping and use the new or updated video buffer:
The decrease in the number of messages simplifies its architecture. Coupled with modern code design, Wayland is able to deliver performance improvements. All of these make window resizing and dragging smooth and fluid during display on Ubuntu.
It’s time to check if our current version of Ubuntu is using Wayland of X11. Furthermore, let’s learn how to enable and disable these features on Ubuntu.
3. Switching Between Wayland and X11 on Ubuntu
Let’s explore how to enable and disable Wayland using a few procedural steps.
3.1. Check for the Current Display Protocol
First, we need to confirm the current display server protocol running on our Ubuntu:
$ echo $XDG_SESSION_TYPE
wayland
The result shows that we’re running Wayland. Now that we know, let’s proceed to check if X11 is also installed and present on our Ubuntu install:
$ dpkg -l | grep xorg
ii  python3-xkit              0.5.0ubuntu6              all          library for the manipulation of xorg.conf files (Python 3)
ii  xorg                      1:7.7+23ubuntu3           amd64        X.Org X Window System
ii  xorg-docs-core            1:1.7.1-1.2               all          Core documentation for the X.org X Window System
ii  xserver-xorg              1:7.7+23ubuntu3           amd64        X.Org X server
ii  xserver-xorg-core         2:21.1.12-1ubuntu1        amd64        Xorg X server - core server
...
The dpkg command above lists all installed packages related to Xorg, the X Window System implementation used in many Linux distributions.
So, as we can see, the result shows that the X11 is present on this system.
3.2. Enabling and Disabling Wayland on Ubuntu
GDM3 is the default display manager for the GNOME desktop environment. Therefore, enabling and disabling Wayland is done within the /etc/gdm3/custom.conf file.
We already know that we’re running Wayland. All we need to do now is disable it. Let’s use nano to open and edit /etc/gdm3/custom.conf:
$ sudo nano /etc/gdm3/custom.confWe’ll apply the following change to the file:
[daemon]
# Uncomment the line below to force the login screen to use Xorg
WaylandEnable=false
We disabled the Wayland display protocol by uncommenting the line that has WaylandEnable=false, taking away # at the beginning of the line. Inversely, we can re-enable it by changing the false to true or adding a comment, which deactivates that command prompt.
After we’ve deactivated Wayland, the next thing to do is to restart GDM3:
$ sudo systemctl restart gdm3The command above restarts the system with X11 as the default display protocol. Now, we can proceed to confirm if our Ubuntu is currently using X11:
$ echo $XDG_SESSION_TYPE
x11
So, the XDG_SESSION_TYPE environment variable shows that our Ubuntu’s display protocol is now x11.
4. Conclusion
In this article, we learned what Wayland is in Ubuntu and also found out why it’s become the default display protocol for the newest releases of the operating system. However, it hasn’t phased out X11 completely. Furthermore, we learned how to disable and enable Wayland on our Ubuntu system.