1. Overview
In this article, we’ll examine YugabyteDB. YugabyteDB is a SQL database created to address the difficulties faced by today’s distributed cloud-native apps. Yugabyte DB provides enterprises and developers with an open-source, high-performance database.
2. YugabyteDB Architecture
YugabyteDB is a distributed SQL database. More precisely, it is a relational database that provides a single logical database deployed across a cluster of network servers.
Most relational databases work like the following:
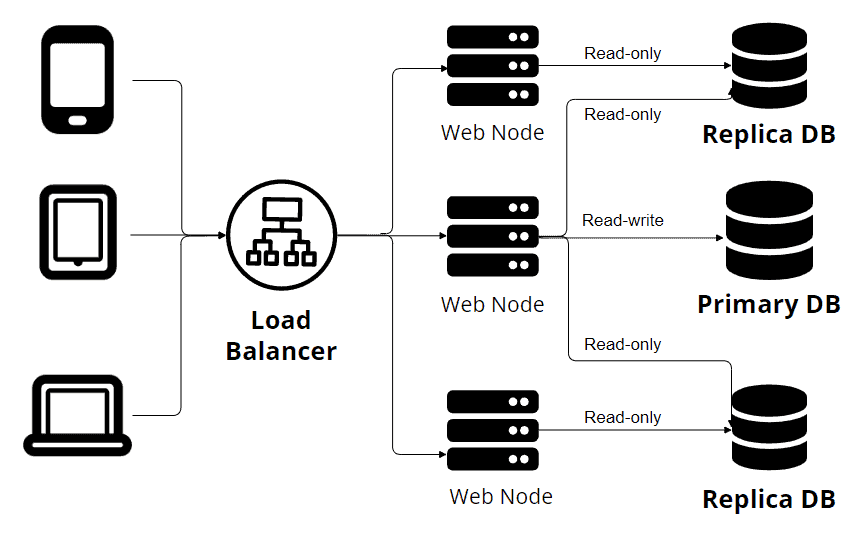
The above picture represents The Single-Primary Replication. You can see in the image that multiple devices make requests through a load balancer. Also, we have multiple web nodes connected to several database nodes. One primary node writes to the database, while the other replicas accept only read-only transactions. This principle works fine. One source of truth (one primary node) allows us to avoid data conflicts. But, this is not the case for YugabyteDB:
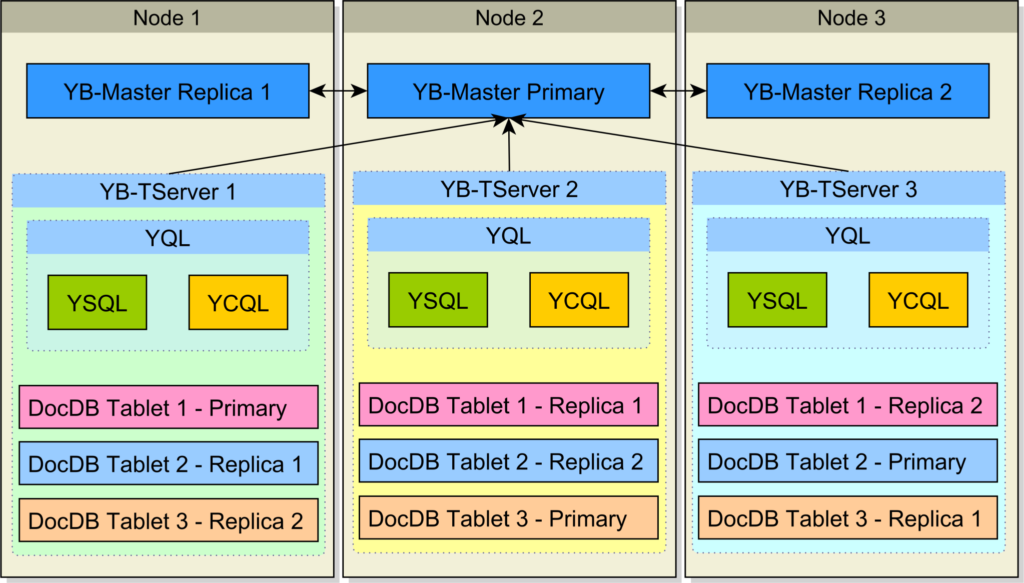
Unlike the traditional database replication system, YugabyteDB utilizes sharding to ensure high availability and fault tolerance. Sharding involves distributing data across multiple nodes in a cluster, where each node is responsible for storing a portion of the data. By splitting the data into smaller pieces and distributing them among multiple nodes, YugabyteDB achieves parallelism and load balancing. In the event of a node failure, the sharded nature of YugabyteDB ensures that the remaining nodes can seamlessly take over the responsibility of serving the data, maintaining uninterrupted availability.
3. Database Example
3.1. Maven Dependencies
We’ll start by adding the following dependencies to our Maven project:
<dependency>
    <groupId>org.postgresql</groupId>
    <artifactId>postgresql</artifactId>
</dependency>
<dependency>
    <groupId>org.springframework.boot</groupId>
    <artifactId>spring-boot-starter-data-jpa</artifactId>
</dependency>
YugabyteDB is compatible with PostgreSQL, so we can easily use a PostgreSQL connector for our example.
3.2. Database Configuration
Depending on our application needs, there are multiple ways to install Yugabyte. But, for the sake of simplicity, we’ll use a Docker image for our YugabyteDB instance.
We’ll start by pulling the Docker image locally:
$ docker pull yugabytedb/yugabyte:latest
After that, we can fire up our YugabyteDB instance:
$ docker run -d --name yugabyte -p7000:7000 -p9000:9000 -p5433:5433 yugabytedb/yugabyte:latest bin/yugabyted start --daemon=false
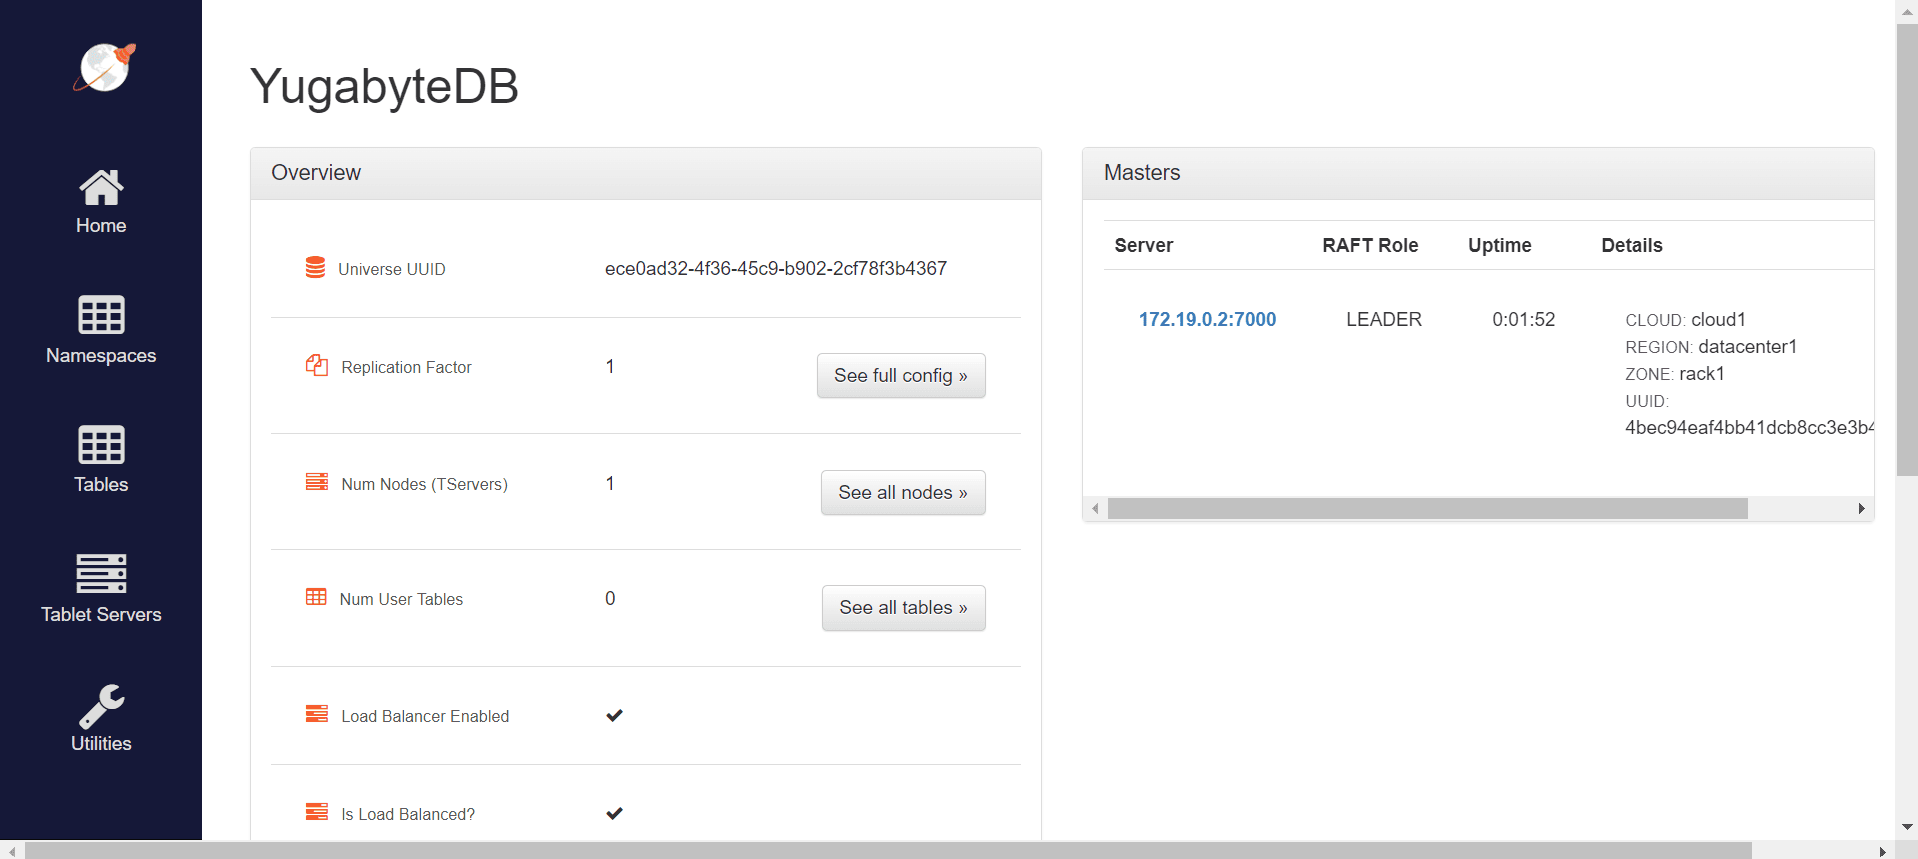
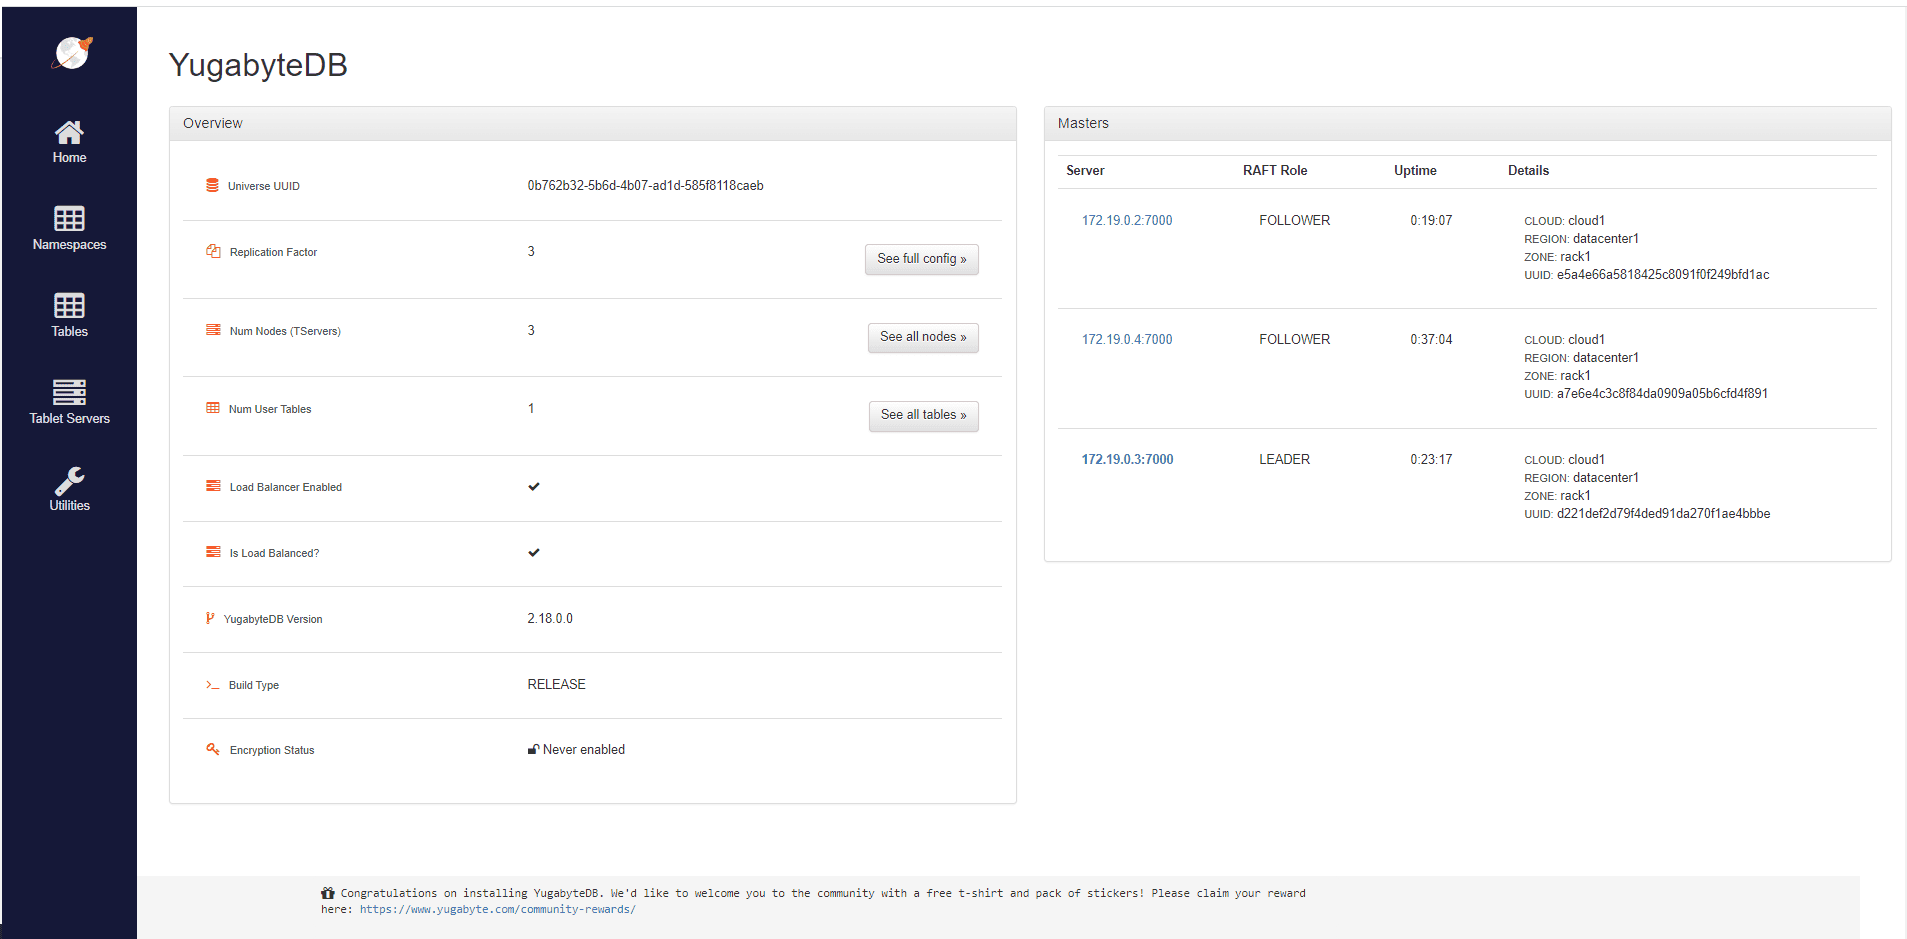
Now we have a full-function YugabyteDB instance. We can access http://localhost:7000/ to see the Admin web server UI:
Now we can start configuring the database connection in our application.properties file.
spring.datasource.url=jdbc:postgresql://localhost:5433/yugabyte
spring.datasource.username=yugabyte
spring.datasource.password=yugabyte
spring.jpa.hibernate.ddl-auto=create
spring.jpa.database-platform=org.hibernate.dialect.PostgreSQLDialect
We can see that the configuration is minimal and similar to a connection for a PostgreSQL database. We also set the spring.jpa.hibernate.ddl-auto property with the value create. This means that Hibernate will take care of creating the tables that match our entities. We stick with the minimum amount of configuration necessary.
3.3. Creating a Table
Now, after configuring the database, we can start by creating the entities.
@Entity
@Table(name = "users")
public class User {

    @Id
    @GeneratedValue(strategy = GenerationType.IDENTITY)
    private Long id;

    @Column
    private String name;

    // getters, setters, toString()
}
Now, we can run our application, and the users table will be created automatically. We can check it by entering the admin UI and selecting the Tables sections: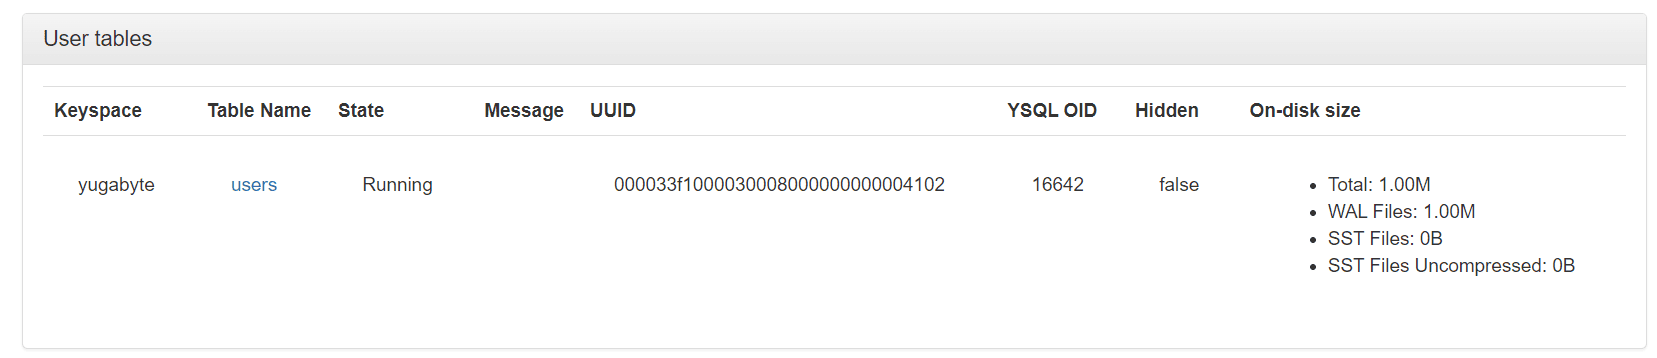
Here we can see that we have one table created. Also, we can get more information about the table by clicking on its name.
We can also connect to our database using any management tool that is compatible with PostgreSQL, like pgAdmin.
3.4. Reading and Writing Data
After the configuration and table creation, we need to create a repository — extending the existing JPARepository interface:
public interface UserRepository extends JpaRepository<User, Long> {
}
JPARepository is a part of the Spring Data JPA framework, which provides us with a set of abstractions and utilities for simplifying database access. Also, it comes with methods like save(), findById(), and delete(), allowing quick and simple interaction with the database.
@Test
void givenTwoUsers_whenPersistUsingJPARepository_thenUserAreSaved() {
    User user1 = new User();
    user1.setName("Alex");
    User user2 = new User();
    user2.setName("John");
    userRepository.save(user1);
    userRepository.save(user2);
    List<User> allUsers = userRepository.findAll();
    assertEquals(2, allUsers.size());
}
The example above illustrates two simple inserts in the database and a query that retrieves all data from the table. For the sake of simplicity, we wrote a test to check if the users persist in the database.
After running the test, we’ll get confirmation that the test has passed, meaning that we inserted and queried our users successfully.
3.5. Write Data Using Multiple Clusters
One of the strengths of this database is its high fault tolerance and resilience. We saw in the previous example a simple scenario, but we all know that we usually need to run more than one instance of the database. And we’ll see how YugabyteDB manages it in the following example.
We’ll start by creating a Docker network for our clusters:
$ docker network create yugabyte-network
Afterward, we’ll create our main YugabyteDB node:
$ docker run -d --name yugabyte1 --net=yugabyte-network -p7000:7000 -p9000:9000 -p5433:5433 yugabytedb/yugabyte:latest bin/yugabyted start --daemon=false
Besides that, we can add two more nodes so that we’ll have a three-node cluster:
$ docker run -d --name yugabyte2 --net=yugabyte-network yugabytedb/yugabyte:latest bin/yugabyted start --join=yugabyte1 --daemon=false
$ docker run -d --name yugabyte3 --net=yugabyte-network yugabytedb/yugabyte:latest bin/yugabyted start --join=yugabyte1 --daemon=false
Now, if we open de Admin UI running at port 7000, we can see that the Replication Factor is 3. This means that data is shared on all three database cluster nodes. More precisely, if one node contains the primary copy of an object, the other two nodes will keep a copy of that object.
For this example, we will implement the CommandLineRunner interface. With its help, by overriding the run(String…args) method, we can write code that will be invoked at application startup after the Spring application context is instantiated.
@Override
public void run(String... args) throws InterruptedException {

    int iterationCount = 1_000;
    int elementsPerIteration = 100;

    for (int i = 0; i < iterationCount; i++) {
        for (long j = 0; j < elementsPerIteration; j++) {
            User user = new User();
            userRepository.save(user);
        }
        Thread.sleep(1000);
    }
}
With this script, we’ll insert serial batches of elements in a row, with a one-second pause between them. We want to observe how the database splits the load between nodes.
First of all, we’ll run the script, enter the admin console and navigate to the Tablet Servers tab.
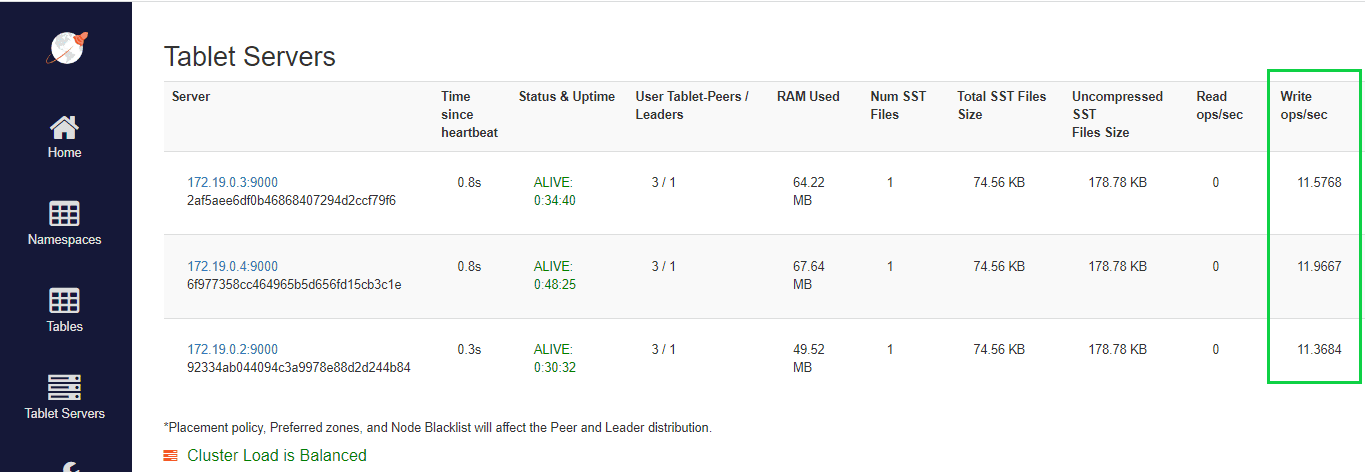
Here we can see that even with minimal load-balancing configuration, YugabyteDB can split all the load between clusters.
3.6. Fault Tolerance
We know things can’t go perfectly all the time. Because of that, we’ll simulate a database cluster going down. Now, we can run the application again, but this time we’ll stop one cluster in the middle of execution:
$ docker stop yugabyte2
Now, if we wait a little bit and access again the Tablet Servers page, we can see that the stopped container is marked as dead. After that, all the load is balanced between the remaining clusters.
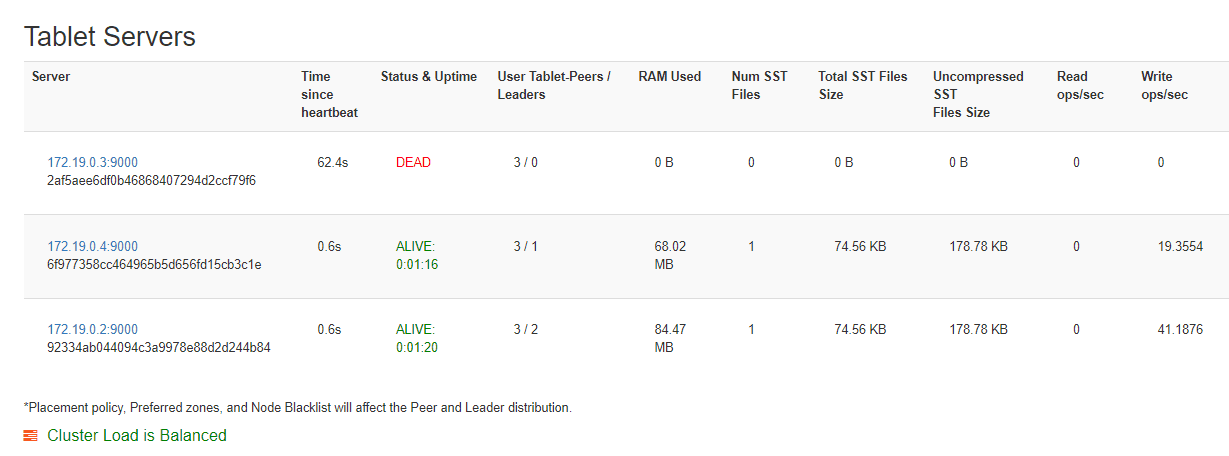
This is made possible by YugabyteDB’s heartbeat-based mechanism. This heartbeat mechanism involves regular communication between the different nodes, where each node sends heartbeats to its peers to indicate its liveliness. If a node fails to respond to the heartbeats within a certain timeout period, it is considered dead.
4. Conclusion
In this article, we went through the basics of YugabyteDB using Spring Data. We saw that not only the YugabyteDB makes scaling applications easier, but it also has automatic fault tolerance.
The source code of the examples above can be found over on GitHub.