1. Overview
Documentation is crucial for any piece of code that we intend to share with the world, especially if this code is relatively complex. Good API documentation not only attracts developers to use it but also shows the quality of the product. A company with sloppy written documentation might also have a sloppy written API.
However, developers like writing code for machines, not text for people.
In this tutorial, we’ll explore how to combine writing documentation and writing APIs with Spring REST Docs. We’ll take query parameter documentation as an example.
2. API
Let’s consider a straightforward API with a single endpoint:
@RestController
@RequestMapping("/books")
public class BookController {
    private final BookService service;

    public BookController(BookService service) {
        this.service = service;
    }

    @GetMapping
    public List<Book> getBooks(@RequestParam(name = "page") Integer page) {
        return service.getBooks(page);
    }
}
This endpoint returns a collection of books available on our website. However, due to the massive volume of the books available, we cannot return all of them. Clients provide a page number of our catalog, and we send them the information only for this page.
We decided to make this parameter required. In this case, it’s a default setup. This way, we improve the performance of our service and don’t allow clients to request too much data in one go.
However, we must provide information about our decision and explain the rules clients should follow. In this case, the clients receive an error message if the parameters aren’t present.
3. Documentation
The usual approach to writing documentation is to write documentation, meaning that a developer has to write the same thing twice. First in the code and then in the text, explaining how to interact with the system. However, this is wasteful, and we cannot assume that all developers follow this.
Documentation is quite a formal document that aims for clarity rather than inspirational insights, clever wording, or innovative plot structure. Thus, why don’t we generate documentation from code? This way, we won’t write the same thing twice, and all the changes are reflected in the documentation.
Spring REST Docs does precisely this. However, it generates the documentation not from the code, as it doesn’t provide much context but from the tests. This way, we can express quite complex cases and examples. Another benefit is that documentation won’t be generated if our tests fail.
4. Tests With Documentation
Spring REST Docs support major testing frameworks for REST testing. We’ll consider the example for MockMvc, WebTestClient, and REST-assured. However, the main idea and the structure would be similar for all of them.
Also, we’ll be using JUnit 5 as the base for our test cases, but it’s possible to set up Spring REST Docs with JUnit 4.
All of the testing methods below require an additional extension:
@ExtendWith({RestDocumentationExtension.class, SpringExtension.class})
These are special classes for documentation generation.
4.1. WebTestClient
Let’s start with WebTestClient, a more modern REST testing method. As was mentioned previously, we need to extend the test class with additional extensions. Also, we need to configure it:
@BeforeEach
public void setUp(ApplicationContext webApplicationContext, RestDocumentationContextProvider restDocumentation) {
    this.webTestClient = WebTestClient.bindToApplicationContext(webApplicationContext)
      .configureClient()
      .filter(documentationConfiguration(restDocumentation))
      .build();
}
After that, we can write a test that wouldn’t only check our API but also provide information about the request:
@Test
@WithMockUser
void givenEndpoint_whenSendGetRequest_thenSuccessfulResponse() {
    webTestClient.get().uri("/books?page=2")
      .exchange().expectStatus().isOk().expectBody()
      .consumeWith(document("books",
        requestParameters(parameterWithName("page").description("The page to retrieve"))));
}
4.2. WebMvcTest and MockMvc
In general, this method is very similar to the previous one. It also requires a correct setup:
@BeforeEach
public void setUp(WebApplicationContext webApplicationContext, RestDocumentationContextProvider restDocumentation) {
    this.mockMvc = webAppContextSetup(webApplicationContext)
      .apply(documentationConfiguration(restDocumentation))
      .alwaysDo(document("{method-name}", preprocessRequest(prettyPrint()), preprocessResponse(prettyPrint())))
      .build();
}
The test method looks the same, except for the fact that we’re using MockMvc and its API:
@Test
void givenEndpoint_whenSendGetRequest_thenSuccessfulResponse() throws Exception {
    mockMvc.perform(get("/books?page=2"))
      .andExpect(status().isOk())
      .andDo(document("books",
        requestParameters(parameterWithName("page").description("The page to retrieve"))));
}
4.3. REST-assured
Lastly, let’s check an example with REST-assured. Because we need a running server for this one, we shouldn’t use @WebMvcTest or @AutoconfigureMockMvc. Here, we use @AutoconfigureWebMvc and also provide the correct port:
@BeforeEach
void setUp(RestDocumentationContextProvider restDocumentation, @LocalServerPort int port) {
    this.spec = new RequestSpecBuilder()
      .addFilter(documentationConfiguration(restDocumentation))
      .setPort(port)
      .build();
}
However, the tests look generally the same:
@Test
@WithMockUser
void givenEndpoint_whenSendGetRequest_thenSuccessfulResponse() {
    RestAssured.given(this.spec).filter(document("users", requestParameters(
        parameterWithName("page").description("The page to retrieve"))))
      .when().get("/books?page=2")
      .then().assertThat().statusCode(is(200));
}
5. Generated Documentation
However, at this point, we still don’t have a generated documentation. To get the result, we need to go through additional steps.
5.1. Generated Snippets
We can find generated snippets in the target folder after running our tests. However, we can configure the output directory to define a different place to store the snippets. In general, they look like this:
[source,bash]
----
$ curl 'http://localhost:8080/books?page=2' -i -X GET
----
At the same time, we can see the information about our parameters, which is stored in a .adoc file.
|===
|Parameter|Description

|`+page+`
|The page to retrieve

|===
5.2. Documentation Generation
The next step is to provide a configuration for AsciiDoctor to create an HTML with more readable documentation. AsciiDoc is a simple yet powerful markup language. We can use it for various purposes, such as generating HTML and PDFs or writing a book.
Thus, as we want to generate HTML documentation, we need to outline the template for our HTML:
= Books With Spring REST Docs

How you should interact with our bookstore:

.request
include::{snippets}/books/http-request.adoc[]

.request-parameters
include::{snippets}/books/request-parameters.adoc[]

.response
include::{snippets}/books/http-response.adoc[]
In our case, we use a simple format, but it’s possible to create a more elaborate custom format that would be appealing and informative. The flexibility of AsciiDoc helps us with this.
5.3. Generated HTML
After correct setup and configuration, when we can attach the generation goal to a Maven phase:
<executions>
    <execution>
        <id>generate-docs</id>
        <phase>package</phase>
        <goals>
            <goal>process-asciidoc</goal>
        </goals>
        <configuration>
            <backend>html</backend>
            <doctype>book</doctype>
            <attributes>
                <snippets>${snippetsDirectory}</snippets>
            </attributes>
            <sourceDirectory>src/docs/asciidocs</sourceDirectory>
            <outputDirectory>target/generated-docs</outputDirectory>
        </configuration>
    </execution>
</executions>
We can run a required mvn command and trigger the generation. The template we defined in the previous section renders the following HTML:
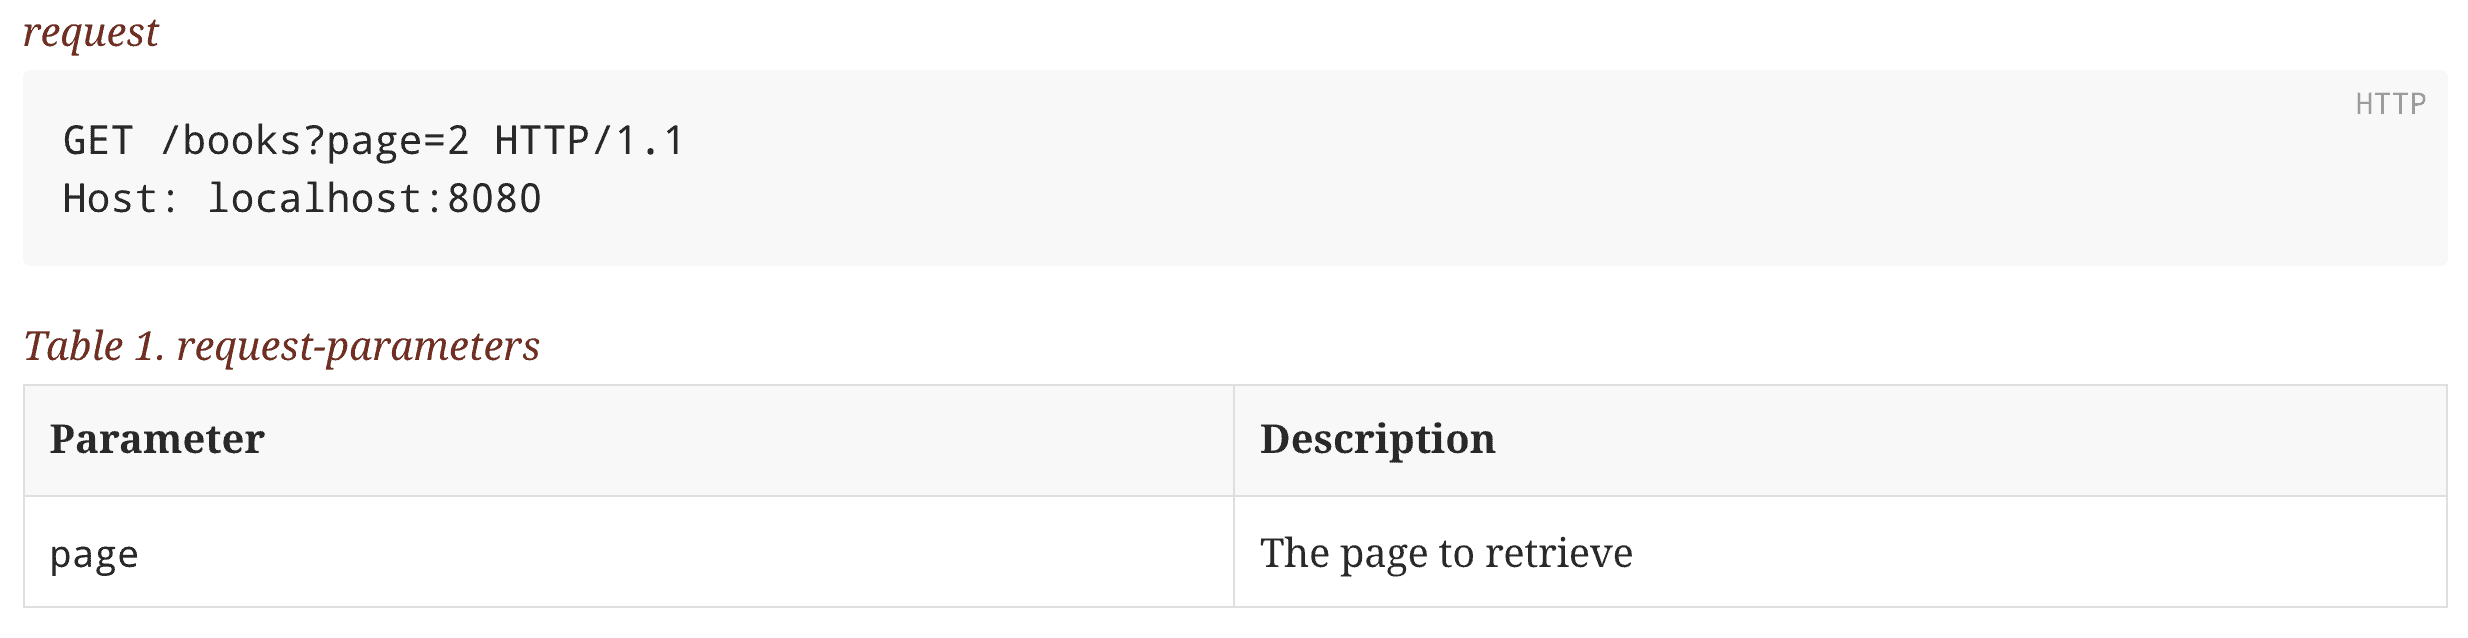
We can attach this process to our pipeline and always have relevant and correct documentation. Another benefit is that this process reduces manual work, which is wasteful and error-prone.
6. Conclusion
Documentation is an essential part of software. The developers acknowledge this, but only a few consistently write or maintain it. Spring REST Docs allow us to generate good documentation with minimal effort based on the code rather than our understanding of what API should do.
As usual, all the code from this tutorial is available over on GitHub.