1. Introduction
In this tutorial, we’ll explore ways to run a standard Java application created using Spring Boot as a Docker container. More specifically, we’ll use Liberica JDK on top of Alpaquita Linux to create the Docker image that will run our application.
Liberica JDK and Alpaquita Linux are part of the product offerings from BellSoft. BellSoft is an organization that has the vision to make Java the preferred language for cloud-native applications. Through their targeted offerings, they promise a better experience at lower costs.
2. A Simple Spring Boot Application
Let’s begin by creating a straightforward application in Java that we’ll proceed to containerize. We’ll use Spring Boot to create this application. Spring Boot makes it easy to create stand-alone, production-grade Spring-based applications with minimal configurations.
The simplest way to initialize a Spring Boot application is to use the Spring Boot CLI. It lets us create a new project by using start.spring.io right from our favorite command line:
$ spring init --build=gradle --dependencies=web spring-bellsoft
Here, we are adding web as a dependency that allows us to build applications with RESTful APIs and Apache Tomcat as the default embedded container. We’ve selected Gradle as the build tool here. However, it chooses Java as the language and many other things as default.
Then, we can import the generated project into our favorite IDE, like IntelliJ Idea, and start developing the application. As said earlier, we’ll keep this very simple. Hence, we’ll add a simple REST API that takes a number as an input and returns the Fibonacci series equal to or less than that number:
@RestController
public class DemoController {

    @GetMapping("/api/v1/fibs")
    public List<Integer> getFibonacciSeriesBelowGivenInteger(Integer input) {
        List<Integer> result;
        if (input == 0)
            result = List.of(0);
        else {
            int n = 0; int m = 1;
            result = new ArrayList<>(Arrays.asList(n));
            while (m <= input) {
                result.add(m);
                m = n + m; n = m - n;
            }
        }
        return result;
    }
}
Building the application in Gradle is as simple as running the following command, which uses the Gradle wrapper generated before:
./gradlew clean build
The default packaging for the generated project is JAR which implies that the above command on success will result in the final executable JAR created in the output directory “./build/libs“. We can start the application using this JAR file:
java -jar ./build/libs/spring-bellsoft-0.0.1-SNAPSHOT.jar
Then, we can call our API and see if it is working fine:
$ curl http://localhost:8080/api/v1/fibs?input=5
[0,1,1,2,3,5]
This concludes our effort to create a simple application for the rest of the tutorial. We’ll be using this application deployable to containerize the application.
3. Containerizing Our Application
A container is a standard unit of software that packages up code and all its dependencies. It’s a form of operating system virtualization that offers a consistent way to deploy applications. Today, it has become the default choice for running any application in cloud environments.
We require a container platform to run our simple application as a container. A container platform, among other things, provides a container engine to create and manage containers. Docker is the most popular platform designed to build, share, and run container applications.
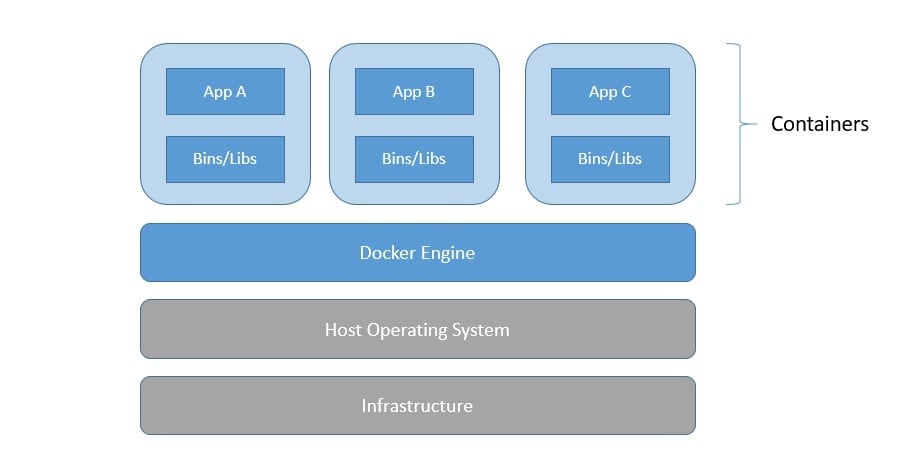
The container engine creates a container from the container image. A container image is an immutable static file that includes everything a container needs to run. However, it shares the operating system kernel of the host. Hence, it offers complete isolation but is still lightweight:
One of the ways to create a Docker image is to describe the recipe for creating the image as a Dockerfile. Then, we can use the Docker daemon to create an image from the Dockerfile. The original image format from Docker has now become the Open Container Initiative (OCI) Image Specification.
One of the key advantages of running an application as a container is that it offers a consistent deployment experience across multiple environments. For instance, imagine we deliver our simple application built using Java 17 but deployed in an environment with Java 11 runtime.
To avoid this surprise, container images allow us to package all critical dependencies for our application, like OS binaries/libraries and the Java runtime. By doing so, we can be sure that our application will behave the same, no matter which environment it gets deployed.
4. Liberica Runtime Containers
A container image is composed of multiple layers stacked on each other. Each layer represents a specific modification to the file system. Typically, we begin with a base image that best matches our application’s requirements and build additional layers on top of it.
BellSoft offers several images highly optimized for running Java applications on cloud-based environments. They are built with the Alpaquita Linux and Liberica JDK. Before using these images, let’s examine the benefits of their BellSoft constituents.
4.1. Benefits of Alpaquita Linux
Alpaquita Linux is a lightweight operating system based on Alpine Linux. It’s tailor-made for Java and optimized for the deployment of cloud-native applications. It results in a base image size of 3.22 MB and requires a small amount of resources to run.
Alpaquita Linux comes in two versions, one based on an optimized musl libc and the other on glib libc. Here, libc refers to the standard library for the C programming language, as specified in the ISO C standard. It provides macros, type definitions, and functions for several tasks.
Besides being optimized for Java applications, Alpaquita Linux offers several security features for our deployment. These include networking features, custom build options, and process isolation. It also includes kernel hardening like kernel lockdown and kernel module signing.
Further, Alpaquita Linux is optimized for deployment as it uses kernel module compression to reduce the size of packages. It delivers a reliable and fast stack to run applications with performance features like kernel optimizations and memory management.
Alpaquita Linux only packages a small number of operating system components. However, we can install extra modules and additional packages from the Alpaquita APK repository. Most importantly, Alpaquita Linux has a four-year support lifecycle for its LTS versions.
4.2. Benefits of Liberica JDK
Liberica JDK is an open-source Java runtime for modern Java deployments. It comes from BellSoft, a key contributor to the OpenJDK, and promises a single runtime for cloud, server, and desktop use for Java applications. It’s also recommended for Spring-based Java applications.
Liberica JDK supports various architectures like x86 64/32 bit, ARM, PowerPC, and SPARC. It also supports several operating systems like Windows, macOS, and most Linux distributions. Moreover, it supports almost all versions of Java in use today.
One of the critical advantages of Liberica JDK is that it’s pretty lightweight. The Liberica runtime container based on Alpaquita Linux for Java 17 is less than 70 MB. It promises better performance while reducing traffic, storage, memory consumption, and total costs.
It also features diverse tools for working with the JDK runtime. There is full-fledged access to tools for monitoring and updation. Further, users can also get access to the Liberica Administration Center (LAC), an enterprise tool for runtime monitoring, license control, and security updates.
Liberica JDK is TCK-verified for Java SE specifications and thoroughly tested for exposure before every release. Moreover, BellSoft guarantees at least eight years of Liberica JDK lifetime with bug fixes, security patches, and other improvements as needed.
5. Creating the Container Image
Now, we are ready to containerize our simple application using Alpaquita Linux and Liberica JDK. The first step is to choose a base image with these dependencies. We can always create our base image, but thankfully, BellSoft maintains several images on the Docker Hub to choose from.
5.1. Choosing a Liberica Runtime Container
These are Alpaquita Linux images with different options of Liberica JDK lite and Liberica JRE to choose from. We can typically identify this from the tag, which may contain one of the following:
- jdk: Alpaquita Linux image with the Liberica JDK Lite version
- jdk-all: packages Liberica JDK that can be used to create a custom runtime with jlink tool
- jre: contains only the Liberica JRE for running Java applications
Here, the tag of the image reveals much other information about the image apart from the version of JDK it contains. Let’s look at the convention for the image tag used by BellSoft:
[JDK type]-Java version-[slim]-[OS release]-[libc type]-[date]
Here, the different parts of the tag tell a specific aspect of the image and help us choose the right now from many available images:
- JDK type: the type of JDK (JDK, jdk-all, and jre, as we’ve seen earlier)
- Java version: the version of Java to which the JDK conforms to
- slim: indicates if the image is a slim one
- OS version: the version of the OS (currently it’s only stream)
- libc type: the type of standard C library (glibc or musl, as we’ve seen earlier)
- date: the release date for the image
5.2. Containerizing Our Application
Now, we’ve all the information in the image tag to choose the right one. For instance, if we want Java 17 with glibc for our application, we’ve to pick the tag “jdk-17-glibc“.
Once we’ve chosen the correct base image tag, the next step is to create a Dockerfile to define how we want to create the container image for our application:
FROM bellsoft/liberica-runtime-container:jdk-17-glibc
VOLUME /tmp
ARG JAR_FILE=build/libs/java-bellsoft-0.0.1-SNAPSHOT.jar
COPY ${JAR_FILE} app.jar
ENTRYPOINT ["java","-jar","/app.jar"]
This fairly simple Dockerfile states that we wish to begin with the mentioned Liberica runtime container and copy our application fat JAR. We also define the entry point with instructions to run our application once the container is instantiated.
We should place this Dockerfile in the root of the application codebase directory. Then, we can use the following command to create the container image in our local repository:
docker buildx build -t spring-bellsoft .
This would pull the base image from the registry, Docker Hub, by default and create the container image for our application. Then, we can run this image as a container:
docker run --name fibonacci -d -p 8080:8080 spring-bellsoft
Please note that we’ve mapped the local port 8080 with the container port 8080. Hence, we can access our application as we did earlier in the tutorial:
$ curl http://localhost:8080/api/v1/fibs?input=5
[0,1,1,2,3,5]
This concludes our effort to containerize the simple application we created earlier in the tutorial with Liberica runtime containers published by BellSoft. Of course, it would be interesting to try out more complex applications and other variations of Liberica runtime containers available to us.
6. Conclusion
In this tutorial, we went through the basics of creating a container for a simple Spring Boot-based Java application. We explored the option to choose BellSoft Liberica runtime containers to do so. In the process, we created a simple application and containerized it.
This helped us to understand the benefits of Alpaquita Linux and Liberica JDK, the constituents of the Liberica runtime containers. These are some of the core offerings from BellSoft, which is committed to optimizing Java applications for cloud-based environments.

