1. Overview
In this tutorial, we’ll implement the OAuth2 Backend for Frontend (BFF) pattern with Spring Cloud Gateway and spring-addons.
If we inspect any of the major websites known for using OAuth2 (Google, Facebook, Github, LinkedIn, etc.) we won’t find Bearer headers with tokens. Why that?
According to security experts, we should not configure single-page applications (Angular, React, Vue, etc.) or mobile applications as “public” OAuth2 clients anymore. The best alternative is probably to authorize both mobile and web apps with sessions on a BFF running on a server we trust.
As a reminder, JSON Web Tokens (JWTs) can’t be invalidated and we can hardly delete it on end-users devices when terminating sessions on the server. If we send JWTs over the network, all we can do is waiting for it to expire, access to resource servers still being authorized until then. But if tokens never leave the backend, then we can delete it with the user session on the BFF, immediately revoking access to resources.
The good news is that we can connect a Single Page Applications (SPAs) to an OAuth2 BFF in a few simple steps. Even better, we have no modification at all to apply to resource servers (REST APIs authorized with Bearer access tokens).
In this tutorial, we’ll use:
- Spring Cloud Gateway as OAuth2 BFF: “confidential” OAuth2 client with TokenRelay filter
- a Spring Boot REST API configured as a stateless OAuth2 resource server
- 3 frontends written with Angular, React (Next.js) and Vue (Vite)
- Keycloak as main OpenID Provider (OP), but the companion repo also contains Spring profiles to easily get started with Auth0 and Amazon Cognito.
- a reverse proxy to have the same origin for at least the SPAs and the BFF
- spring-addons-starter-oidc, an open-source Spring Boot starter, to further simplify OAuth2 configuration in Spring Boot applications
2. OAuth2 Backend for Frontend Pattern
The Backend for Frontend pattern is an architecture with a middleware between a frontend and REST APIs. When OAuth2 is involved, requests are authorized with:
- session cookie and CSRF protection between the frontend and the BFF
- access token between the BFF and REST API (and between backend services)
Such an OAuth2 BFF is responsible for:
- driving the authorization-code flow using a “confidential” OAuth2 client
- storing tokens in session
- replacing the session cookie with the access token in session before forwarding a request from the frontend to a resource server
The OAuth2 BFF pattern is safer than configuring a single-page or mobile application as a “public” OAuth2 client because:
- the BFF running on a server we trust, it can keep a secret to call the authorization server token endpoint
- we can set firewall rules to allow only requests from our backend to access the token endpoint
- tokens are kept on the server (sessions). Usage of session cookies requires protection against CSRF, but cookies can be flagged with HttpOnly, Secure and SameSite, which is safer than exposing tokens to the code running on end-user devices.
As BFF, we’ll use Spring Cloud Gateway with:
- spring-boot-starter-oauth2-client and oauth2Login() to handle the authorization-code flow and store tokens in the session
- the TokenRelay= filter to replace the session cookie with the access token in the session when forwarding requests from the frontend to a resource server
3. Architecture
So far, we listed quite a few services: frontends (SPAs), REST API, BFF, authorization server, and reverse proxy. Let’s have a look at how it makes a coherent system.
3.1. System Overview
Here is a representation of services, ports, and path-prefixes we’ll use with the main profile:
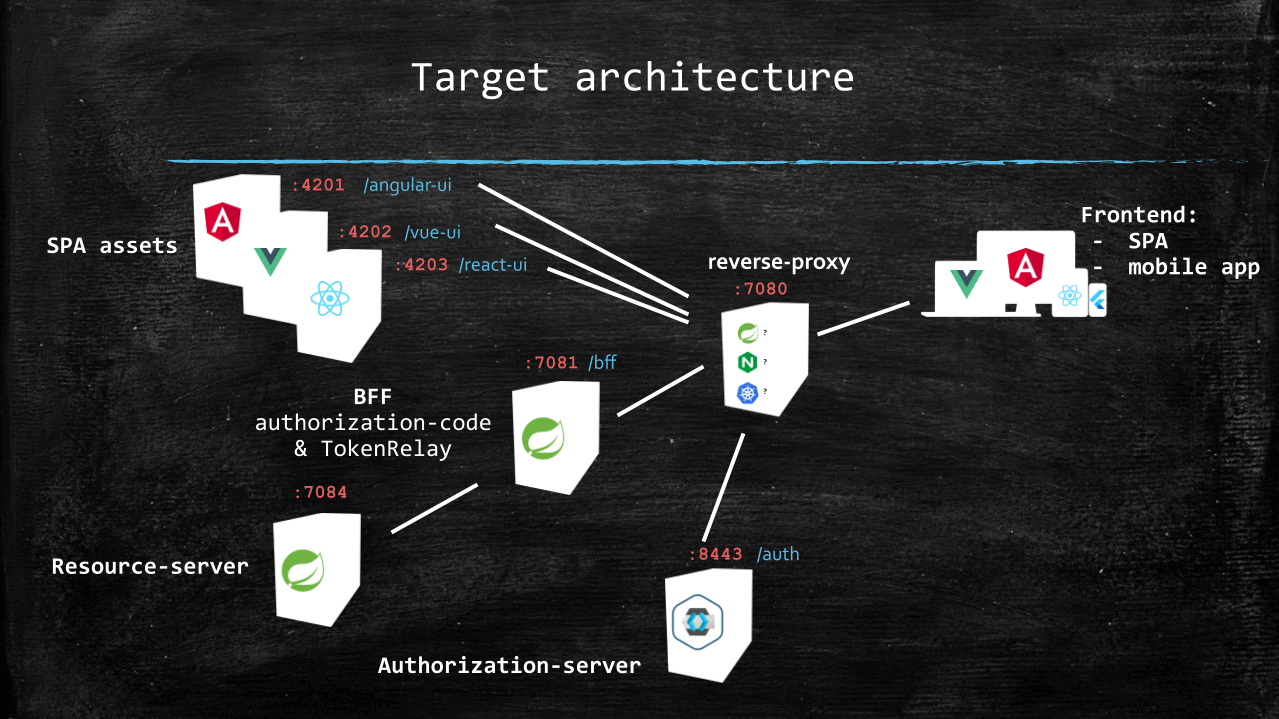
A few points to note from this schema are:
- from the perspective of the end-user device, there is a single point of contact with the backend: the reverse proxy
- we expose three different single-page applications to demo the integration with each of the major frameworks (Angular, React, and Vue)
- the reverse-proxy uses a path prefix to route requests to the right service
The reasons why the only link to the authorization server is from the reverse-proxy are:
- when configuring Keycloak in section 4 we’ll set the hostname-url property with a value pointing to the reverse proxy, with /auth as path-prefix. This influences the value of tokens issuer claim, but also of all endpoint URIs in the OpenID configuration (authorization, token, endsession, …).
- the reverse proxy is configured to route to Keycloak all requests with a path starting with /auth
Note that in the companion project, the profiles for Auth0 and Amazon Cognito are configured differently: no route to the authorization server on the reverse proxy and issuer as well as endpoint URIs are kept with their defaults on the authorization servers. This leads to this slightly different alternative architecture:
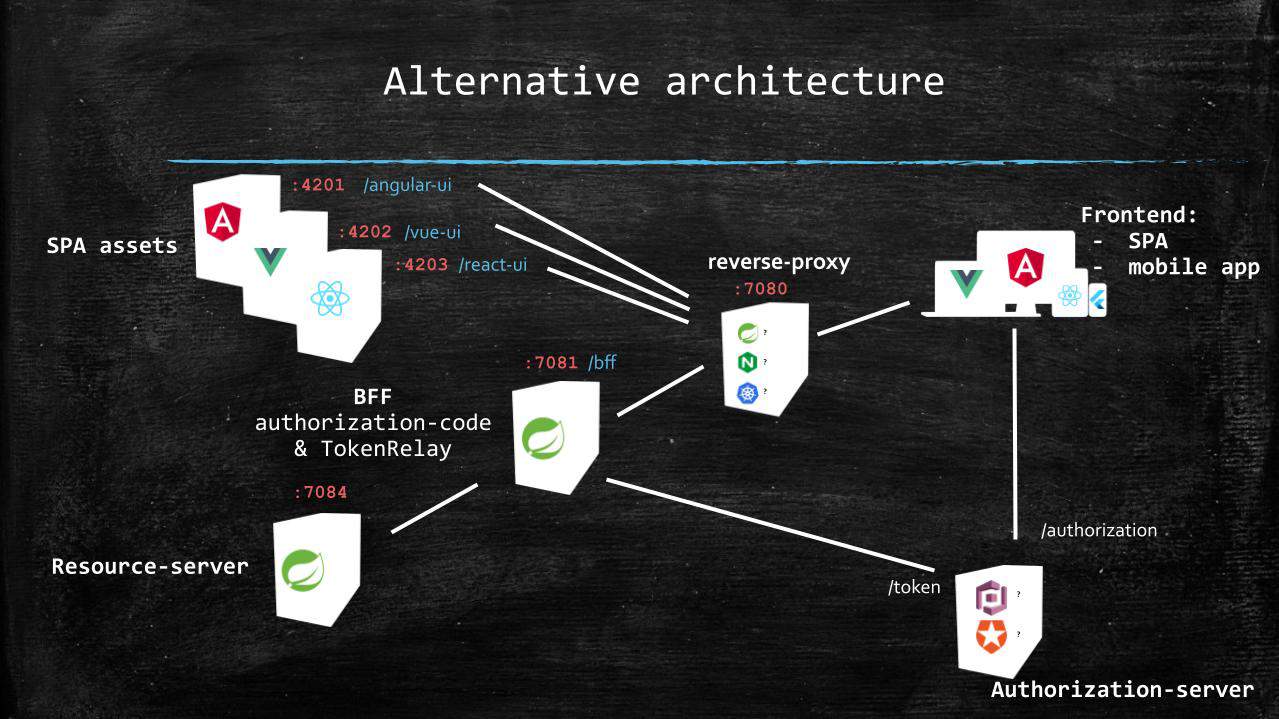
Using path-prefix to make a distinction between SPAs is nice when working on a single dev machine, but when going to a production-like environment, we might as well configure the reverse-proxy to use (sub)domains for routing, or even use a distinct reverse-proxy for each frontend.
3.2. Reverse Proxy
We need the same origin for a SPA and its BFF because:
- the requests are authorized with session cookies between the frontend and the BFF
- Spring session cookies are flagged with SameSite=Lax
For that, we’ll use a reverse proxy as a single contact point for browsers. It will route requests to the right service using path-prefix.
In the companion repo, we use a very basic Spring Cloud Gateway instance with just some routing (no security, no other filter than a StripPrefix=1 on the route to the BFF), but there are plenty of other options to achieve the same goal, some being more adapted to specific environments: nginx container in Docker, ingress on K8s, etc.
3.3. Whether to Hide the Authorization Server Behind the Reverse Proxy
For security reasons, an authorization server should always set the X-Frame-Options header. As Keycloak allows to set it to SAMEORIGIN, if the authorization server and the SPA share the same origin, then it’s possible to display Keycloak login & registration forms in an iframe embedded in this SPA.
From the end-user perspective, it’s probably a better experience to stay in the same web app with authorization forms displayed in a modal, rather than being redirected back and forth between the SPA and an authorization server.
On the other hand, Single Sign-On (SSO) relies on cookies flagged with SameOrigin. As a consequence, for two SPAs to benefit from Single Sign-On they should not only authenticate users on the same authorization server but also use the same authority for it (both https://appa.net and https://appy.net authenticate users on https://sso.net).
A solution to match both conditions is using the same origin for all SPAs and the authorization server, with URIs like:
- https://domain.net/appa
- https://domain.net/appy
- https://domain.net/auth
This is the option we’ll use when working with Keycloak, but sharing the same origin between the SPAs and the authorization server isn’t a requirement for the BFF pattern to work, only sharing the same origin between the SPAs and the BFF is.
The projects in the companion repo are preconfigured to use Amazon Cognito and Auth0 with their origin (no smart proxy rewriting redirection URLs on the fly). For this reason, login from an iframe is available only when using the default profile (with Keycloak).
3.4. Implementation
First, using our IDE or https://start.spring.io/, we create a new Spring Boot project named reverse-proxy with Reactive Gateway as a dependency.
Then we rename src/main/resources/application.properties to src/main/resources/application.yml.
We should then define the routing properties for Spring Cloud Gateway:
# Custom properties to ease configuration overrides
# on command-line or IDE launch configurations
scheme: http
hostname: localhost
reverse-proxy-port: 7080
angular-port: 4201
angular-prefix: /angular-ui
angular-uri: http://${hostname}:${angular-port}${angular-prefix}
vue-port: 4202
vue-prefix: /vue-ui
vue-uri: http://${hostname}:${vue-port}${vue-prefix}
react-port: 4203
react-prefix: /react-ui
react-uri: http://${hostname}:${react-port}${react-prefix}
authorization-server-port: 8080
authorization-server-prefix: /auth
authorization-server-uri: ${scheme}://${hostname}:${authorization-server-port}${authorization-server-prefix}
bff-port: 7081
bff-prefix: /bff
bff-uri: ${scheme}://${hostname}:${bff-port}

server:
  port: ${reverse-proxy-port}

spring:
  cloud:
    gateway:
      default-filters:
      - DedupeResponseHeader=Access-Control-Allow-Credentials Access-Control-Allow-Origin
      routes:
      # SPAs assets
      - id: angular-ui
        uri: ${angular-uri}
        predicates:
        - Path=${angular-prefix}/**
      - id: vue-ui
        uri: ${vue-uri}
        predicates:
        - Path=${vue-prefix}/**
      - id: react-ui
        uri: ${react-uri}
        predicates:
        - Path=${react-prefix}/**

      # Authorization-server
      - id: authorization-server
        uri: ${authorization-server-uri}
        predicates:
        - Path=${authorization-server-prefix}/**

      # BFF
      - id: bff
        uri: ${bff-uri}
        predicates:
        - Path=${bff-prefix}/**
        filters:
        - StripPrefix=1
With this configuration added, we can start our reverse-proxy!
4. Authorization Server
In the companion project on GitHub the default profile is designed for Keycloak but, thanks to spring-addons-starter-oidc, switching to any other OpenID Provider is just a matter of editing application.yml. The files provided in the companion project contain profiles to get started easily with Auth0 and Amazon Cognito.
4.1. Keycloak in Docker
The companion repo contains a docker compose file. To use it, all we need to do is:
- edit the .env file to change the KEYCLOAK_ADMIN_PASSWORD
- run “docker compose -f docker-compose.yaml up” from the keycloak directory
4.2. Standalone Keycloak
We could also download a distribution powered by Quarkus from the Keycloak website.
First, we’d need to edit keycloak.conf to add something like the following:
hostname-url=http://localhost:7080/auth
hostname-admin-url=http://localhost:7080/auth
http-relative-path=/auth

http-port=8080
Then we should:
- check that the reverse proxy is running
- start Keycloak with either “bin\kc.bat start-dev” or “bash ./bin/kc.sh start-dev”
- visit http://localhost:7080/auth/ to set the admin password
4.3. Realm and Test User
To sandbox the labs in a Keycloak realm, we’ll:
- click the dropdown in the top left corner displaying master
- click the Create Realm button
- input baeldung as Realm name
Then, we’ll create a user:
- click on Users from the left menu
- click the Add user button
- fill the form
- click the Create button
- switch to Credentials tab
- click the Set password button
4.3. Confidential Client With Authorization-Code
By browsing http://localhost:7080/auth/admin/master/console/#/baeldung/clients, we can create a baeldung-confidential client:

Client authentication is turned on to specify we want a “confidential” client and only Standard flow is selected because we’ll only use authorization-code.
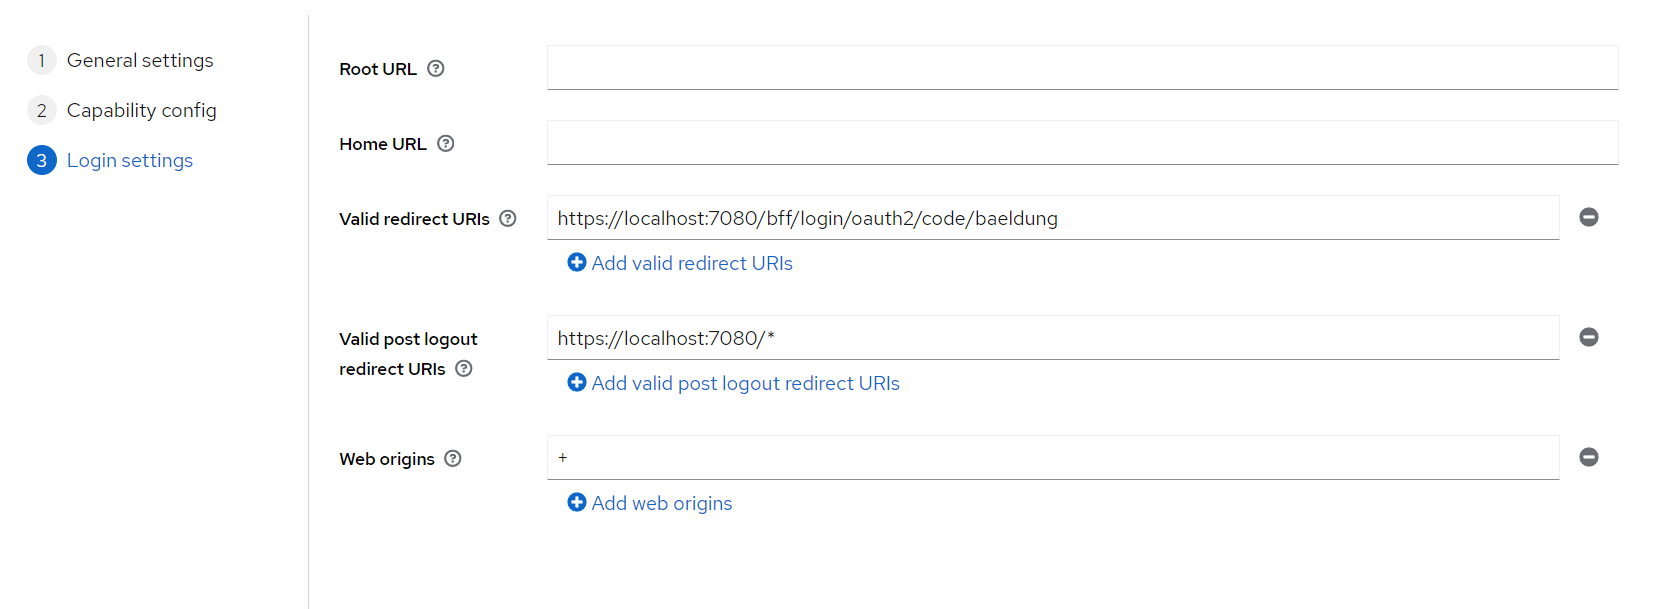
We should have as a very minimum:
- http://localhost:7080/bff/login/oauth2/code/baeldung as redirect URI
- http://localhost:7080/* as post logout URI
- + as web origin (allows origins configured in redirect and post logout URIs)
When debugging from other devices (like mobile devices or emulators), we should add more network interfaces for our dev machine than just localhost (and adapt hostname-url as well as hostname-admin-url in the Keycloak configuration).
4.4. Working With Other OpenID Providers
Each OpenID Provider has its way of declaring “confidential” OAuth2 clients, therefore we should refer to its documentation for details, but all have similar configuration parameters.
For instance, on Auth0, we’d create a new Regular Web Application named baeldung-confidential and its Settings tab would expect the same values as those visible in the second Keycloak screenshot from the preceding section. It would also be the place to collect client-id and client-secret. Last, we’d create an API with bff.baeldung.com as an identifier and with baeldung-confidential enabled in the Machine To Machine Applications tab.
5. BFF Implementation With Spring Cloud Gateway and spring-addons-starter-oidc
First, using our IDE or https://start.spring.io/, we create a new Spring Boot project named bff with Reactive Gateway and OAuth2 client as dependencies.
Then we rename src/main/resources/application.properties to src/main/resources/application.yml.
Last, we’ll add spring-addons-starter-oidc to our dependencies:
<dependency>
    <groupId>com.c4-soft.springaddons</groupId>
    <artifactId>spring-addons-starter-oidc</artifactId>
    <version>7.5.3</version>
</dependency>
5.1. Re-Used Properties
Let’s start with a few constants in application.yml that will help us in other sections and when needing to override some values on the command line or IDE launch configuration:
scheme: http
hostname: localhost
reverse-proxy-port: 7080
reverse-proxy-uri: ${scheme}://${hostname}:${reverse-proxy-port}
authorization-server-prefix: /auth
issuer: ${reverse-proxy-uri}${authorization-server-prefix}/realms/baeldung
client-id: baeldung-confidential
client-secret: change-me
username-claim-json-path: $.preferred_username
authorities-json-path: $.realm_access.roles
bff-port: 7081
bff-prefix: /bff
resource-server-port: 7084
audience:
Of course, we’ll have to override the value of client-secret with, for instance, an environment variable, a command line argument, or an IDE launch configuration.
5.2. Server Properties
Now come the usual server properties:
server:
  port: ${bff-port}
5.3. Spring Cloud Gateway Routing
As we have a single resource server behind the gateway, we need only one route definition:
spring:
  cloud:
    gateway:
      routes:
      - id: bff
        uri: ${scheme}://${hostname}:${resource-server-port}
        predicates:
        - Path=/api/**
        filters:
        - DedupeResponseHeader=Access-Control-Allow-Credentials Access-Control-Allow-Origin
        - TokenRelay=
        - SaveSession
        - StripPrefix=1
The most important parts are the SaveSession and TokenRelay= which form a cornerstone for the OAuth2 BFF pattern implementation: the first ensures that the session is persisted (with the tokens fetched by oauth2Login()) and the second replaces the session cookie with the access token in session when routing a request.
The StripPrefix=1 filter removes /api prefix from the path when routing a request. Notably, the /bff prefix was already stripped during the reverse-proxy routing. As a consequence, a request sent from the frontend to /bff/api/me lands as /me on the resource server.
5.4. Spring Security
We can now get into configuring OAuth2 client security with the standard Boot properties:
spring:
  security:
    oauth2:
      client:
        provider:
          baeldung:
            issuer-uri: ${issuer}
        registration:
          baeldung:
            provider: baeldung
            authorization-grant-type: authorization_code
            client-id: ${client-id}
            client-secret: ${client-secret}
            scope: openid,profile,email,offline_access
Really nothing special here, just a very standard authorization-code registration with the required provider.
5.5. spring-addons-starter-oidc
To complete the configuration, let’s tune the security with spring-addons-starter-oidc:
com:
  c4-soft:
    springaddons:
      oidc:
        # Trusted OpenID Providers configuration (with authorities mapping)
        ops:
        - iss: ${issuer}
          authorities:
          - path: ${authorities-json-path}
          aud: ${audience}
        # SecurityFilterChain with oauth2Login() (sessions and CSRF protection enabled)
        client:
          client-uri: ${reverse-proxy-uri}${bff-prefix}
          security-matchers:
          - /api/**
          - /login/**
          - /oauth2/**
          - /logout
          permit-all:
          - /api/**
          - /login/**
          - /oauth2/**
          csrf: cookie-accessible-from-js
          oauth2-redirections:
            rp-initiated-logout: ACCEPTED
        # SecurityFilterChain with oauth2ResourceServer() (sessions and CSRF protection disabled)
        resourceserver:
          permit-all:
          - /login-options
          - /error
          - /actuator/health/readiness
          - /actuator/health/liveness
Let’s understand the three main sections:
- ops, with provider(s) specific values. This enables us to specify the JSON path of the claims to convert to Spring authorities (with optional prefixes and case transformation for each). If aud property is not empty, spring-addons adds an audience validator to the JWT decoders.
- client, when security-matchers are not empty, this section triggers the creation of a SecurityFilterChain bean with oauth2Login(). Here, with client-uri property, we force the usage of the reverse-proxy URI as a base for all redirections (instead of the BFF internal URI). Also, as we are using SPAs, we ask the BFF to expose the CSRF token in a cookie accessible to Javascript. Last, to prevent CORS errors, we ask that the BFF respond to the RP-Initiated Logout with 201 status (instead of 3xx), which gives SPAs the ability to intercept this response and ask the browser to process it in a request with a new origin.
- resourceserver, this requests for a second SecurityFilterChain bean with oauth2ResourceServer(). This filter chain having an @Order with the lowest precedence will process all of the requests that weren’t matched by the security matchers from the client SecurityFilterChain. We use it for all resources for which a session is not desirable: endpoints that aren’t involved in login or routing with TokenRelay.
We can now run the BFF application, carefully providing the client-secret on the command line or run configuration.
5.6. /login-options Endpoint
The BFF is the place where we define login configuration: Spring OAuth2 client registration(s) with authorization code. To avoid configuration duplication in each SPA (and possible inconsistencies), we’ll host on the BFF a REST endpoint exposing the login option(s) it supports for users.
For that, all we have to do is expose a @RestController with a single endpoint returning a payload built from configuration properties:
@RestController
public class LoginOptionsController {
    private final List<LoginOptionDto> loginOptions;

    public LoginOptionsController(OAuth2ClientProperties clientProps, SpringAddonsOidcProperties addonsProperties) {
        final var clientAuthority = addonsProperties.getClient()
          .getClientUri()
          .getAuthority();
        this.loginOptions = clientProps.getRegistration()
          .entrySet()
          .stream()
          .filter(e -> "authorization_code".equals(e.getValue().getAuthorizationGrantType()))
          .map(e -> {
              final var label = e.getValue().getProvider();
              final var loginUri = "%s/oauth2/authorization/%s".formatted(addonsProperties.getClient().getClientUri(), e.getKey());
              final var providerId = clientProps.getRegistration()
                .get(e.getKey())
                .getProvider();
              final var providerIssuerAuthority = URI.create(clientProps.getProvider()
                .get(providerId)
                .getIssuerUri())
                .getAuthority();
              return new LoginOptionDto(label, loginUri, Objects.equals(clientAuthority, providerIssuerAuthority));
          })
          .toList();
    }

    @GetMapping(path = "/login-options", produces = MediaType.APPLICATION_JSON_VALUE)
    public Mono<List<LoginOptionDto>> getLoginOptions() throws URISyntaxException {
        return Mono.just(this.loginOptions);
    }

    public static record LoginOptionDto(@NotEmpty String label, @NotEmpty String loginUri, boolean isSameAuthority) {
    }

}
5.7. Non-Standard RP-Initiated Logout
RP-Initiated Logout is part of the OpenID standard, but some providers don’t implement it strictly. This is the case of Auth0 and Amazon Cognito for instance which don’t provide an end_session endpoint in their OpenID configuration and use some non-standard query parameters for logout.
spring-addons-starter-oidc supports such logout endpoints “almost” complying with the standard. The BFF configuration in the companion project contains profiles with the required configuration:
---
spring:
  config:
    activate:
      on-profile: cognito
issuer: https://cognito-idp.us-west-2.amazonaws.com/us-west-2_RzhmgLwjl
client-id: 12olioff63qklfe9nio746es9f
client-secret: change-me
username-claim-json-path: username
authorities-json-path: $.cognito:groups
com:
  c4-soft:
    springaddons:
      oidc:
        client:
          oauth2-logout:
            baeldung:
              uri: https://spring-addons.auth.us-west-2.amazoncognito.com/logout
              client-id-request-param: client_id
              post-logout-uri-request-param: logout_uri

---
spring:
  config:
    activate:
      on-profile: auth0
issuer: https://dev-ch4mpy.eu.auth0.com/
client-id: yWgZDRJLAksXta8BoudYfkF5kus2zv2Q
client-secret: change-me
username-claim-json-path: $['https://c4-soft.com/user']['name']
authorities-json-path: $['https://c4-soft.com/user']['roles']
audience: bff.baeldung.com
com:
  c4-soft:
    springaddons:
      oidc:
        client:
          authorization-request-params:
            baeldung:
            - name: audience
              value: ${audience}
          oauth2-logout:
            baeldung:
              uri: ${issuer}v2/logout
              client-id-request-param: client_id
              post-logout-uri-request-param: returnTo
In the snippet above, baeldung is a reference to the client registration in Spring Boot properties. If we used another key in spring.security.oauth2.client.registration, we’d have to use it here too.
In addition to the required properties overrides, we can note in the second profile, the specification for an additional request parameter when we send an authorization request to Auth0: audience.
6. Resource Server With spring-addons-starter-oidc
Our need for this system is very simple: a stateless REST API authorized with JWT access tokens, exposing a single endpoint to reflect some user info contained in the token (or a payload with empty values if the request isn’t authorized).
For this, we’ll create a new Spring Boot project named resource-server with Spring Web and OAuth2 Resource Server as dependencies.
Then we rename src/main/resources/application.properties to src/main/resources/application.yml.
Last, we’ll add spring-addons-starter-oidc to our dependencies:
<dependency>
    <groupId>com.c4-soft.springaddons</groupId>
    <artifactId>spring-addons-starter-oidc</artifactId>
    <version>7.5.3</version>
</dependency>
6.1. Configuration
Here are the properties we need for our resource server:
scheme: http
hostname: localhost
reverse-proxy-port: 7080
reverse-proxy-uri: ${scheme}://${hostname}:${reverse-proxy-port}
authorization-server-prefix: /auth
issuer: ${reverse-proxy-uri}${authorization-server-prefix}/realms/baeldung
username-claim-json-path: $.preferred_username
authorities-json-path: $.realm_access.roles
resource-server-port: 7084
audience:

server:
  port: ${resource-server-port}

com:
  c4-soft:
    springaddons:
      oidc:
        ops:
        - iss: ${issuer}
          username-claim: ${username-claim-json-path}
          authorities:
          - path: ${authorities-json-path}
          aud: ${audience}
        resourceserver:
          permit-all:
          - /me
          - /actuator/health/readiness
          - /actuator/health/liveness
Thanks to spring-addons-starter-oidc, this is enough to declare a stateless resource server with:
- authorities mapping from a claim of our choice (realm_access.roles in the case of Keycloak with realm roles)
- making /me accessible to anonymous requests
The application.yaml in the companion repo contains profiles for other OpenID Providers using other private claims for roles.
6.2. @RestController
Let’s implement a REST endpoint returning some data from the Authentication in the security context (if any):
@RestController
public class MeController {

    @GetMapping("/me")
    public UserInfoDto getMe(Authentication auth) {
        if (auth instanceof JwtAuthenticationToken jwtAuth) {
            final var email = (String) jwtAuth.getTokenAttributes()
                .getOrDefault(StandardClaimNames.EMAIL, "");
            final var roles = auth.getAuthorities()
                .stream()
                .map(GrantedAuthority::getAuthority)
                .toList();
            final var exp = Optional.ofNullable(jwtAuth.getTokenAttributes()
                .get(JwtClaimNames.EXP)).map(expClaim -> {
                    if(expClaim instanceof Long lexp) {
                        return lexp;
                    }
                    if(expClaim instanceof Instant iexp) {
                        return iexp.getEpochSecond();
                    }
                    if(expClaim instanceof Date dexp) {
                        return dexp.toInstant().getEpochSecond();
                    }
                    return Long.MAX_VALUE;
                }).orElse(Long.MAX_VALUE);
            return new UserInfoDto(auth.getName(), email, roles, exp);
        }
        return UserInfoDto.ANONYMOUS;
    }

    /**
     * @param username a unique identifier for the resource owner in the token (sub claim by default)
     * @param email OpenID email claim
     * @param roles Spring authorities resolved for the authentication in the security context
     * @param exp seconds from 1970-01-01T00:00:00Z UTC until the specified UTC date/time when the access token expires
     */
    public static record UserInfoDto(String username, String email, List<String> roles, Long exp) {
        public static final UserInfoDto ANONYMOUS = new UserInfoDto("", "", List.of(), Long.MAX_VALUE);
    }
}
6.3. Resource Server Multi-Tenancy
What if the frontends consuming our REST API don’t all authorize their users on the same authorization server or realm (or if they offer a choice of authorization servers)?
With spring-security-starter-oidc, this is dead simple: com.c4-soft.springaddons.oidc.ops configuration property is an array and we can add as many issuers as we trust, each with its mapping for user name and authorities. A valid token issued by any of these issuers will be accepted by our resource server and roles correctly mapped to Spring authorities.
7. SPAs
Because there are some differences between the frameworks used to connect SPAs to an OAuth2 BFF, we’ll cover the three major ones: Angular, React, and Vue.
But, creating SPAs is out of the scope of this article. Hereafter, we’ll focus only on what it takes for a web application to log users in & out on an OAuth2 BFF and query a REST API behind it. Please refer to the companion repo for complete implementations.
An effort was made for the apps to have the same structure:
- two routes to demo how the current one can be restored after authentication
- a Login component offers a choice of login experience if both iframe and default are available. It also handles iframe display status or redirection to the authorization server.
- a Logout component sends a POST request to the BFF /logout endpoint and then redirects to the authorization server for RP-Initiated Logout
- a UserService fetches current user data from the resource server through the BFF. It also holds some logic for scheduling a refresh of this data just before the access token on the BFF expires.
There is however a difference in the way the current user data is managed because of the very different way frameworks handle state:
- in an Angular app, the UserService is a singleton managing current user with a BehaviorSubject
- in a React app, we used createContext in app/layout.tsx to expose the current user to all components, and useContext wherever we need to access it
- in a Vue app, the UserService is a singleton (instantiated in main.ts) managing the current user with a ref
7.1. Running SPAs in Companion Repo
The first thing to do is to cd in the folder of the project we want to run.
Then, we should run “npm install” to pull all required npm packages.
Lastly, depending on the framework:
We should be careful to use only URLs pointing to the reverse proxy and not to the SPAs dev-servers (http://localhost:7080, not http://localhost:4201, http://localhost:4202 and http://localhost:4203).
7.2. User Service
The responsibility for the UserService is to:
- define the user representations (internal and DTO)
- expose a function to fetch user data from the resource server through the BFF
- schedule a refresh() call just before the access token expires (keep the session alive)
7.3. Login
As we already saw, when possible, we provide two different login experiences:
- the user is redirected to the authorization server using the current browser tab (the SPA temporarily “exits”). This is the default behavior and is always available.
- authorization server forms are displayed in an iframe inside the SPA, which requires SameOrigin for the SPA and the authorization server and, as so, works only when the BFF and resource server run with the default profile (with Keycloak)
The logic is implemented by a Login component which displays a drop-down to select the login experience (iframe or default) and a button.
Login options are fetched from the BFF when the component is initialized. In the case of this tutorial, we expect only one option, so we pick only the 1st entry in the response payload.
When the user clicks the Login button, what happens depends on the chosen login experience:
- if iframe is selected, the iframe source is set to the login URI, and the modal div containing the iframe displayed
- otherwise, the window.location.href is set to the login URI, which “exits” the SPA and sets the current tab with a brand-new origin
When the user selects the iframe login experience, we register an event listener for the iframe load events to check if the user authentication is successful and hide the modal. This call-back runs each time a redirection happens in the iframe.
Last, we can note how the SPAs add a post_login_success_uri request parameter to the authorization-code flow initiation request. spring-addons-starter-oidc saves the value of this parameter in session and, after the authorization code is exchanged for tokens, uses it to build the redirection URI returned to the frontend.
7.4. Logout
The logout button and associated logic are handled by the Logout component.
By default, Spring /logout endpoint expects a POST request and, as any request modifying state on a server with sessions, it should contain a CSRF token. Angular and React handle transparently CSRF cookies flagged with http-only=false and request headers, but we have to manually read the XSRF-TOKEN cookie and set the X-XSRF-TOKEN header in Vue for every POST, PUT, PATCH and DELETE requests.
When involving a Spring OAuth2 client, the RP-Initiated Logout happens in two requests:
- first, a POST request is sent to the Spring OAuth2 client which closes its own session
- the response of the 1st request has a Location header with a URI on the authorization server to close the other session that the user has there
The default Spring behavior is to use 302 status for the 1st request, which makes the browser follow automatically to the authorization server, but keeping the same origin. To avoid CORS errors, we configured the BFF to use a status in the 2xx field. This requires the SPA to manually follow the redirection but gives it the opportunity to do it with window.location.href (request having a new origin).
Last, we can note how the post-logout URI is provided by SPAs using a X-POST-LOGOUT-SUCCESS-URI header with the logout request. spring-addons-starter-oidc uses the value of this header to insert a request parameter in the URI of the logout request from the authorization server.
7.5. Client Multi-Tenancy
In the companion project, there is a single OAuth2 client registration with an authorization code. But what if we had more? This might happen for instance if we share a BFF across several frontends, some having distinct issuer or scope.
The user should be prompted to choose only between OpenID Providers he can authenticate on, and in many cases, we can filter the login options.
Here are a few samples of situations where we can drastically shrink the number of possible choices, ideally to one so that the user isn’t prompted for a choice:
- the SPA is configured with a specific option to use
- there are several reverse-proxies and each can set something like a header with the option to use
- some technical info, like the IP of the frontend device, can tell us that a user should be authorized here or there
In such situations, we have two choices:
- send the filtering criteria with the request to /login-options and filter in the BFF controller
- filter /login-options response inside the frontend
8. Back-Channel Logout
What if, in a SSO configuration, a user with an opened session on our BFF logs-out using another OAuth2 client?
In OIDC, the Back-Channel Logout specification was made for such scenarios: when declaring a client on an authorization server, we can register an URL to be called when a user logs-out.
Because the BFF runs on a server, it can expose an endpoint to be notified with such log-out events. Since version 6.2, Spring Security supports Back-Channel Logout and spring-addons-starter-oidc exposes a flag to enable it.
Once the session ended on the BFF with Back-Channel Logout, the requests from the frontend to the resource server(s) won’t be authorized anymore (even before tokens expiration). So for a perfect user experience, when activating Back-Channel Logout on a BFF, we should probably also add a mechanism like WebSockets to notify frontends with user status changes.
9. Why Using spring-addons-starter-oidc?
All along this article, we modified quite a few default behaviors of both spring-boot-starter-oauth2-client and spring-boot-starter-oauth2-resource-server:
- change OAuth2 redirect URIs to point to a reverse-proxy instead of the internal OAuth2 client
- give SPAs the control of where the user is redirected after login / logout
- expose CSRF token in a cookie accessible to Javascript code running in a browser
- adapt to not exactly standard RP-Initiated Logout (Auth0 and Amazon Cognito for instance)
- add optional parameters to the authorization request (Auth0 audience or whatever)
- change the HTTP status of OAuth2 redirections so that SPAs can choose how to follow to Location header
- register two distinct SecurityFilterChain beans with respectively oauth2Login() (with session-based security and CSRF protection) and oauth2ResourceServer() (stateless, with token-based security) to secure different groups of resources
- define which endpoints are accessible to anonymous
- on resource servers, accept tokens issued by more than just one OpenID Provider
- add an audience validator to JWT decoder(s)
- map authorities from any claim(s) (and add prefix or force upper / lower case)
This usually requires quite some Java code and a deep knowledge of Spring Security. But here, we did it with just application properties and could use the guidance of our IDE auto-completion!
We should refer to the starter README on Github for a complete list of features, auto-configuration tuning and defaults overrides.
10. Conclusion
In this tutorial, we saw how to implement the OAuth2 Backend for Frontend pattern with Spring Cloud Gateway and spring-addons.
We also saw:
- why we should favor this solution over configuring SPAs as “public” OAuth2 clients
- introducing a BFF has very little impact on the SPA itself
- this pattern changes nothing at all on resource servers
- because we use a server-side OAuth2 client, we can get complete control on user session, even in SSO configurations, thanks to Back-Channel Logout
Last, we started to explore how convenient spring-addons-starter-oidc can be to configure, with just properties, what usually requires quite some Java configuration.
As usual, all the code implementations are available over on GitHub.