1. Introduction
In this tutorial, we’ll create a Telegram Bot using Spring Boot.
A Telegram bot is an automated program that operates within the Telegram messaging platform. It utilizes the Telegram Bot API to interact with users and perform various tasks. We’ll use a Java library instead of interacting with the API directly. Bots help us respond to user commands, provide information, and perform automated actions.
We’ll start by setting up a brand-new bot and then go on to describe how to use the Java library to implement simple actions.
2. Creating a Telegram Bot
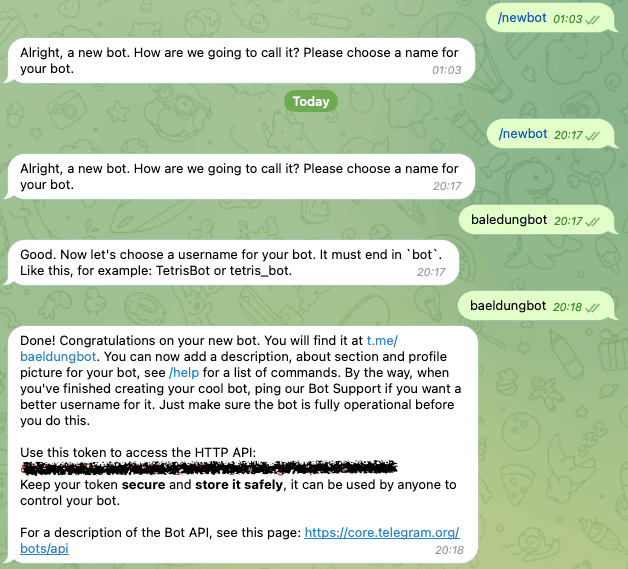
First, we need to create a new bot on the Telegram platform. We do it directly using the Telegram messaging application and searching for the BotFather in the search bar. Once open, we’ll type the /newbot command to create the bot and follow BotFather’s instructions. It’ll ask for the username we want to assign to the bot, which needs to end with a bot as per Telegram’s policy:
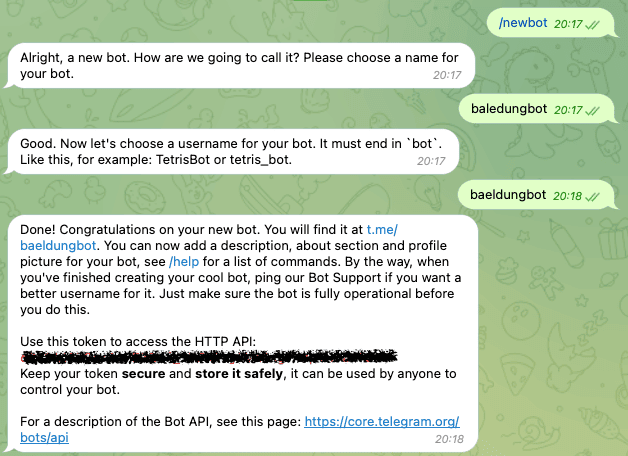
Above, the BotFather generated a token that we must save somewhere safe to use later to configure our application.
3. Setting Up the Application
Second, we must have a Spring Boot project where we want to integrate the Telegram Bot. We are going to modify the pom.xml file and include the telegrambots-spring-boot-starter and the telegrambots-abilities library:
<dependency>
    <groupId>org.telegram</groupId>
    <artifactId>telegrambots-spring-boot-starter</artifactId>
    <version>6.7.0</version>
</dependency>
<dependency>
    <groupId>org.telegram</groupId>
    <artifactId>telegrambots-abilities</artifactId>
    <version>6.7.0</version>
</dependency>
Under the hood, the AbilityBot uses webhooks to communicate with Telegrams APIs, but we don’t need to worry about that. In fact, the library implements all the interfaces provided by the Telegram Bot API.
Now, we can implement our bot.
4. Explaining the PizzaBot
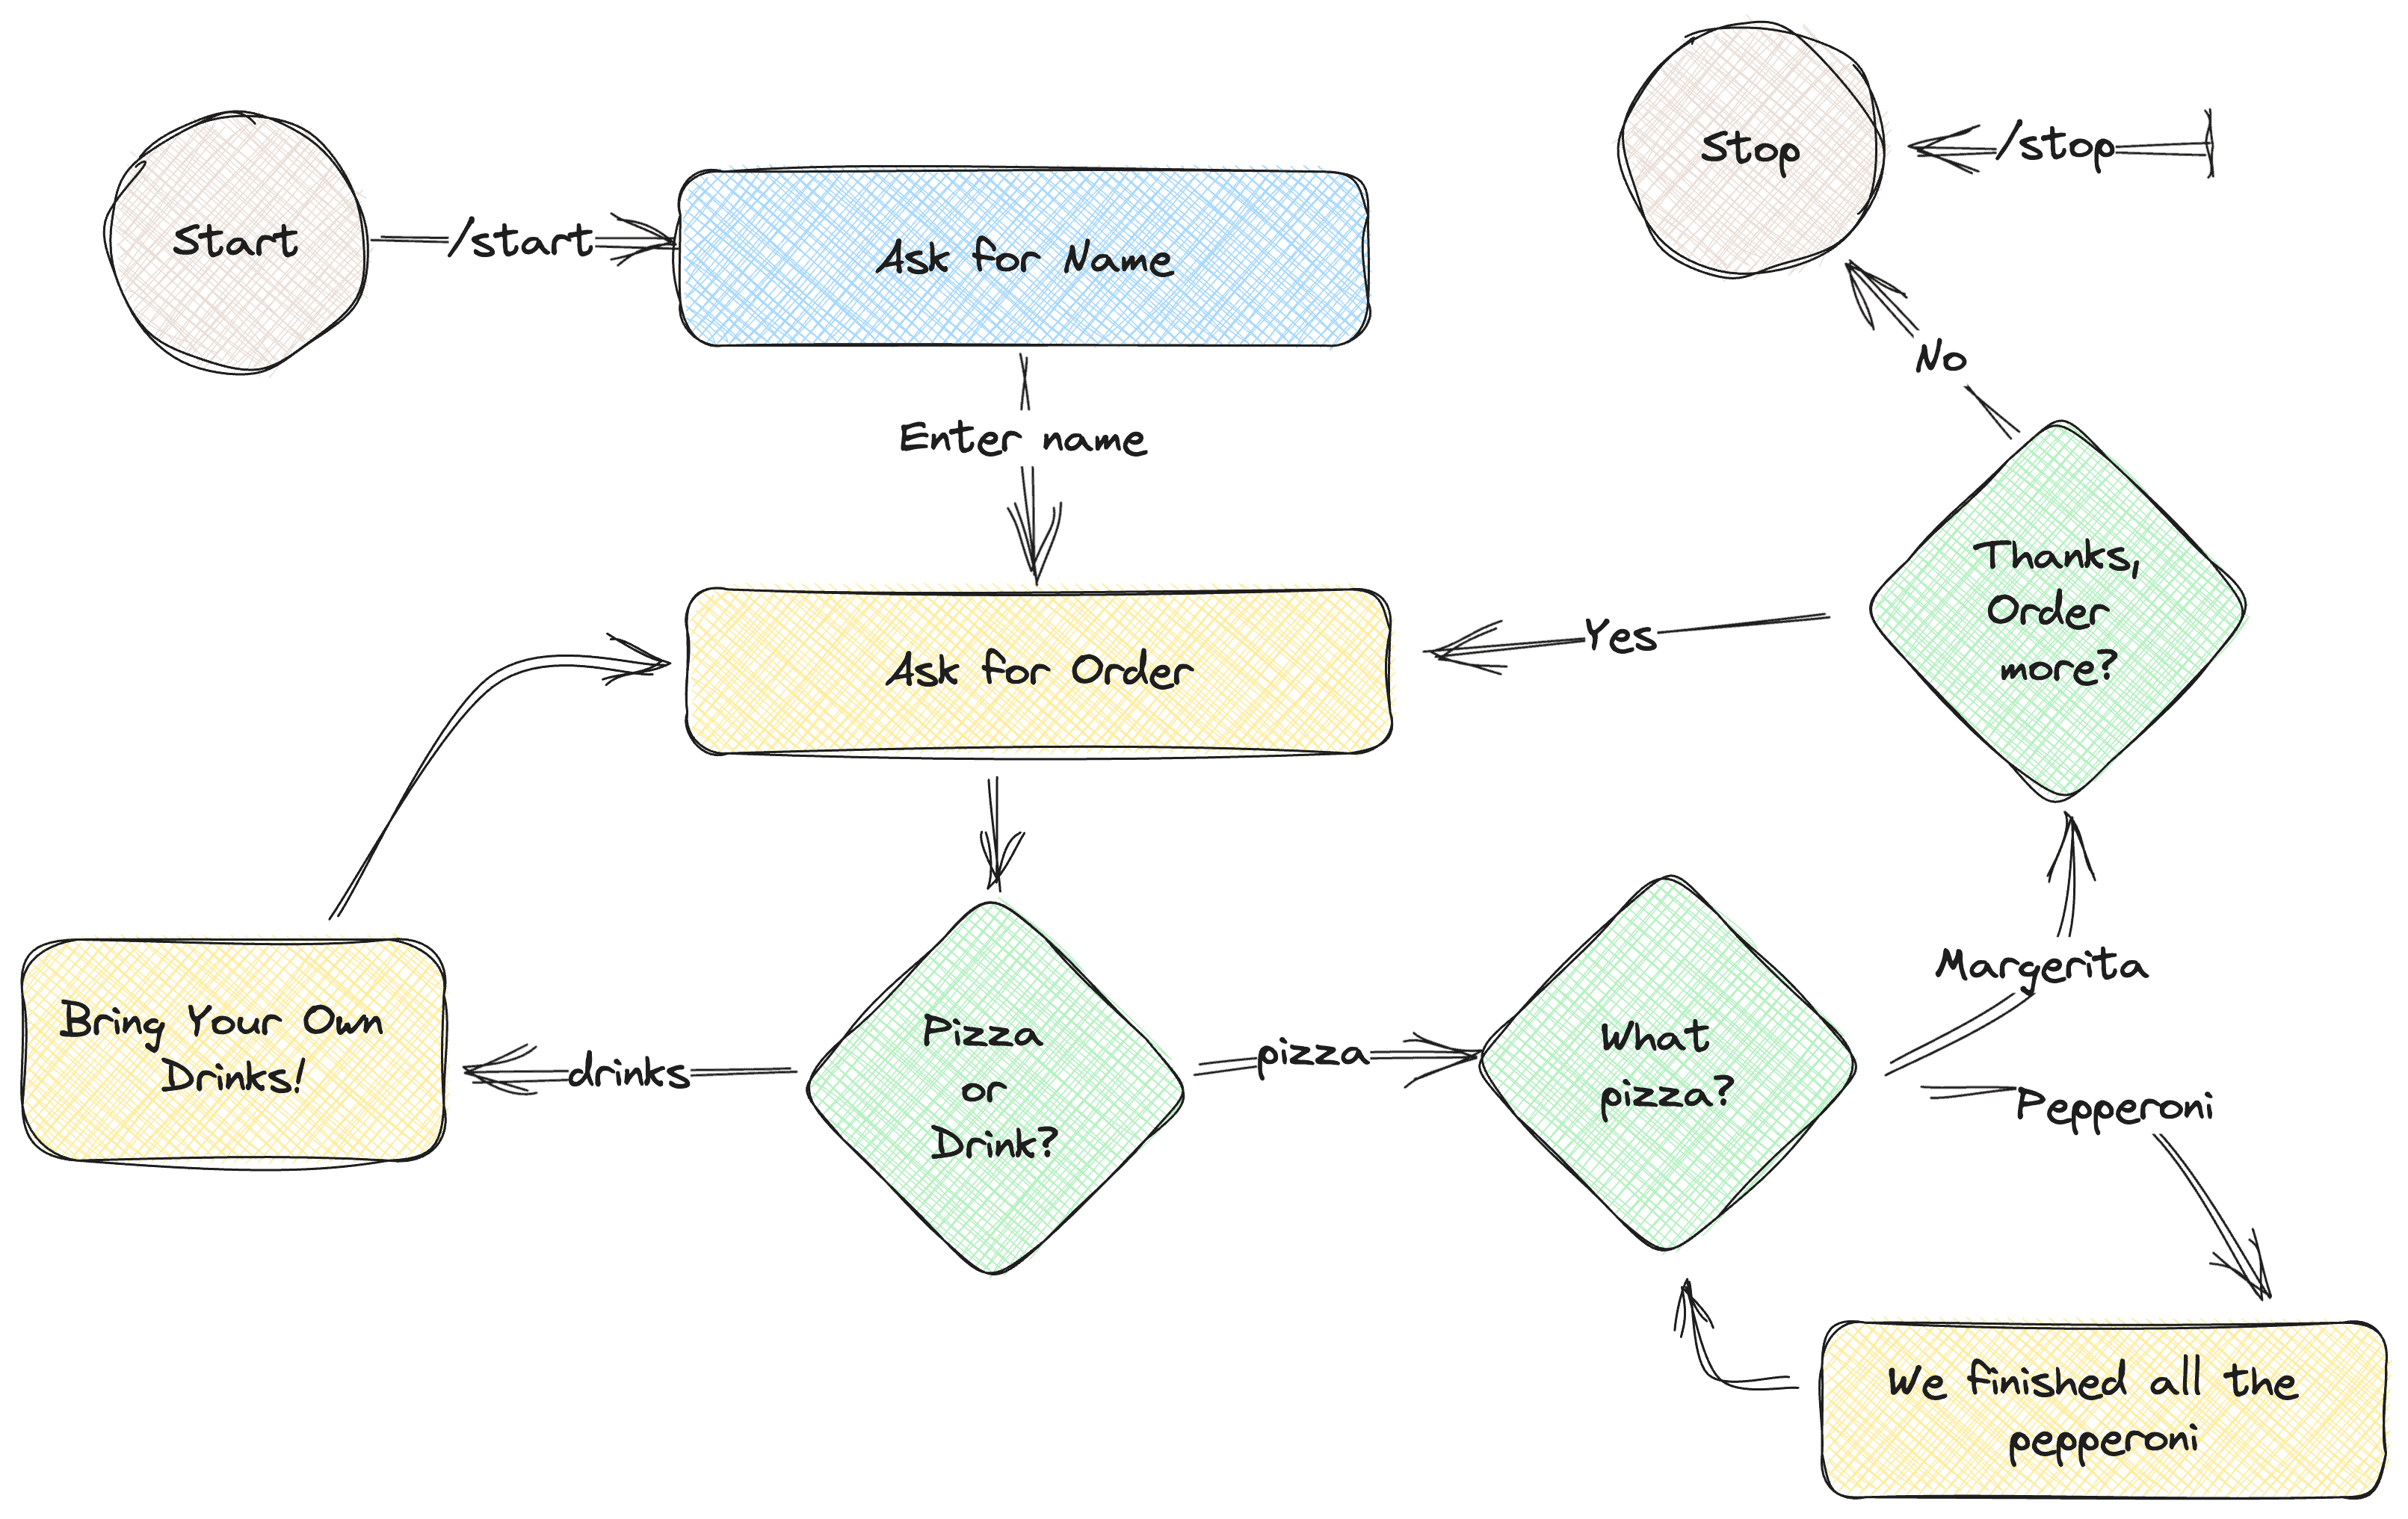
We’ll implement a simple bot simulating a pizza shop to demonstrate using the library with Spring Boot. Moreover, we’ll have a predefined set of interactions with the bot:
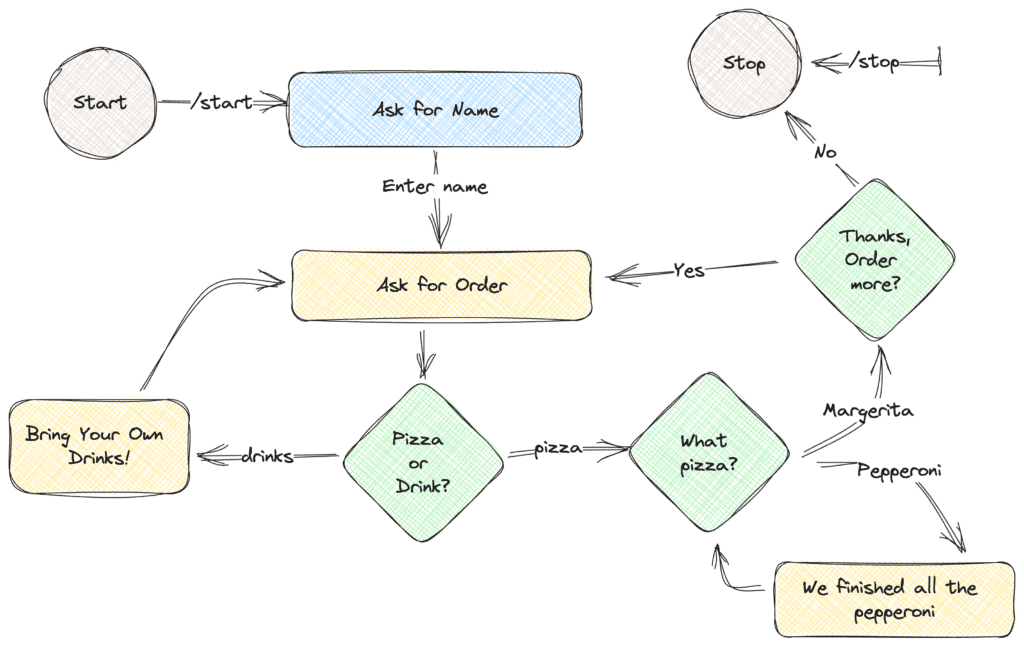
In short, we’ll start by asking the user for their name. Then, we’ll prompt him to select a Pizza or a drink. In the case of drinks, we’ll display a message saying we don’t sell drinks. Otherwise, we’ll ask them for the toppings of the pizza. After selecting the available toppings, we’ll confirm if the user wants to order again. In this case, we’ll repeat the flow. Alternatively, we’ll thank them and close the chat with a closing message.
Let’s start by configuring an AbilityBot for our new PizzaShop:
@Component
public class PizzaBot extends AbilityBot {
    private final ResponseHandler responseHandler;
    @Autowired
    public PizzaBot(Environment env) {
        super(env.getProperty("botToken"), "baeldungbot");
        responseHandler = new ResponseHandler(silent, db);
    }
    @Override
    public long creatorId() {
        return 1L;
    }
}
We read the botToken property injected as an environment variable inside the constructor. We must keep the token safe and not push it into the codebase. In this example, we export it to our environment before running the application. Alternatively, we could define it inside the properties file. Moreover, we must provide a unique creatorId that describes our bot.
Also, we are extending the AbilityBot class which reduces the boilerplate code and offers commonly used tools such as state machines through ReplyFlow. However, we’ll only use the embedded database and manage the state explicitly inside ResponseHandler:
public class ResponseHandler {
    private final SilentSender sender;
    private final Map<Long, UserState> chatStates;

    public ResponseHandler(SilentSender sender, DBContext db) {
        this.sender = sender;
        chatStates = db.getMap(Constants.CHAT_STATES);
    }

}
5.1. Spring Boot 3 Compatibility Issue
When using version 3 of Spring Boot, the library doesn’t automatically configure the bot when declared as @Component. Therefore, we must initialize it manually inside our main application class:
TelegramBotsApi botsApi = new TelegramBotsApi(DefaultBotSession.class);
botsApi.registerBot(ctx.getBean("pizzaBot", TelegramLongPollingBot.class));
We create a new instance of the TelegramBotsApi and then provide the pizzaBot component instance from the Spring Application context.
6. Implementing the PizzaBot
The Telegram API is huge and can become repetitive to implement new commands. Consequently, we use abilities to simplify the process of developing new capabilities. We should consider the end user, the necessary conditions, and the execution process when designing the interaction flow.
In our PizzaBot, we’ll use just a single ability that’ll /start the conversation with the bot:
public Ability startBot() {
    return Ability
      .builder()
      .name("start")
      .info(Constants.START_DESCRIPTION)
      .locality(USER)
      .privacy(PUBLIC)
      .action(ctx -> responseHandler.replyToStart(ctx.chatId()))
      .build();
}
We use the builder pattern to build the Ability. First, we define the name of the Ability, which is the same as the command of the Ability. Second, we provide a description string of this new Ability. This will be helpful when we run the /commands command to get our bot’s abilities. Third, we define the locality and privacy of the bot. Finally, we define what action we must take upon receiving the command. For this example, we’ll forward the id of the chat to the ResponseHandler class. Following the design from the diagram above, we’ll ask for the name of the user and save it inside a map with its initial state:
public void replyToStart(long chatId) {
    SendMessage message = new SendMessage();
    message.setChatId(chatId);
    message.setText(START_TEXT);
    sender.execute(message);
    chatStates.put(chatId, AWAITING_NAME);
}
In this method, we create a SendMessage command and execute it using the sender. Then, we set the chat state to AWAITING_NAME, signaling we are waiting for the user’s name:
private void replyToName(long chatId, Message message) {
    promptWithKeyboardForState(chatId, "Hello " + message.getText() + ". What would you like to have?",
      KeyboardFactory.getPizzaOrDrinkKeyboard(),
      UserState.FOOD_DRINK_SELECTION);
}
After the user enters their name, we send them a ReplyKeyboardMarkup that prompts them with two options:
public static ReplyKeyboard getPizzaToppingsKeyboard() {
    KeyboardRow row = new KeyboardRow();
    row.add("Margherita");
    row.add("Pepperoni");
    return new ReplyKeyboardMarkup(List.of(row));
}
This will hide the keyboard and display the user an interface with two buttons:
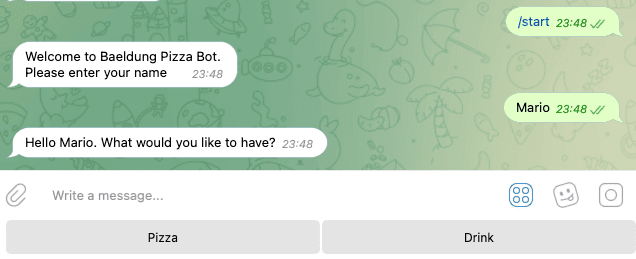 Now, the user can select a pizza or drink that our pizza shop doesn’t offer. Telegram sends a text message with a response when selecting any of the two options.
For all the green diamond-shaped elements in the diagram above, we follow a similar process. Therefore, we won’t repeat it here. Instead, let’s focus on handling the response to the buttons.
7. Handling the Replies From the User
For all the incoming messages and the current state of the chat, we handle the response differently inside our PizzaBot class:
public Reply replyToButtons() {
    BiConsumer<BaseAbilityBot, Update> action = (abilityBot, upd) -> responseHandler.replyToButtons(getChatId(upd), upd.getMessage());
    return Reply.of(action, Flag.TEXT,upd -> responseHandler.userIsActive(getChatId(upd)));
}
The .replyToButtons() gets all the TEXT replies and forwards them to the ResponseHandler along with the chatId and the incoming Message object. Then, inside the ResponseHandler the .replyToButtons() method decides how to process the message:
public void replyToButtons(long chatId, Message message) {
    if (message.getText().equalsIgnoreCase("/stop")) {
        stopChat(chatId);
    }

    switch (chatStates.get(chatId)) {
        case AWAITING_NAME -> replyToName(chatId, message);
        case FOOD_DRINK_SELECTION -> replyToFoodDrinkSelection(chatId, message);
        case PIZZA_TOPPINGS -> replyToPizzaToppings(chatId, message);
        case AWAITING_CONFIRMATION -> replyToOrder(chatId, message);
        default -> unexpectedMessage(chatId);
    }
}
Inside the switch, we check the current status of the chat and reply to the user accordingly. For example, when the current state for the user is FOOD_DRINK_SELECTION, we process the response and move to the next state when the user taps on the option pizza:
private void replyToFoodDrinkSelection(long chatId, Message message) {
    SendMessage sendMessage = new SendMessage();
    sendMessage.setChatId(chatId);
    if ("drink".equalsIgnoreCase(message.getText())) {
        sendMessage.setText("We don't sell drinks.\nBring your own drink!! :)");
        sendMessage.setReplyMarkup(KeyboardFactory.getPizzaOrDrinkKeyboard());
        sender.execute(sendMessage);
    } else if ("pizza".equalsIgnoreCase(message.getText())) {
        sendMessage.setText("We love Pizza in here.\nSelect the toppings!");
        sendMessage.setReplyMarkup(KeyboardFactory.getPizzaToppingsKeyboard());
        sender.execute(sendMessage);
        chatStates.put(chatId, UserState.PIZZA_TOPPINGS);
    } else {
        sendMessage.setText("We don't sell " + message.getText() + ". Please select from the options below.");
        sendMessage.setReplyMarkup(KeyboardFactory.getPizzaOrDrinkKeyboard());
        sender.execute(sendMessage);
    }
}
Additionally, inside .replyToButtons(), we immediately check if the user sent the /stop command. In that case, we stop the chat and remove the chatId from the chatStates map:
private void stopChat(long chatId) {
    SendMessage sendMessage = new SendMessage();
    sendMessage.setChatId(chatId);
    sendMessage.setText("Thank you for your order. See you soon!\nPress /start to order again");
    chatStates.remove(chatId);
    sendMessage.setReplyMarkup(new ReplyKeyboardRemove(true));
    sender.execute(sendMessage);
}
This removes the user’s state from the database. To interact again, the user must write the /start command.
8. Conclusion
In this tutorial, we discussed implementing a Telegram bot using Spring Boot.
First, we created a new bot on the Telegram platform using BotFather. Second, we set up our Spring Boot project and explained the functionality of our PizzaBot and how it interacts with users. Then, we implemented the PizzaBot using abilities to simplify developing new commands. Finally, we handled the replies from users and provided appropriate responses based on the chat state.
As always, the source code of this article is available over on GitHub.