1. Overview
In this tutorial, we’ll learn about the ConnectionDetails interface introduced in Spring Boot 3.1 to externalize the connection properties. Spring Boot provides out-of-the-box abstractions to integrate with remote services like relational databases, NoSQL databases, messaging services, etc.
Traditionally, the application.properties file is used for storing the connection details of the remote services. Hence, it becomes difficult to externalize these properties to an external service like AWS Secret Manager, Hashicorp Vault, etc.
To address this concern, Spring Boot has introduced ConnectionDetails. This interface is empty and acts like a tag. Spring offers subinterfaces of this, such as JdbcConnectionDetails, CassandraConnectionDetails, KafkaConnectionDetails, and more. They can be implemented and specified in the Spring configuration classes as beans. After this, Spring relies on these configuration beans to dynamically retrieve the connection properties, instead of the static application.properties file.
We’d begin with an introduction to a use case and then move on to its implementation.
2. Use Case Description
Let’s imagine a multinational bank called the Bank of Malgudi. It operates numerous applications running on Spring Boot. These applications connect to various remote services. Presently, the connection details of these remote services are stored in the application.properties file.
After a recent review, the Compliance Body in the Bank raised several concerns about the security of these properties. A few of their requests pertaining to these concerns are:
- Encrypt all the secrets
- Periodically rotate the secrets
- No exchange of secrets in emails
3. Proposed Solution and Design
The application owners in the Bank of Malgudi brainstormed on the above concerns and finally came up with a solution. They proposed moving all the secrets to Hashicorp Vault.
As a result, all the Spring Boot applications have to read the secrets from the Vault. Following is the proposed high-level design:
Now, the Spring Boot application has to call the Vault service with a secret key to retrieve the secret. Then with the retrieved secret, it can call the remote service to get the connection object for further operations.
Consequently, applications will rely on the Vault to take care of storing the secrets safely. Vault would periodically rotate the secrets as per the organization’s policy. In case the applications cache the secrets, they also have to reload them.
4. Implementation With ConnectionDetails
With the ConnectionDetails interface, Spring Boot applications can discover the connection details themselves without any manual intervention. Having said this, it’s important to note that ConnectionDetails takes precedence over the application.properties file. However, there are still some non-connection properties like JDBC connection pool size, that can still be configured through the application.properties file.
In the upcoming section, we’ll see various ConnectionDetails implementation classes in action by leveraging the Spring Boot docker compose feature.
4.1. Externalize JDBC Connection Details
Here we’ll take the example of the Spring Boot application’s integration with Postgres Database. Let’s begin with the class diagram:

In the above class diagram, the JdbcConnectionDetails interface is from the Spring Boot framework. The PostgresConnectionDetails class implements the methods of the interface to fetch the details from the Vault:
public class PostgresConnectionDetails implements JdbcConnectionDetails {
    @Override
    public String getUsername() {
        return VaultAdapter.getSecret("postgres_user_key");
    }

    @Override
    public String getPassword() {
        return VaultAdapter.getSecret("postgres_secret_key");
    }

    @Override
    public String getJdbcUrl() {
        return VaultAdapter.getSecret("postgres_jdbc_url");
    }
}
As shown below, JdbcConnectionDetailsConfiguration is the configuration class in the application:
@Configuration(proxyBeanMethods = false)
public class JdbcConnectionDetailsConfiguration {
    @Bean
    @Primary
    public JdbcConnectionDetails getPostgresConnection() {
        return new PostgresConnectionDetails();
    }
}
Interestingly Spring Boot automatically discovers it during the application boot-up process and gets the JdbcConnectionDetails bean. As explained earlier, the bean holds the logic to retrieve the Postgres database connection details from the Vault.
Since we’re using Docker Compose to start the Postgres database container, Spring Boot automatically creates a ConnectionDetails bean holding the necessary connection details. Hence we’re using @Primary annotation to give the JdbcConectionDetails bean precedence over it.
Let’s take a look at how it works:
@Test
public void givenSecretVault_whenIntegrateWithPostgres_thenConnectionSuccessful() {
    String sql = "select current_date;";
    Date date = jdbcTemplate.queryForObject(sql, Date.class);
    assertEquals(LocalDate.now().toString(), date.toString());
}
As expected, the application connects to the database and fetches the result successfully.
4.2. Externalize Rabbit MQ Connection Details
Similar to JdbcConnectionDetails, Spring Boot has provided the interface RabbitConnectionDetails to integrate with RabbitMQ Server. Let’s see how to use this interface to externalize the Spring Boot properties for connecting to RabbitMQ Server:

First, as per the contract let’s implement the RabbitConnectionDetails interface to fetch the connection properties from the Vault:
public class RabbitMQConnectionDetails implements RabbitConnectionDetails {
    @Override
    public String getUsername() {
        return VaultAdapter.getSecret("rabbitmq_username");
    }

    @Override
    public String getPassword() {
        return VaultAdapter.getSecret("rabbitmq_password");
    }

    @Override
    public String getVirtualHost() {
        return "/";
    }

    @Override
    public List<Address> getAddresses() {
        return List.of(this.getFirstAddress());
    }

    @Override
    public Address getFirstAddress() {
        return new Address(VaultAdapter.getSecret("rabbitmq_host"),
          Integer.valueOf(VaultAdapter.getSecret("rabbitmq_port")));
    }
}
Next, we’ll define the above bean RabbitMQConnectionDetails in the RabbitMQConnectionDetailsConfiguration class:
@Configuration(proxyBeanMethods = false)
public class RabbitMQConnectionDetailsConfiguration {
    @Primary
    @Bean
    public RabbitConnectionDetails getRabbitmqConnection() {
        return new RabbitMQConnectionDetails();
    }
}
Finally, let’s see if that works:
@Test
public void givenSecretVault_whenPublishMessageToRabbitmq_thenSuccess() {
    final String MSG = "this is a test message";
    this.rabbitTemplate.convertAndSend(queueName, MSG);
    assertEquals(MSG, this.rabbitTemplate.receiveAndConvert(queueName));
}
The above method sends a message to a queue in RabbitMQ and then reads it. The object rabbitTemplate is auto-configured by Spring Boot by referring to the connection details in the RabbitMQConnectionDetails bean. We injected the rabbitTemplate object into the test class and then used it in the above test method.
4.3. Externalize Redis Connection Details
Now let’s move on to the Spring ConnectionDetails abstraction on Redis. First, we’ll start with the class diagram:

Let’s take a look at RedisCacheConnectionDetails, which has externalized the connection properties of Redis by implementing RedisConnectionDetails:
public class RedisCacheConnectionDetails implements RedisConnectionDetails {
    @Override
    public String getPassword() {
        return VaultAdapter.getSecret("redis_password");
    }

    @Override
    public Standalone getStandalone() {
        return new Standalone() {
            @Override
            public String getHost() {
                return VaultAdapter.getSecret("redis_host");
            }

            @Override
            public int getPort() {
                return Integer.valueOf(VaultAdapter.getSecret("redis_port"));
            }
        };
    }
}
As shown below, the configuration class RedisConnectionDetailsConfiguration returns the RedisConnectionDetails bean:
@Configuration(proxyBeanMethods = false)
@Profile("redis")
public class RedisConnectionDetailsConfiguration {
    @Bean
    @Primary
    public RedisConnectionDetails getRedisCacheConnection() {
        return new RedisCacheConnectionDetails();
    }
}
Finally, let’s see if we can integrate with Redis:
@Test
public void giveSecretVault_whenStoreInRedisCache_thenSuccess() {
    redisTemplate.opsForValue().set("City", "New York");
    assertEquals("New York", redisTemplate.opsForValue().get("City"));
}
First, the Spring framework successfully injects redisTemplate into the test class. Then it’s used for adding a key-value pair into the cache. Finally, we retrieve the value as well.
4.4. Externalize MongoDB Connection Details
Just like before, let’s begin with the usual class diagram:

Let’s take a look at the implementation of the MongoDBConnectionDetails class above:
public class MongoDBConnectionDetails implements MongoConnectionDetails {
    @Override
    public ConnectionString getConnectionString() {
        return new ConnectionString(VaultAdapter.getSecret("mongo_connection_string"));
    }
}
Just like the class diagram, we have implemented the method getConnectionString() of MongoConnectionDetails interface. The method getConnectionString() retrieves the connection string from the Vault.
We can now take a look at how the MongoDBConnectionDetailsConfiguration class creates the MongoConnectionDetails bean:
@Configuration(proxyBeanMethods = false)
public class MongoDBConnectionDetailsConfiguration {
    @Bean
    @Primary
    public MongoConnectionDetails getMongoConnectionDetails() {
        return new MongoDBConnectionDetails();
    }
}
Let’s see if our efforts result in successful integration with MongoDB Server:
@Test
public void givenSecretVault_whenExecuteQueryOnMongoDB_ReturnResult() {
    mongoTemplate.insert("{\"msg\":\"My First Entry in MongoDB\"}", "myDemoCollection");
    String result = mongoTemplate.find(new Query(), String.class, "myDemoCollection").get(0);

    JSONObject jsonObject = new JSONObject(result);
    result = jsonObject.get("msg").toString();

    assertEquals("My First Entry in MongoDB", result);
}
So, as we see above, the method inserts data into MongoDB and then retrieves it successfully. This is possible because Spring Boot creates the mongoTemplate bean with the help of MongoConnectionDetails bean defined in MongoDBConnectionDetailsConfiguration.
4.5. Externalize R2dbc Connection Details
Spring Boot has also provided ConnectionDetails abstraction for Reactive Relational Database Connection programming with the help of R2dbcConnectionDetails. Let’s take a look at the following class diagram to externalize the connection details:

First, let’s implement R2dbcPostgresConnectionDetails:
public class R2dbcPostgresConnectionDetails implements R2dbcConnectionDetails {
    @Override
    public ConnectionFactoryOptions getConnectionFactoryOptions() {
        ConnectionFactoryOptions options = ConnectionFactoryOptions.builder()
          .option(ConnectionFactoryOptions.DRIVER, "postgresql")
          .option(ConnectionFactoryOptions.HOST, VaultAdapter.getSecret("r2dbc_postgres_host"))
          .option(ConnectionFactoryOptions.PORT, Integer.valueOf(VaultAdapter.getSecret("r2dbc_postgres_port")))
          .option(ConnectionFactoryOptions.USER, VaultAdapter.getSecret("r2dbc_postgres_user"))
          .option(ConnectionFactoryOptions.PASSWORD, VaultAdapter.getSecret("r2dbc_postgres_secret"))
          .option(ConnectionFactoryOptions.DATABASE, VaultAdapter.getSecret("r2dbc_postgres_database"))
          .build();

        return options;
    }
}
Just like in earlier sections, here also we’ve used VaultAdapter to retrieve the connection details.
Now, let’s implement the R2dbcPostgresConnectionDetailsConfiguration class to return R2dbcPostgresConnectionDetails as a Spring bean:
@Configuration(proxyBeanMethods = false)
public class R2dbcPostgresConnectionDetailsConfiguration {
    @Bean
    @Primary
    public R2dbcConnectionDetails getR2dbcPostgresConnectionDetails() {
        return new R2dbcPostgresConnectionDetails();
    }
}
Because of the above bean, the Spring Boot framework auto-configures R2dbcEntityTemplate. Finally, it can be autowired and used for running queries in a reactive manner:
@Test
public void givenSecretVault_whenQueryPostgresReactive_thenSuccess() {
    String sql = "select * from information_schema.tables";

    List<String> result = r2dbcEntityTemplate.getDatabaseClient().sql(sql).fetch().all()
      .map(r -> {
          return "hello " + r.get("table_name").toString();
      }).collectList().block();
    logger.info("count ------" + result.size());
}
4.6. Externalize Elasticsearch Connection Details
For externalizing the connection details of the Elasticsearch service, Spring Boot offers the interface ElasticsearchConnectionDetails. Let’s begin by taking a look at the following class diagram:

Just like before, we adopted the same pattern for retrieving the connection details. Now, we can move on to the implementation, starting with the CustomElasticsearchConnectionDetails class:
public class CustomElasticsearchConnectionDetails implements ElasticsearchConnectionDetails {
    @Override
    public List<Node> getNodes() {
        Node node1 = new Node(
          VaultAdapter.getSecret("elastic_host"),
          Integer.valueOf(VaultAdapter.getSecret("elastic_port1")),
          Node.Protocol.HTTP
        );
        Node node2 = new Node(
          VaultAdapter.getSecret("elastic_host"),
          Integer.valueOf(VaultAdapter.getSecret("elastic_port2")),
          Node.Protocol.HTTP
        );
        return List.of(node1, node2);
    }

    @Override
    public String getUsername() {
        return VaultAdapter.getSecret("elastic_user");
    }

    @Override
    public String getPassword() {
        return VaultAdapter.getSecret("elastic_secret");
    }

}
The class sets the connection details by using the VaultAdapter.
Let’s take a look at the configuration class that Spring Boot uses to discover the ElasticSearchConnectionDetails bean:
@Configuration(proxyBeanMethods = false)
@Profile("elastic")
public class CustomElasticsearchConnectionDetailsConfiguration {
    @Bean
    @Primary
    public ElasticsearchConnectionDetails getCustomElasticConnectionDetails() {
        return new CustomElasticsearchConnectionDetails();
    }
}
Finally, it’s time to check how it works:
@Test
public void givenSecretVault_whenCreateIndexInElastic_thenSuccess() {
    Boolean result = elasticsearchTemplate.indexOps(Person.class).create();
    logger.info("index created:" + result);
    assertTrue(result);
}
Interestingly, Spring Boot autoconfigures elasticsearchTemplate with the correct connection details into the test class. Then, it’s used for creating an index in Elasticsearch.
4.7. Externalize Cassandra Connection Details
As usual, the following is the class diagram of the proposed implementation:

According to Spring Boot, we have to implement the methods of CassandraConnectionDetails interface as shown above. Let’s see the implementation of the class CustomCassandraConnectionDetails:
public class CustomCassandraConnectionDetails implements CassandraConnectionDetails {
    @Override
    public List<Node> getContactPoints() {
        Node node = new Node(
          VaultAdapter.getSecret("cassandra_host"),
          Integer.parseInt(VaultAdapter.getSecret("cassandra_port"))
        );
        return List.of(node);
    }

    @Override
    public String getUsername() {
        return VaultAdapter.getSecret("cassandra_user");
    }

    @Override
    public String getPassword() {
        return VaultAdapter.getSecret("cassandra_secret");
    }

    @Override
    public String getLocalDatacenter() {
        return "datacenter-1";
    }
}
Basically, we’re retrieving most of the sensitive connection details from the Vault.
Now, we can take a look at the configuration class which is responsible for creating the CustomCassandraConnectionDetails bean:
@Configuration(proxyBeanMethods = false)
public class CustomCassandraConnectionDetailsConfiguration {
    @Bean
    @Primary
    public CassandraConnectionDetails getCustomCassandraConnectionDetails() {
        return new CustomCassandraConnectionDetails();
    }
}
Finally, let’s see if Spring Boot is able to auto-configure CassandraTemplate:
@Test
public void givenSecretVaultVault_whenRunQuery_thenSuccess() {
    Boolean result = cassandraTemplate.getCqlOperations()
      .execute("CREATE KEYSPACE IF NOT EXISTS spring_cassandra"
      + " WITH replication = {'class':'SimpleStrategy', 'replication_factor':3}");
    logger.info("the result -" + result);
    assertTrue(result);
}
Using cassandraTemplate, the above method successfully creates a keyspace in the Cassandra database.
4.8. Externalize Neo4j Connection Details
Spring Boot provides ConnectionDetails abstraction for Neo4j Database which is a popular graph database:

Moving on, let’s implement CustomNeo4jConnectionDetails:
public class CustomNeo4jConnectionDetails implements Neo4jConnectionDetails {
    @Override
    public URI getUri() {
        try {
            return new URI(VaultAdapter.getSecret("neo4j_uri"));
        } catch (URISyntaxException e) {
            throw new RuntimeException(e);
        }
    }
    @Override
    public AuthToken getAuthToken() {
        return AuthTokens.basic("neo4j", VaultAdapter.getSecret("neo4j_secret"));
    }
}
Again, here also we’re reading the connection details from the Vault using VaultAdapter.
Now, let’s implement the CustomNeo4jConnectionDetailsConfiguration:
@Configuration(proxyBeanMethods = false)
public class CustomNeo4jConnectionDetailsConfiguration {
    @Bean
    @Primary
    public Neo4jConnectionDetails getNeo4jConnectionDetails() {
        return new CustomNeo4jConnectionDetails();
    }
}
Spring Boot framework loads Neo4jConncetionDetails bean using the above configuration class.
Finally, it’s time to see if the following method successfully connects to Neo4j Database:
@Test
public void giveSecretVault_whenRunQuery_thenSuccess() {
    Person person = new Person();
    person.setName("James");
    person.setZipcode("751003");

    Person data = neo4jTemplate.save(person);
    assertEquals("James", data.getName());
}
Remarkably, Neo4jTemplate is autowired to the test class and it saves the data into the database.
4.9. Externalize Kafka Connection Details
Kafka, being a popular and extremely powerful messaging broker, Spring Boot has provided integration libraries for it as well. KafkaConnectionDetails is the latest feature by Spring to support externalizing the connection properties. Hence, let’s see how we can use it with the help of the following class diagram:

The above design is mostly similar to the earlier designs discussed so far. Hence, we’ll straightaway jump to its implementation, starting with the CustomKafkaConnectionDetails class:
public class CustomKafkaConnectionDetails implements KafkaConnectionDetails {
    @Override
    public List<String> getBootstrapServers() {
        return List.of(VaultAdapter.getSecret("kafka_servers"));
    }
}
For a very basic setup of a Kafka single-node server, the above class just overrode the method getBootstrapServers() to read properties from the vault. For a more complex multinode setup, there are other methods that can be overridden.
We can now have a look at the CustomKafkaConnectionDetailsConfiguration class:
@Configuration(proxyBeanMethods = false)
public class CustomKafkaConnectionDetailsConfiguration {
    @Bean
    public KafkaConnectionDetails getKafkaConnectionDetails() {
        return new CustomKafkaConnectionDetails();
    }
}
The above method returns the KafkaConnectionDetails bean. And finally, that gets used by Spring to inject kafkaTemplate into the following method:
@Test
public void givenSecretVault_whenPublishMsgToKafkaQueue_thenSuccess() {
    assertDoesNotThrow(kafkaTemplate::getDefaultTopic);
}
4.10. Externalize Couchbase Connection Details
Spring Boot has also provided the interface CouchbaseConnectionDetails for externalizing the connection properties of the Couchbase database. Let’s take a look at the following class diagram:

We’ll first implement the CouchbaseConnectionDetails interface by overriding its methods to fetch the user, password, and connection string:
public class CustomCouchBaseConnectionDetails implements CouchbaseConnectionDetails {
    @Override
    public String getConnectionString() {
        return VaultAdapter.getSecret("couch_connection_string");
    }

    @Override
    public String getUsername() {
        return VaultAdapter.getSecret("couch_user");
    }

    @Override
    public String getPassword() {
        return VaultAdapter.getSecret("couch_secret");
    }
}
Then, we’ll create the above custom bean in the CustomCouchBaseConnectionDetails class:
@Configuration(proxyBeanMethods = false)
@Profile("couch")
public class CustomCouchBaseConnectionDetailsConfiguration {
    @Bean
    public CouchbaseConnectionDetails getCouchBaseConnectionDetails() {
        return new CustomCouchBaseConnectionDetails();
    }
}
Spring Boot, loads the above configuration class when the application boots up.
Now, we can check the following method where we’re able to successfully connect with Couchbase server:
@Test
public void givenSecretVault_whenConnectWithCouch_thenSuccess() {
    assertDoesNotThrow(cluster.ping()::version);
}
The Cluster class gets autowired in the method and then it’s used for integrating with the database.
4.11. Externalize Zipkin Connection Details
Finally, in this section, we’ll discuss the ZipkinConnectionDetails interface for externalizing the properties for connecting to Zipkin Server which is a popular distributed tracing system. Let’s begin with the following class diagram:

Using the above design in the class diagram, we’ll first implement CustomZipkinConnectionDetails:
public class CustomZipkinConnectionDetails implements ZipkinConnectionDetails {
    @Override
    public String getSpanEndpoint() {
        return VaultAdapter.getSecret("zipkin_span_endpoint");
    }
}
The method getSpanEndpoint() fetches the Zipkin API endpoint from the Vault using the VaultAdapter.
Next, we’ll implement CustomZipkinConnectionDetailsConfiguration class:
@Configuration(proxyBeanMethods = false)
@Profile("zipkin")
public class CustomZipkinConnectionDetailsConfiguration {
    @Bean
    @Primary
    public ZipkinConnectionDetails getZipkinConnectionDetails() {
        return new CustomZipkinConnectionDetails();
    }
}
As we can see, it returns the ZipkinConnectionDetails bean. During the application bootup, Spring Boot discovers the bean so that Zipkin libraries can push the trace information into Zipkin.
Let’s first run the application:
mvn spring-boot:run -P connection-details
-Dspring-boot.run.arguments="--spring.config.location=./target/classes/connectiondetails/application-zipkin.properties"
Before running the application, we must have Zipkin running on our local workstation.
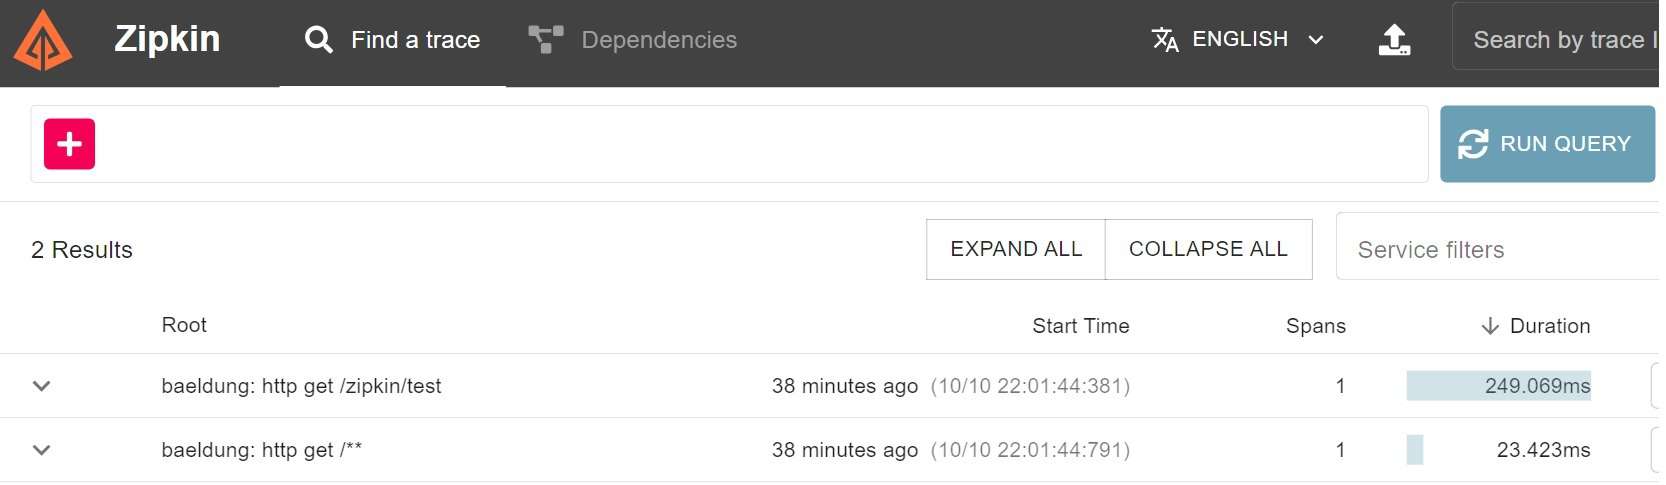
Then, we’ll run the following command to access a controller endpoint defined in ZipkinDemoController:
curl http://localhost:8080/zipkin/test
Finally, we can check the trace on the Zipkin front end:

5. Conclusion
In this article, we learned about the ConnectionDetails interface in Spring Boot 3.1. We saw how it can help in externalizing the sensitive connection details to remote services used by the application. It’s worth noting that some of the non-connection-related information is still read from the application.properties file.
Finally, the code examples used here can be found over on GitHub.