1. Overview
In this tutorial, we’ll explore how to create reactive REST APIs with Micronaut and MongoDB.
Micronaut is a framework for constructing microservices and serverless applications on the Java Virtual Machine (JVM).
We’ll look at how to create entities, repositories, services, and controllers using Micronaut.
2. Project Setup
For our code example, we’ll create a CRUD application that stores and retrieves books from a MongoDB database. To start with, let’s create a Maven project using Micronaut Launch, set up the dependencies, and configure the database.
2.1. Initializing the Project
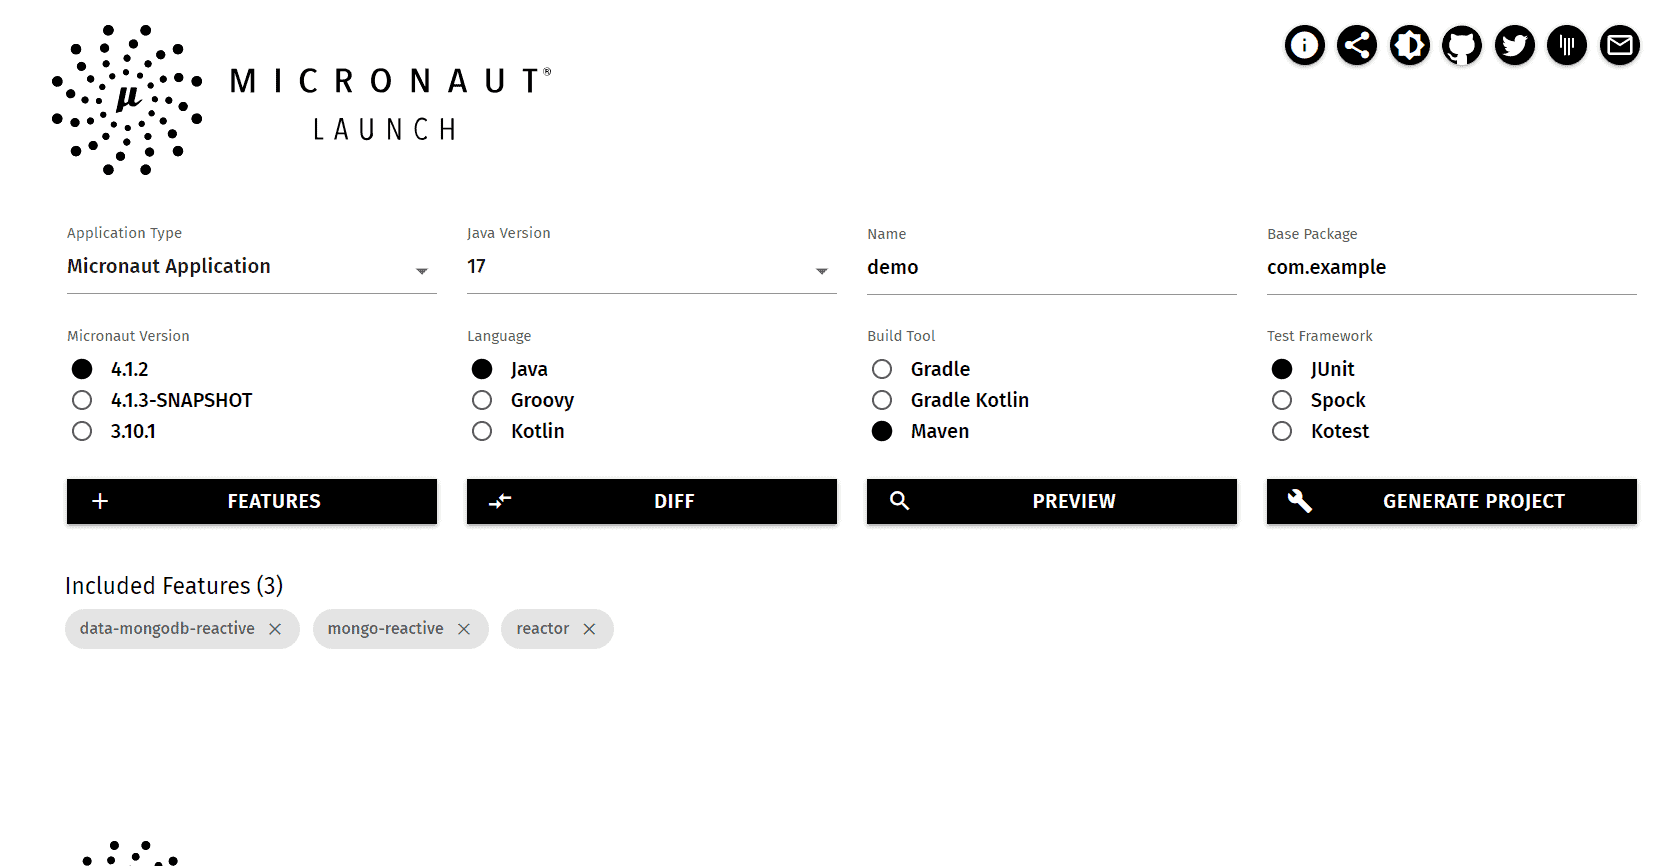
Let’s start by creating a new project using Micronaut Launch. We’ll select the settings below:
- Application Type: Micronaut Application
- Java Version: 17
- Build Tool: Maven
- Language: Java
- Test Framework: JUnit
Additionally, we need to provide the Micronaut version, base package, and a name for our project. To include MongoDB and reactive support, we’ll add the following features:
- reactor – to enable reactive support.
- mongo-reactive – to enable MongoDB Reactive Streams support.
- data-mongodb-reactive – to enable reactive MongoDB repositories.
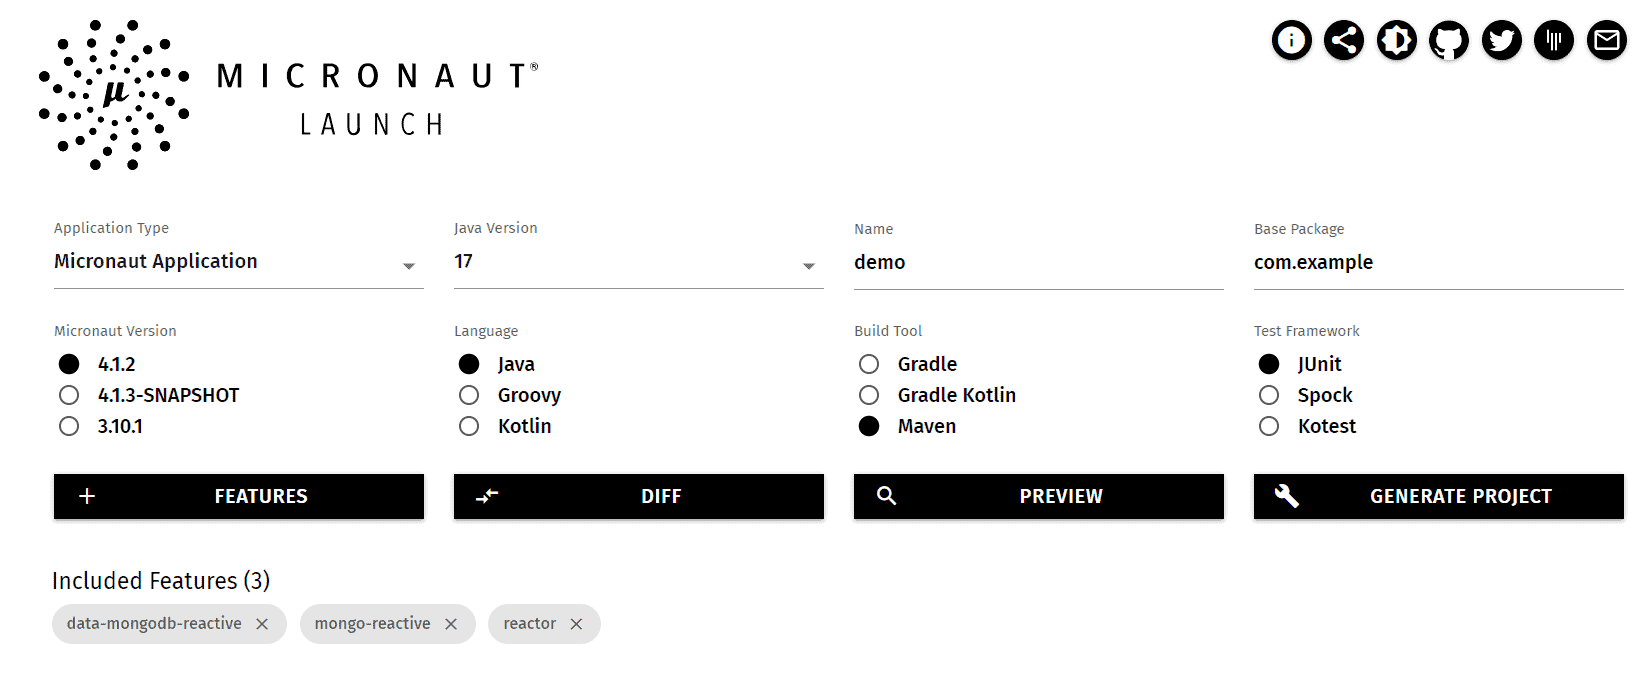
Once we’ve selected the above features, we can generate and download the project. Then, we can import the project into our IDE.
2.2. MongoDB Setup
There are multiple ways to set up a MongoDB database. For instance, we may install MongoDB locally, use a cloud service like MongoDB Atlas, or use a Docker container.
After this, we need to configure the connection details in the already generated application.properties file:![]()
mongodb.uri=mongodb://${MONGO_HOST:localhost}:${MONGO_PORT:27017}/someDb
Here, we have added the default host and port for the database as localhost and 27017 respectively.
3. Entities
Now that we have our project set up, let’s look at how to create entities. We’ll create a Book entity that maps to a collection in the database:
@Serdeable
@MappedEntity
public class Book {
    @Id
    @Generated
    @Nullable
    private ObjectId id;
    private String title;
    private Author author;
    private int year;
}
The @Serdeable annotation indicates that the class can be serialized and deserialized. Since we’ll pass this entity in our request and response, it needs to be made serializable. This is the same as implementing the Serializable interface.
To map the class to a database collection, we use the @MappedEntity annotation. While writing or reading from the database, Micronaut uses this class to convert the database document into a Java object and vice-versa. This is parallel to the @Document annotation in Spring Data MongoDB.
We annotate the id field with @Id to indicate that it’s the primary key for the entity. Additionally, we annotate it with @Generated to indicate that the database generates the value. The @Nullable annotation is used to indicate that the field can be null as the id field will be null when the entity is created.
Similarly, let’s create an Author entity:![]()
@Serdeable
public class Author {
    private String firstName;
    private String lastName;
}
We don’t need to annotate this class with @MappedEntity as it will be embedded in the Book entity.
4. Repositories
Next, let’s create a repository to store and retrieve the books from the MongoDB database. Micronaut provides several pre-defined interfaces to create repositories.
We’ll use the ReactorCrudRepository interface to create a reactive repository. This interface extends the CrudRepository interface and adds support for reactive streams.
Additionally, we’ll annotate the repository with @MongoRepository to indicate that it’s a MongoDB repository. This also directs Micronaut to create a bean for this class:![]()
@MongoRepository
public interface BookRepository extends ReactorCrudRepository<Book, ObjectId> {
    @MongoFindQuery("{year: {$gt: :year}}")
    Flux<Book> findByYearGreaterThan(int year);
}
We’ve extended the ReactorCrudRepository interface and provided the Book entity and the type of the ID as generic parameters.
Micronaut generates an implementation of the interface at compile time. It contains methods to save, retrieve, and delete books from the database. We’ve added a custom method to find books published after a given year. The @MongoFindQuery annotation is used to specify a custom query.
In our query, we use the :year placeholder to indicate that the value will be provided at runtime. The $gt operator is similar to the > operator in SQL.
5. Services
Services are employed to encapsulate the business logic and are typically injected into the controllers. Additionally, they may encompass other functionalities such as validation, error handling, and logging.
We’ll create a BookService using the BookRepository to store and retrieve books:
@Singleton
public class BookService {
    private final BookRepository bookRepository;

    public BookService(BookRepository bookRepository) {
        this.bookRepository = bookRepository;
    }

    public ObjectId save(Book book) {
        Book savedBook = bookRepository.save(book).block();
        return null != savedBook ? savedBook.getId() : null;
    }

    public Book findById(String id) {
        return bookRepository.findById(new ObjectId(id)).block();
    }

    public ObjectId update(Book book) {
        Book updatedBook = bookRepository.update(book).block();
        return null != updatedBook ? updatedBook.getId() : null;
    }

    public Long deleteById(String id) {
        return bookRepository.deleteById(new ObjectId(id)).block();
    }


    public Flux<Book> findByYearGreaterThan(int year) {
        return bookRepository.findByYearGreaterThan(year);
    }
}
Here, we inject the BookRepository into the constructor using the constructor injection. The @Singleton annotation indicates that only one instance of the service will be created. This is similar to the @Component annotation of Spring Boot.
Next, we have the save(), findById(), update(), and deleteById() methods to save, find, update, and delete books from the database. The block() method blocks the execution until the result is available.
Finally, we have a findByYearGreaterThan() method to find books published after a given year.
6. Controllers
Controllers are used to handle the incoming requests and return the response. In Micronaut, we can use annotations to create controllers and configure routing based on different paths and HTTP methods.
6.1. Controller
We’ll create a BookController to handle the requests related to books:
@Controller("/books")
public class BookController {

    private final BookService bookService;

    public BookController(BookService bookService) {
        this.bookService = bookService;
    }

    @Post
    public String createBook(@Body Book book) {
        @Nullable ObjectId bookId = bookService.save(book);
        if (null == bookId) {
            return "Book not created";
        } else {
            return "Book created with id: " + bookId.getId();
        }
    }

    @Put
    public String updateBook(@Body Book book) {
        @Nullable ObjectId bookId = bookService.update(book);
        if (null == bookId) {
            return "Book not updated";
        } else {
            return "Book updated with id: " + bookId.getId();
        }
    }
}
We have annotated the class with @Controller to indicate it is a controller. We have also specified the base path for the controller as /books.
Let’s look at some important parts of the controller:
- First, we inject the BookService into the constructor.
- Then, we have a createBook() method to create a new book. The @Post annotation indicates the method handles the POST requests.
- Since we want to convert the incoming request body to a Book object, we’ve used the @Body annotation.
- When the book is saved successfully, an ObjectId will be returned. We’ve used the @Nullable annotation to indicate that the value can be null in case the book isn’t saved.
- Similarly, we have an updateBook() method to update an existing book. We used the @Put annotation since the method handles the PUT requests.
- The methods return a string response indicating whether the book was created or updated successfully.
6.2. Path Variables
To extract values from the path, we can use path variables. To demonstrate this, let’s add methods to find and delete a book by its ID:![]()
@Delete("/{id}")
public String deleteBook(String id) {
    Long bookId = bookService.deleteById(id);
    if (0 == bookId) {
        return "Book not deleted";
    } else {
        return "Book deleted with id: " + bookId;
    }
}

@Get("/{id}")
public Book findById(@PathVariable("id") String identifier) {
    return bookService.findById(identifier);
}
Path variables are indicated using curly braces in the path. In this example, {id} is a path variable that will be extracted from the path and passed to the method.
By default, the name of the path variable should match the name of the method parameter. This is the case with the deleteBook() method. In case it doesn’t match, we can use the @PathVariable annotation to specify a different name for the path variable. This is the case with the findById() method.
6.3. Query Parameters
We can use query parameters to extract values from the query string. Let’s add a method to find books published after a given year:
@Get("/published-after")
public Flux<Book> findByYearGreaterThan(@QueryValue("year") int year) {
    return bookService.findByYearGreaterThan(year);
}
@QueryValue indicates that the value will be provided as a query parameter. Additionally, we need to specify the query parameter’s name as the annotation’s value.
When we make a request to this method, we’ll append a year parameter to the URL and provide its value.
7. Testing
We can test the application using either curl or an application like Postman. Let’s use curl to test the application.
7.1. Create a Book
Let’s create a book using a POST request:![]()
curl --request POST \
  --url http://localhost:8080/books \
  --header 'Content-Type: application/json' \
  --data '{
    "title": "1984",
    "year": 1949,
    "author": {
        "firstName": "George",
        "lastName": "Orwel"
    }
  }'
First, we use the -request POST option to indicate that the request is a POST request. Then we provide headers using the -header option. Here, we set the content type as application/json. Finally, we have used the -data option to specify the request body.
Here’s a sample response:
Book created with id: 650e86a7f0f1884234c80e3f
7.2. Find a Book
Next, let’s find the book we just created:
curl --request GET \
  --url http://localhost:8080/books/650e86a7f0f1884234c80e3f
This returns the book with the ID 650e86a7f0f1884234c80e3f .
7.3. Update a Book
Next, let’s update the book. We have a typo in the author’s last name. So let’s fix it:![]()
curl --request PUT \
  --url http://localhost:8080/books \
  --header 'Content-Type: application/json' \
  --data '{
	"id": {
	    "$oid": "650e86a7f0f1884234c80e3f"
	},
	"title": "1984",
	"author": {
	    "firstName": "George",
	    "lastName": "Orwell"
	},
	"year": 1949
}'
If we try to find the book again, we’ll see that the author’s last name is now Orwell.
7.4. Custom Query
Next, let’s find all the books published after 1940:
curl --request GET \
  --url 'http://localhost:8080/books/published-after?year=1940'
When we execute this command, it calls our API and returns a list of all the books published after 1940 in a JSON array:
[
    {
        "id": {
            "$oid": "650e86a7f0f1884234c80e3f"
        },
        "title": "1984",
        "author": {
            "firstName": "George",
            "lastName": "Orwell"
        },
        "year": 1949
    }
]
Similarly, if we try to find all the books published after 1950, we’ll get an empty array:
curl --request GET \
  --url 'http://localhost:8080/books/published-after?year=1950'
[]
8. Error Handling
Next, let’s look at a few ways to handle errors in the application. We’ll look at two common scenarios:
- The book isn’t found when trying to get, update, or delete it.
- Wrong input is provided when creating or updating a book.
8.1. Bean Validation
Firstly, let’s look at how to handle wrong input. For this, we can use the Bean Validation API of Java.
Let’s add a few constraints to the Book class:![]()
public class Book {
    @NotBlank
    private String title;
    @NotNull
    private Author author;
    // ...
}
The @NotBlank annotation indicates that the title cannot be blank. Similarly, we use the @NotNull annotation to indicate that the author cannot be null.
Then, to enable input validation in our controller, we need to use the @Valid annotation:
@Post
public String createBook(@Valid @Body Book book) {
    // ...
}
When the input is invalid, the controller returns a 400 Bad Request response with a JSON body containing the details of the error:
{
    "_links": {
        "self": [
            {
                "href": "/books",
                "templated": false
            }
        ]
    },
    "_embedded": {
        "errors": [
            {
                "message": "book.author: must not be null"
            },
            {
                "message": "book.title: must not be blank"
            }
        ]
    },
    "message": "Bad Request"
}
8.2. Custom Error Handler
In the above example, we can see how Micronaut handles errors by default. However, if we want to change this behavior, we can create a custom error handler.
Since the validation errors are instances of the ConstraintViolation class, let’s create a custom error handling method that handles ConstraintViolationException:
@Error(exception = ConstraintViolationException.class)
public MutableHttpResponse<String> onSavedFailed(ConstraintViolationException ex) {
    return HttpResponse.badRequest(ex.getConstraintViolations().stream()
      .map(cv -> cv.getPropertyPath() + " " + cv.getMessage())
      .toList().toString());
}
When any controller throws a ConstraintViolationException, Micronaut invokes this method. It then returns a 400 Bad Request response with a JSON body containing the details of the error:
[
    "createBook.book.author must not be null",
    "createBook.book.title must not be blank"
]
8.3. Custom Exception
Next, let’s look at how to handle the case when the book isn’t found. In this case, we can create a custom exception:
public class BookNotFoundException extends RuntimeException {
    public BookNotFoundException(long id) {
        super("Book with id " + id + " not found");
    }
}
We can then throw this exception from the controller:
@Get("/{id}")
public Book findById(@PathVariable("id") String identifier) throws BookNotFoundException {
    Book book = bookService.findById(identifier);
    if (null == book) {
        throw new BookNotFoundException(identifier);
    } else {
        return book;
    }
}
When the book isn’t found, the controller throws a BookNotFoundException.
Finally, we can create a custom error-handling method that handles BookNotFoundException:
@Error(exception = BookNotFoundException.class)
public MutableHttpResponse<String> onBookNotFound(BookNotFoundException ex) {
    return HttpResponse.notFound(ex.getMessage());
}
When a non-existing book ID is provided, the controller returns a 404 Not Found response with a JSON body containing the details of the error:
Book with id 650e86a7f0f1884234c80e3f not found
9. Conclusion
In this article, we looked at how to create a REST API using Micronaut and MongoDB. First, we looked at how to create a MongoDB repository, a simple controller, and how to use path variables and query parameters. Then, we tested the application using curl. Finally, we looked at how to handle errors in the controllers.
The complete source code for the application is available over on GitHub.