

1. Introduction
A healthy system is supposed to have enough free disk resources to stay operational. It is generally preferable that at least some percentage of the disk capacity remains free most of the time. When disk space is exhausted, a No space left on device system message in program output or log file will tell us that the problem is there.
In this article, we focus on methods of tracking down where space has gone. That eventually will allow us to perform some cleaning or archiving.
We’ll discuss possible approaches with some practical examples.
2. Starting Point
As a rule, disk resources consist of several partitions, each assigned to a mount point directory. That is why it’s a good idea to narrow the search down to one partition or mount point only. Unless we already know the partition or directory, we can use the df command to determine the partition for investigation:
# df -h
Filesystem               Size  Used Avail Use% Mounted on
/dev/mapper/centos-root  4.8G   58M  4.5G   2% /
/dev/mapper/centos-home  4.8G  925M  3.7G  20% /home
/dev/mapper/centos-var   3.2G  3.1G  122M  96% /var
From the output above, we see that the /var partition is nearing its capacity limit. Therefore, it is likely the one that should be investigated.
3. CLI Approach
3.1. du Command
The first and most used command that can calculate and report the usage statistic is du, short for “disk usage”. Its purpose is to calculate and report the size of the directory passed as an argument, along with all its subdirectories.
# du /varRunning it like that with no options, however, will likely result in a long unsorted output where we hardly get a clear indication of where the problem is. Rather, we want to get a top 5 list instead. For that, we can add some options to the du command and use sort and tail commands to get the desired form:
##    1    2                  3         4
##    v    v                  v         v
# du -BM --max-depth=1 /var | sort -n | tail -n 5
73M     /var/www
108M    /var/lib
346M    /var/cache
1860M   /var/log
2387M   /var
Here is the explanation for each numbered point:
- –B option is used to specify the block size unit (Megabyte in this case)
- –max-depth=1 aggregates the calculation results by the first level of subdirectories
- sort utility is used for sorting the output of the du command, and the -n option makes it treat strings as numbers
- tail with the -n option cuts the output, leaving only the last five lines
We noticed that the /var/log directory seems to be the main offender. We can get more details on it by increasing the depth:
# du -BM --max-depth=<strong>2</strong> /var | sort -n | tail -n 5
345M    /var/cache/yum
346M    /var/cache
637M    /var/log/httpd
1861M   /var/log
2388M   /var
Also, we can pass a deeper level directory /var/log to du instead of just /var:
# du -BM --max-depth=1 /var/log | sort -n | tail -n 5
1M    /var/log/vmware-imc
4M    /var/log/anaconda
34M   /var/log/audit
637M  /var/log/httpd
1861M /var/log
As we see, /var/log/httpd is the consumption leader. That’s the directory where the Apache HTTP server keeps its log files. Perhaps a log rotation needs to be configured, or the log level should be decreased.
By further combining the target directory and depth, we can make our search more precise.
3.2. find Command
Sometimes, we can make assumptions on what kind of data could consume the disk space the most.
For example, we know that the system can create big archived files. In that case, instead of gathering general usage statistics, we can address our search to file size directly. This is where the find command can be an alternative to du.
When the system is running out of space, finding and removing a couple of big files can be a quick fix. Let’s assume we want to find files greater than 100M.
For that, we use the -size option along with the -printf option. In the example below, the latter option prints out the file size in bytes and the file path. Here again, like in the du examples above, we pass the output to the sort -n command to get the list ordered by file size:
# find /var -size +100M -printf '%s %p\n' | sort -n
104958094 /var/log/iptables.log
104958282 /var/log/kern
235536682 /var/log/secure
241433352 /var/log/httpd/ssl-error.log.20191022.gz
277761696 /var/log/messages
3.3. Deleted Files Still Using Space
Under certain circumstances, the system does not report space used by deleted files as free. The reason is that file descriptors can still be open by some process.
For example, an application log file can be deleted by the user while the application is still running. This does not physically remove the file, and the application keeps on writing to that file. However, the file can no longer be seen by either ls or a file manager.
Here is where the lsof utility can help. It shows file descriptors associated with processes and reports files marked deleted. A practical example command may look like:
# lsof | grep -E '^COM|deleted'
COMMAND   PID   TID   USER   FD    TYPE       DEVICE    SIZE/OFF     NODE NAME
httpd     334         root   10w    REG   182,249585   231932418   527588 /var/log/httpd/error.log (deleted)
Here we can see that the deleted /var/log/httpd/error.log still uses more than 200 MB of space. To release it, we should stop or restart the httpd process.
4. TUI Approach
The CLI approach described above can be used on most Linux systems. Even on minimal system installations, du and find are nearly always available.
If, however, the system installation is more than just minimal, or administration permission to install new software is granted, the TUI approach may be preferred. TUI applications allow interacting with the full terminal screen area by using shortcuts and mouse, thus making the interaction more convenient and user-friendly. Commands mentioned below are available from repositories of many Linux platforms and can be installed by native system package managers.
4.1. Midnight Commander File Manager
mc is one of the oldest file managers available in all Linux distributions, and it has an inbound option for calculating disk usage. We can visually select a folder or files and then Ctrl-Space shortcut to get the usage summary. Directory names can be specified as arguments:
# mc /var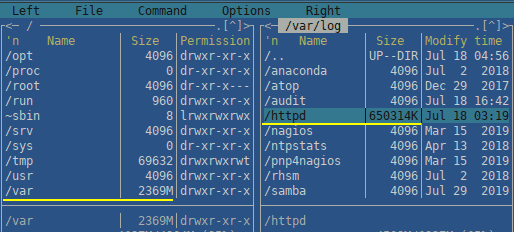
4.2. ncdu Command
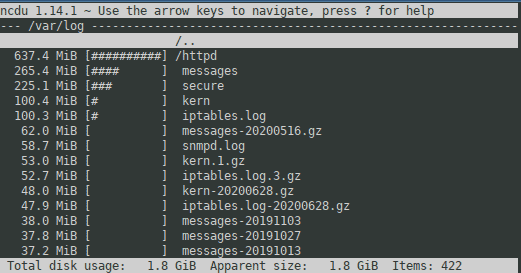
ncdu is another tool that has a friendly visual text interface. We specify the starting directory the same way we did for du above:
# ncdu /varOnce the search is finished, we get a summary sorted in descending order:
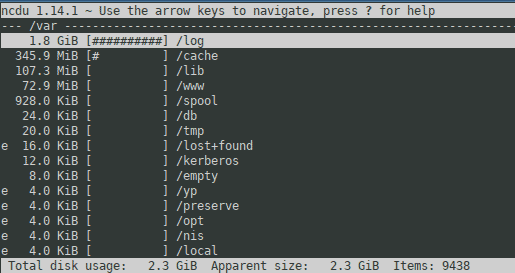
Then we can interact with the screen using arrow keys and Enter to get more details, or use the d shortcut to delete files in-place without leaving the program:
5. Сonclusion
In this tutorial, we’ve looked at several ways of finding disk consumption points so that we can free up disk space. Each of them can be applied, depending on what programs are available on the system, and how quickly or accurately we need to locate these space-consuming elements of the file system.