1. Overview
The HTTP/2 protocol comes with a push feature that allows the server to send multiple resources to the client for a single request. Hence, it improves the loading time of the page by reducing the multiple round-trips needed to fetch all the resources.
Jetty supports the HTTP/2 protocol for both client and server implementations.
In this tutorial, we’ll explore HTTP/2 support in Jetty and create a Java web application to examine the HTTP/2 Push feature.
2. Getting Started
2.1. Downloading Jetty
Jetty requires JDK 8 or later and ALPN (Application-Layer Protocol Negotiation) support for running HTTP/2.
Typically, the Jetty server is deployed over SSL and enables the HTTP/2 protocol via the TLS extension (ALPN).
First, we’ll need to download the latest Jetty distribution and set the JETTY_HOME variable.
2.2. Enabling the HTTP/2 Connector
Next, we can use a Java command to enable the HTTP/2 connector on the Jetty server:
java -jar $JETTY_HOME/start.jar --add-to-start=http2
This command adds HTTP/2 protocol support to the SSL connector on port 8443. Also, it transitively enables the ALPN module for protocol negotiation:
INFO  : server          transitively enabled, ini template available with --add-to-start=server
INFO  : alpn-impl/alpn-1.8.0_131 dynamic dependency of alpn-impl/alpn-8
INFO  : alpn-impl       transitively enabled
INFO  : alpn            transitively enabled, ini template available with --add-to-start=alpn
INFO  : alpn-impl/alpn-8 dynamic dependency of alpn-impl
INFO  : http2           initialized in ${jetty.base}/start.ini
INFO  : ssl             transitively enabled, ini template available with --add-to-start=ssl
INFO  : threadpool      transitively enabled, ini template available with --add-to-start=threadpool
INFO  : bytebufferpool  transitively enabled, ini template available with --add-to-start=bytebufferpool
INFO  : Base directory was modified
Here, the logs show the information of modules like ssl and alpn-impl/alpn-8 that are transitively enabled for the HTTP/2 connector.
2.3. Starting the Jetty Server
Now, we’re ready to start the Jetty server:
java -jar $JETTY_HOME/start.jar
When the server starts, the logging will show the modules that are enabled:
INFO::main: Logging initialized @228ms to org.eclipse.jetty.util.log.StdErrLog
...
INFO:oejs.AbstractConnector:main: Started ServerConnector@42dafa95{SSL, (ssl, alpn, h2)}{0.0.0.0:8443}
INFO:oejs.Server:main: Started @872ms
2.4. Enabling Additional Modules
Similarly, we can enable other modules like http and http2c:
java -jar $JETTY_HOME/start.jar --add-to-start=http,http2c
Let’s verify the logs:
INFO:oejs.AbstractConnector:main: Started ServerConnector@6adede5{SSL, (ssl, alpn, h2)}{0.0.0.0:8443}
INFO:oejs.AbstractConnector:main: Started ServerConnector@dc24521{HTTP/1.1, (http/1.1, h2c)}{0.0.0.0:8080}
INFO:oejs.Server:main: Started @685ms
Also, we can list all the modules provided by Jetty:
java -jar $JETTY_HOME/start.jar --list-modules
The output will look like:
Available Modules:
==================
tags: [-internal]
Modules for tag '*':
--------------------
     Module: alpn
           : Enables the ALPN (Application Layer Protocol Negotiation) TLS extension.
     Depend: ssl, alpn-impl
        LIB: lib/jetty-alpn-client-${jetty.version}.jar
        LIB: lib/jetty-alpn-server-${jetty.version}.jar
        XML: etc/jetty-alpn.xml
    Enabled: transitive provider of alpn for http2
    // ...

Modules for tag 'connector':
----------------------------
     Module: http2
           : Enables HTTP2 protocol support on the TLS(SSL) Connector,
           : using the ALPN extension to select which protocol to use.
       Tags: connector, http2, http, ssl
     Depend: ssl, alpn
        LIB: lib/http2/*.jar
        XML: etc/jetty-http2.xml
    Enabled: ${jetty.base}/start.ini
    // ...

Enabled Modules:
================
    0) alpn-impl/alpn-8 dynamic dependency of alpn-impl
    1) http2           ${jetty.base}/start.ini
    // ...
2.5. Additional Configuration
Similar to the –list-modules argument, we can use –list-config to list all the XML config files for each module:
java -jar $JETTY_HOME/start.jar --list-config
To configure the common properties like host and port for the Jetty server, we can make changes in the start.ini file:
jetty.ssl.host=0.0.0.0
jetty.ssl.port=8443
jetty.ssl.idleTimeout=30000
Also, there are a few http2 properties like maxConcurrentStreams and maxSettingsKeys that we can configure:
jetty.http2.maxConcurrentStreams=128
jetty.http2.initialStreamRecvWindow=524288
jetty.http2.initialSessionRecvWindow=1048576
jetty.http2.maxSettingsKeys=64
jetty.http2.rateControl.maxEventsPerSecond=20
3. Setting Up a Jetty Server Application
3.1. Maven Configuration
Now that we’ve got Jetty configured, it’s time to create our application.
Let’s add the jetty-maven-plugin Maven plugin to our pom.xml along with Maven dependencies like http2-server, jetty-alpn-openjdk8-server, and jetty-servlets:
<build>
    <plugins>
        <plugin>
            <groupId>org.eclipse.jetty</groupId>
            <artifactId>jetty-maven-plugin</artifactId>
            <version>9.4.27.v20200227</version>
            <dependencies>
                <dependency>
                    <groupId>org.eclipse.jetty.http2</groupId>
                    <artifactId>http2-server</artifactId>
                    <version>9.4.27.v20200227</version>
                </dependency>
                <dependency>
                    <groupId>org.eclipse.jetty</groupId>
                    <artifactId>jetty-alpn-openjdk8-server</artifactId>
                    <version>9.4.27.v20200227</version>
                </dependency>
                <dependency>
                    <groupId>org.eclipse.jetty</groupId>
                    <artifactId>jetty-servlets</artifactId>
                    <version>9.4.27.v20200227</version>
                </dependency>
            </dependencies>
        </plugin>
    </plugins>
</build>
Then, we’ll compile the classes using the Maven command:
mvn clean package
And lastly, we can deploy our unassembled Maven app to the Jetty server:
mvn jetty:run-forked
By default, the server starts on port 8080 with the HTTP/1.1 protocol:
oejmp.Starter:main: Started Jetty Server
oejs.AbstractConnector:main: Started ServerConnector@4d910fd6{HTTP/1.1, (http/1.1)}{0.0.0.0:8080}
oejs.Server:main: Started @1045ms
Next, we’ll configure the Jetty server with the HTTP/2 protocol in our jetty.xml file by adding the appropriate Call element:
<?xml version="1.0" encoding="UTF-8"?>
<!DOCTYPE Configure PUBLIC "-//Jetty//Configure//EN" "http://www.eclipse.org/jetty/configure_9_0.dtd">
<Configure id="Server" class="org.eclipse.jetty.server.Server">
    <!-- sslContextFactory and httpConfig configs-->

    <Call name="addConnector">
        <Arg>
            <New class="org.eclipse.jetty.server.ServerConnector">
                <Arg name="server"><Ref id="Server"/></Arg>
                <Arg name="factories">
                    <Array type="org.eclipse.jetty.server.ConnectionFactory">
                        <Item>
                            <New class="org.eclipse.jetty.server.SslConnectionFactory">
                                <Arg name="sslContextFactory"><Ref id="sslContextFactory"/></Arg>
                                <Arg name="next">alpn</Arg>
                            </New>
                        </Item>
                        <Item>
                            <New class="org.eclipse.jetty.alpn.server.ALPNServerConnectionFactory">
                                <Arg>h2</Arg>
                            </New>
                        </Item>
                        <Item>
                            <New class="org.eclipse.jetty.http2.server.HTTP2ServerConnectionFactory">
                                <Arg name="config"><Ref id="httpConfig"/></Arg>
                            </New>
                        </Item>
                    </Array>
                </Arg>
                <Set name="port">8444</Set>
            </New>
        </Arg>
    </Call>

    <!-- other Call elements -->
</Configure>
Here, the HTTP/2 connector is configured with ALPN on port 8444 along with sslContextFactory and httpConfig configs.
Also, we can add other modules like h2-17 and h2-16 (draft versions of h2) by defining comma-separated arguments in jetty.xml:
<Item>
    <New class="org.eclipse.jetty.alpn.server.ALPNServerConnectionFactory">
        <Arg>h2,h2-17,h2-16</Arg>
    </New>
</Item>
Then, we’ll configure the location of the jetty.xml in our pom.xml:
<plugin>
    <groupId>org.eclipse.jetty</groupId>
    <artifactId>jetty-maven-plugin</artifactId>
    <version>9.4.27.v20200227</version>
    <configuration>
        <stopPort>8888</stopPort>
        <stopKey>quit</stopKey>
        <jvmArgs>
            -Xbootclasspath/p:
            ${settings.localRepository}/org/mortbay/jetty/alpn/alpn-boot/8.1.11.v20170118/alpn-boot-8.1.11.v20170118.jar
        </jvmArgs>
        <jettyXml>${basedir}/src/main/config/jetty.xml</jettyXml>
        <webApp>
            <contextPath>/</contextPath>
        </webApp>
    </configuration>
    ...
</plugin>
Note: To enable HTTP/2 in our Java 8 app, we’ve added the alpn-boot jar to the JVM BootClasspath. However, ALPN support is already available in Java 9 or later.
Let’s re-compile our classes and re-run the application to verify if the HTTP/2 protocol is enabled:
oejmp.Starter:main: Started Jetty Server
oejs.AbstractConnector:main: Started ServerConnector@6fadae5d{SSL, (ssl, http/1.1)}{0.0.0.0:8443}
oejs.AbstractConnector:main: Started ServerConnector@1810399e{SSL, (ssl, alpn, h2)}{0.0.0.0:8444}
Here, we can observe that port 8443 is configured with the HTTP/1.1 protocol and 8444 with HTTP/2.
Next, we need a filter that pushes the secondary resources like images, JavaScript, and CSS to the client.
To do so, we can use the PushCacheFilter class available in the org.eclipse.jetty.servlets package. PushCacheFilter builds a cache of secondary resources associated with a primary resource like index.html and pushes them to the client.
Let’s configure the PushCacheFilter in our web.xml:
<filter>
    <filter-name>push</filter-name>
    <filter-class>org.eclipse.jetty.servlets.PushCacheFilter</filter-class>
    <init-param>
        <param-name>ports</param-name>
        <param-value>8444</param-value>
    </init-param>
</filter>
<filter-mapping>
    <filter-name>push</filter-name>
    <url-pattern>/*</url-pattern>
</filter-mapping>
Then, we’ll create the Http2JettyServlet class to access the images, and we’ll add the servlet-mapping in our web.xml file:
<servlet>
    <servlet-name>http2Jetty</servlet-name>
    <servlet-class>com.baeldung.jetty.http2.Http2JettyServlet</servlet-class>
</servlet>
<servlet-mapping>
    <servlet-name>http2Jetty</servlet-name>
    <url-pattern>/images/*</url-pattern>
</servlet-mapping>
4. Setting up the HTTP/2 Client
Finally, to verify the HTTP/2 Push feature and the improved page-load time, we’ll create an http2.html file that loads a few images (secondary resources):
<!DOCTYPE html>
<html>
<head>
    <title>Baeldung HTTP/2 Client in Jetty</title>
</head>
<body>
    <h2>HTTP/2 Demo</h2>
    <div>
        <img src="images/homepage-latest_articles.jpg" alt="latest articles" />
        <img src="images/homepage-rest_with_spring.jpg" alt="rest with spring" />
        <img src="images/homepage-weekly_reviews.jpg" alt="weekly reviews" />
    </div>
</body>
</html>
5. Testing the HTTP/2 Client
To get a baseline for the page-load time, let’s access the HTTP/1.1 application at https://localhost:8443/http2.html with the Developer Tools to verify the protocol and load time:
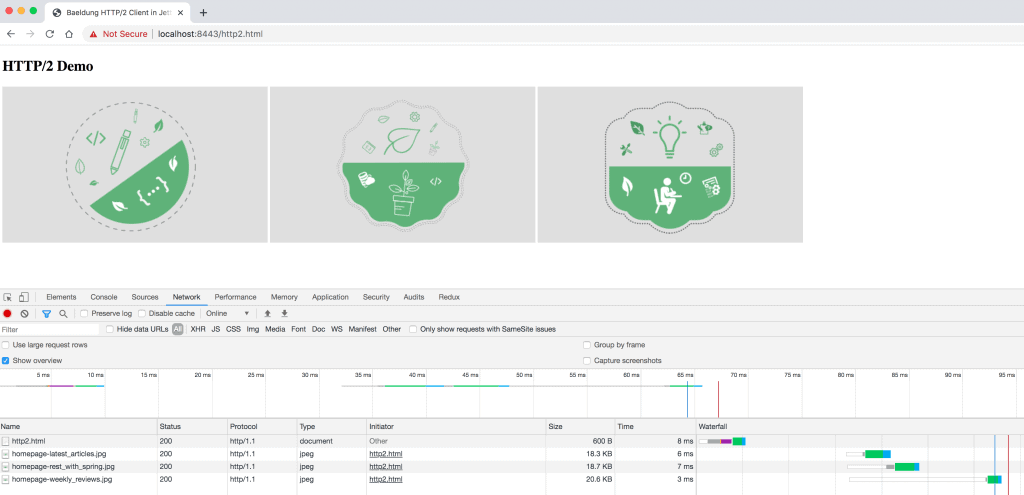
Here, we can observe that the images are loaded in 3-6ms using the HTTP/1.1 protocol.
Then, we’ll access the HTTP/2 application, which has Push enabled, at https://localhost:8444/http2.html:
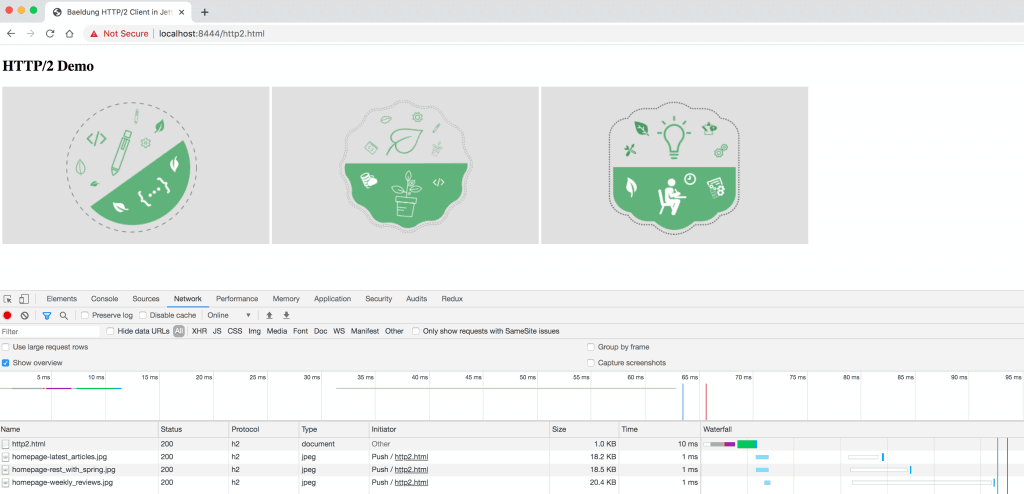
Here, we observe that the protocol is h2, the initiator is Push, and the loading time is 1ms for all the images (secondary resources).
Therefore, the PushCacheFilter caches the secondary resources for http2.html, pushes them on port 8444, and provides a great improvement in the load time of the page.
6. Conclusion
In this tutorial, we’ve explored HTTP/2 in Jetty.
First, we examined how to start Jetty with the HTTP/2 protocol along with its configurations.
Then, we’ve seen a Java 8 web application with the HTTP/2 Push feature, configured with a PushCacheFilter, and observed how the load time of a page containing secondary resources improved over what we saw with the HTTP/1.1 protocol.
As usual, all the code implementations are available over on GitHub.


