1. Introduction
In this tutorial, we’ll present the concept of Kubernetes operators and how we can implement them using the Java Operator SDK. To illustrate this, we’ll implement an operator that simplifies the task of deploying an instance of the OWASP’s Dependency-Track application to a cluster.
2. What Is a Kubernetes Operator?
In Kubernetes parlance, an Operator is a software component, usually deployed in a cluster, that manages the lifecycle of a set of resources. It extends the native set of controllers, such as replicaset and job controllers, to manage complex or interrelated components as a single-managed unit.
Let’s look at a few common use cases where operators are used:
- Enforce best practices when deploying applications to a cluster
- Keep track and recover from accidentally removing/changing resources used by an application
- Automate housekeeping tasks associated with an application, such as regular backups and cleanups
- Automate off-cluster resource provisioning — for example, storage buckets and certificates
- Improve application developers’ experience when interacting with Kubernetes in general
- Improve overall security by allowing users to manage only application-level resources instead of low-level ones such as pods and deployments
- Expose application-specific resources (a.k.a. Custom Resource Definitions) as Kubernetes resources
This last use case is quite interesting. It allows a solution provider to leverage the existing practices around regular Kubernetes resources to manage application-specific resources. The main benefit is that anyone adopting this application can use existing infrastructure-as-code tools.
To give us an idea of the different kinds of available operators, we can check the OperatorHub.io site. There, we’ll find operators for popular databases, API managers, development tools, and others.
3. Operators and CRDs
Custom Resource Definitions, or CRDs for short, are a Kubernetes extension mechanism that allows us to store structured data in a cluster. As with almost everything on this platform, the CRD definition itself is also a resource.
This meta-definition describes the scope of a given CRD instance (namespace-based or global) and the schema used to validate CRD instances. Once registered, users can create CRD instances as if they were native ones. Cluster administrators can also include CRDs as part of role definitions, thus granting access only to authorized users and applications.
Now, registering a CRD on itself does not imply that Kubernetes will use it in any way. As far as Kubernetes is concerned, a CRD instance is just an entry in its internal database. Since none of the standard Kubernetes native controllers know what to do with it, nothing will happen.
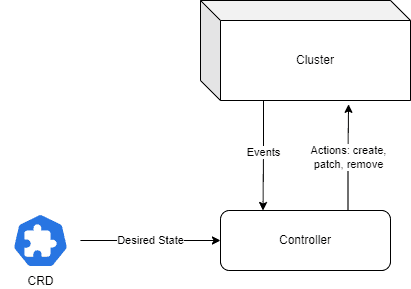
This is where the controller part of an operator comes into play. Once deployed, it will watch for events related to the corresponding custom resources and act in response to them.
Here, the act part is the important one. The terminology is inspired by Control Theory, which can be summarized in the following diagram:
4. Implementing an Operator
Let’s review the main tasks we have to complete to create an Operator:
- Define a model of the target resources we’ll manage through the operator
- Create a CRD that captures the required parameters needed to deploy those resources
- Create a controller that watches a cluster for events related to the registered CRD
For this tutorial, we’ll implement an operator for the OWASP flagship project, Dependency-Track. This application allows users to track vulnerabilities in libraries used across an organization, thus allowing software security professionals to evaluate and address any issues found.
Dependency-Track’s Docker distribution consists of two components: API and frontend services, each with its own image. When deploying them to a Kubernetes cluster, the common practice is to wrap each one in a Deployment to manage the Pods that run these images.
That’s not all, however. We also need a few extra resources for a complete solution:
- Services to act as load balancers in front of each Deployment
- An Ingress to expose the application to the external world
- A Persistent Volume claim to store vulnerability definitions downloaded from public sources
- ConfigMap and Secret resources to store generic and sensitive parameters, respectively
Moreover, we also need to properly set liveness/readiness probes, resource limits, and other minutiae that a regular user should not be concerned about.
Let’s see how we can simplify this task with an Operator.
5. Defining the Model
Our operator will focus on the minimal set of resources needed to run a Dependency-Track system. Fortunately, the provided images have sensible default values, so we only need one piece of information: the external URL used to access the application.
This leaves database and storage settings out for now, but once we get the basics right, adding those features is straightforward.
We will, however, leave some leeway for customization. In particular, it’s convenient to allow users to override the image and version used for the deployments, as they’re constantly evolving.
Let’s see a diagram of a Dependency-Track installation showing all its components:
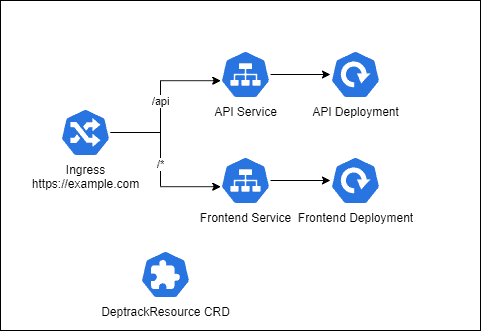
The required model parameters are:
- Kubernetes namespace where the resources will be created
- A name used for the installation and to derive each component name
- The hostname to use with the Ingress resource
- Optional extra annotations to add to the Ingress. We need those as some cloud providers (AWS, for example) require them to work properly.
6. Controller Project Setup
The next step would be to define the CRD schema by hand, but since we’re using the Java Operator SDK, this will be taken care of. Instead, let’s move to the controller project itself.
We’ll start with a standard Spring Boot 3 WebFlux application and add the required dependencies:
<dependency>
    <groupId>io.javaoperatorsdk</groupId>
    <artifactId>operator-framework-spring-boot-starter</artifactId>
    <version>5.4.0</version>
</dependency>

<dependency>
    <groupId>io.javaoperatorsdk</groupId>
    <artifactId>operator-framework-spring-boot-starter-test</artifactId>
    <version>5.4.0</version>
    <scope>test</scope>
    <exclusions>
        <exclusion>
            <groupId>org.apache.logging.log4j</groupId>
            <artifactId>log4j-slf4j2-impl</artifactId>
        </exclusion>
    </exclusions>
</dependency>

<dependency>
    <groupId>io.fabric8</groupId>
    <artifactId>crd-generator-apt</artifactId>
    <version>6.9.2</version>
    <scope>provided</scope>
</dependency>

<dependency>
    <groupId>org.bouncycastle</groupId>
    <artifactId>bcprov-jdk18on</artifactId>
    <version>1.77</version>
</dependency>

<dependency>
    <groupId>org.bouncycastle</groupId>
    <artifactId>bcpkix-jdk18on</artifactId>
    <version>1.77</version>
</dependency>
The latest version of these dependencies is available on Maven Central:
The first two are required to implement and test the operator, respectively. crd-generator-apt is the annotation processor that generates the CRD definition from annotated classes. Finally, the bouncycastle libraries are required to support modern encryption standards.
Notice the exclusion added to the test starter. We’ve removed the log4j dependency because it conflicts with logback.
7. Implementing the Primary Resource
A Primary Resource class represents a CRD that users will deploy into a cluster. It is identified using the @Group and @Version annotations so the CRD annotation processor can generate the appropriate CRD definition at compile-time:
@Group("com.baeldung")
@Version("v1")
public class DeptrackResource extends CustomResource<DeptrackSpec, DeptrackStatus> implements Namespaced {
    @JsonIgnore
    public String getFrontendServiceName() {
        return this.getMetadata().getName() + "-" + DeptrackFrontendServiceResource.COMPONENT;
    }

    @JsonIgnore
    public String getApiServerServiceName() {
        return this.getMetadata().getName() + "-" + DeptrackApiServerServiceResource.COMPONENT;
    }
}
Here, we leverage the SDK’s class CustomResource to implement our DeptrackResource. Besides the base class, we’re also using Namespaced, a marker interface that informs the annotation processor that our CRD instances will be deployed to a Kubernetes namespace.
We’ve added just two helper methods to the class, which we’ll later use to derive names for the frontend and API services. We need the @JsonIgnore annotation, in this case, to avoid issues when serializing/deserializing instances CRD instances in API calls to Kubernetes.
8. Specification and Status Classes
The CustomResource class requires two template parameters:
- A specification class with the parameters supported by our model
- A status class with information about the dynamic state of our system
In our case, we have just a few parameters, so this specification is quite simple:
public class DeptrackSpec {
    private String apiServerImage = "dependencytrack/apiserver";
    private String apiServerVersion = "";

    private String frontendImage = "dependencytrack/frontend";
    private String frontendVersion = "";

    private String ingressHostname;
    private Map<String, String> ingressAnnotations;

    // ... getters/setters omitted
}
As for the status class, we’ll just extend ObservedGenerationAwareStatus:
public class DeptrackStatus extends ObservedGenerationAwareStatus {
}
Using this approach, the SDK will automatically increment the observedGeneration status field on each update. This is a common practice used by controllers to track changes in a resource.
9. Reconciler
Next, we need to create a Reconciler class that is responsible for managing the overall state of the Dependency-Track system. Our class must implement this interface, which takes the resource class as a parameter:
@ControllerConfiguration(dependents = {
    @Dependent(name = DeptrackApiServerDeploymentResource.COMPONENT, type = DeptrackApiServerDeploymentResource.class),
    @Dependent(name = DeptrackFrontendDeploymentResource.COMPONENT, type = DeptrackFrontendDeploymentResource.class),
    @Dependent(name = DeptrackApiServerServiceResource.COMPONENT, type = DeptrackApiServerServiceResource.class),
    @Dependent(name = DeptrackFrontendServiceResource.COMPONENT, type = DeptrackFrontendServiceResource.class),
    @Dependent(type = DeptrackIngressResource.class)
})
@Component
public class DeptrackOperatorReconciler implements Reconciler<DeptrackResource> {
    @Override
    public UpdateControl<DeptrackResource> reconcile(DeptrackResource resource, Context<DeptrackResource> context) throws Exception {
        return UpdateControl.noUpdate();
    }
}
The key point here is the @ControllerConfiguration annotation. Its dependents property lists individual resources whose lifecycle will be linked to the primary resource.
For deployments and services, we need to specify a name property in addition to the resource’s type to distinguish them. As for the Ingress, there’s no need for a name since there’s just one for each deployed Dependency-Track resource.
Notice that we’ve also added a @Component annotation. We need this so the operator’s autoconfiguration logic detects the reconciler and adds it to its internal registry.
10. Dependent Resource Classes
For each resource that we want to create in the cluster as a result of a CRD deployment, we need to implement a KubernetesDependentResource class. These classes must be annotated with @KubernetesDependent and are responsible for managing the lifecycle of those resources in response to changes in the primary resource.
The SDK provides the CRUDKubernetesDependentResource utility class that vastly simplifies this task. We just need to override the desired() method, which returns a description of the desired state for the dependent resource:
@KubernetesDependent(resourceDiscriminator = DeptrackApiServerDeploymentResource.Discriminator.class)
public class DeptrackApiServerDeploymentResource extends CRUDKubernetesDependentResource<Deployment, DeptrackResource> {
    public static final String COMPONENT = "api-server";
    private Deployment template;

    public DeptrackApiServerDeploymentResource() {
        super(Deployment.class);
        this.template = BuilderHelper.loadTemplate(Deployment.class, "templates/api-server-deployment.yaml");
    }

    @Override
    protected Deployment desired(DeptrackResource primary, Context<DeptrackResource> context) {
        ObjectMeta meta = fromPrimary(primary, COMPONENT)
          .build();

        return new DeploymentBuilder(template)
          .withMetadata(meta)
          .withSpec(buildSpec(primary, meta))
          .build();
    }

    private DeploymentSpec buildSpec(DeptrackResource primary, ObjectMeta primaryMeta) {
        return new DeploymentSpecBuilder()
          .withSelector(buildSelector(primaryMeta.getLabels()))
          .withReplicas(1)
          .withTemplate(buildPodTemplate(primary,primaryMeta))
          .build();
    }

    private LabelSelector buildSelector(Map<String, String> labels) {
        return new LabelSelectorBuilder()
          .addToMatchLabels(labels)
          .build();
    }

    private PodTemplateSpec buildPodTemplate(DeptrackResource primary, ObjectMeta primaryMeta) {
        return new PodTemplateSpecBuilder()
          .withMetadata(primaryMeta)
          .withSpec(buildPodSpec(primary))
          .build();
    }

    private PodSpec buildPodSpec(DeptrackResource primary) {
        String imageVersion = StringUtils.hasText(primary.getSpec().getApiServerVersion()) ?
          ":" + primary.getSpec().getApiServerVersion().trim() : "";

        String imageName = StringUtils.hasText(primary.getSpec().getApiServerImage()) ?
          primary.getSpec().getApiServerImage().trim() : Constants.DEFAULT_API_SERVER_IMAGE;

        return new PodSpecBuilder(template.getSpec().getTemplate().getSpec())
          .editContainer(0)
            .withImage(imageName + imageVersion)
            .and()
          .build();
    }
}
In this case, we create Deployment using the available builder classes. The data itself comes partly from metadata extracted from the primary resource passed to the method and from a template read at initialization time. This approach allows us to use existing deployments that are already battle-proven as a template and modify only what’s really needed.
Finally, we need to specify a Discriminator class, which the operator engine uses to target the right resource class when processing events from multiple sources of the same kind. Here, we’ll use an implementation based on the ResourceIDMatcherDiscriminator utility class available in the framework:
class Discriminator extends ResourceIDMatcherDiscriminator<Deployment, DeptrackResource> {
     public Discriminator() {
         super(COMPONENT, (p) -> new ResourceID(
           p.getMetadata().getName() + "-" + COMPONENT,
           p.getMetadata().getNamespace()));
     }
}
The utility class requires an event source name and a mapping function. The latter takes a primary resource instance and returns the resource identifier (namespace + name) for the associated component.
Since all resource classes share the same basic structure, we won’t reproduce them here. Instead, we recommend checking the source code to see how each resource is built.
11. Local Testing
Since the controller is just a regular Spring application, we can use regular test frameworks to create unit and integration tests for our application.
The Java Operator SDK also offers a convenient mock Kubernetes implementation that helps with simple test cases. To use this mock implementation in test classes, we use the @EnableMockOperator together with the standard @SpringBootTest:
@SpringBootTest
@EnableMockOperator(crdPaths = "classpath:META-INF/fabric8/deptrackresources.com.baeldung-v1.yml")
class ApplicationUnitTest {
    @Autowired
    KubernetesClient client;
    @Test
    void whenContextLoaded_thenCrdRegistered() {
        assertThat(
          client
            .apiextensions()
            .v1()
            .customResourceDefinitions()
            .withName("deptrackresources.com.baeldung")
            .get())
          .isNotNull();
    }
}
The crdPath property contains the location where the annotation processor creates the CRD definition YAML file. During test initialization, the mock Kubernetes service will automatically register it so we can create a CRD instance and check whether the expected resources are correctly created.
The SDK’s test infrastructure also configures a Kubernetes client that we can use to simulate deployments and check whether the expected resources are correctly created. Notice that there’s no need for a working Kubernetes cluster!
12. Packaging and Deployment
To package our controller project, we can use a Dockerfile or, even better, Spring Boot’s build-image goal. We recommend the latter, as it ensures that the image follows recommended best practices regarding security and layer organization.
Once we’ve published the image to a local or remote registry, we must create a YAML manifest to deploy the controller into an existing cluster.
This manifest contains the deployment itself that manages the controller and supporting resources:
- The CRD definition
- A namespace where the controller will “live”
- A Cluster Role listing all APIs used by the controller
- A Service Account
- A Cluster Role Binding that links the role to the account
The resulting manifest is available in our GitHub repository.
13. CRD Deployment Test
To complete our tutorial, let’s create a simple Dependency-Track CRD manifest and deploy it. We’ll use a dedicated namespace (“test”) and expose it.
For our test, we’re using a local Kubernetes that listens on IP address 172.31.42.16, so we’ll use deptrack.172.31.42.16.nip.io as the hostname. NIP.IO is a DNS service that resolves any hostname in the form *.1.2.3.4.nip.io to the IP address 1.2.3.4, so we don’t need to set up any DNS entry.
Let’s have a look at the deployment manifest:
apiVersion: com.baeldung/v1
kind: DeptrackResource
metadata:
  namespace: test
  name: deptrack1
  labels:
    project: tutorials
  annotations:
    author: Baeldung

spec:
  ingressHostname: deptrack.172.31.42.16.nip.io
Now, let’s deploy it with kubectl:
$ kubectl apply -f k8s/test-resource.yaml
deptrackresource.com.baeldung/deptrack1 created
We can get the controller logs to see that it reacted to the CRD creation and created the dependent resources:
$ kubectl get --namespace test deployments
NAME                   READY   UP-TO-DATE   AVAILABLE   AGE
deptrack1-api-server   0/1     1            0           62s
deptrack1-frontend     1/1     1            1           62s

$ kubectl get --namespace test services
NAME TYPE CLUSTER-IP EXTERNAL-IP PORT(S) AGE
deptrack1-frontend-service ClusterIP 10.43.122.76 <none> 8080/TCP 2m17s

$ kubectl get --namespace test ingresses
NAME CLASS HOSTS ADDRESS PORTS AGE
deptrack1-ingress traefik deptrack.172.31.42.16.nip.io 172.31.42.16 80 2m53s
As expected, the test namespace now has two deployments, two services, and an ingress. If we open a browser and point to https://deptrack.172.31.42.16.nip.io, we’ll see the application’s login page. This shows that the solution was correctly deployed.
To complete the test, let’s remove the CRD:
$ kubectl delete --namespace test deptrackresource/deptrack1
deptrackresource.com.baeldung "deptrack1" deleted
Since Kubernetes knows which resources are linked to the CRD, they’ll also be deleted:
$ kubectl get --namespace test deployments
No resources found in test namespace.
14. Conclusion
In this tutorial, we’ve shown how to implement a basic Kubernetes Operator using the Java Operator SDK. Despite the amount of required boilerplate code, the implementation is straightforward.
Also, the SDK handles most of the heavy lifting of state reconciliation, leaving developers the task of defining the best way to handle complex deployments.
As usual, all code is available over on GitHub.


