Mocking is an essential part of unit testing, and the Mockito library makes it easy to write clean and intuitive unit tests for your Java code.
Get started with mocking and improve your application tests using our Mockito guide:
Handling concurrency in an application can be a tricky process with many potential pitfalls. A solid grasp of the fundamentals will go a long way to help minimize these issues.
Get started with understanding multi-threaded applications with our Java Concurrency guide:
Spring 5 added support for reactive programming with the Spring WebFlux module, which has been improved upon ever since. Get started with the Reactor project basics and reactive programming in Spring Boot:
Since its introduction in Java 8, the Stream API has become a staple of Java development. The basic operations like iterating, filtering, mapping sequences of elements are deceptively simple to use.
But these can also be overused and fall into some common pitfalls.
To get a better understanding on how Streams work and how to combine them with other language features, check out our guide to Java Streams:
Explore Spring Boot 3 and Spring 6 in-depth through building a full REST API with the framework:
Yes, Spring Security can be complex, from the more advanced functionality within the Core to the deep OAuth support in the framework.
I built the security material as two full courses - Core and OAuth, to get practical with these more complex scenarios. We explore when and how to use each feature and code through it on the backing project.
You can explore the course here:
Spring Data JPA is a great way to handle the complexity of JPA with the powerful simplicity of Spring Boot.
Get started with Spring Data JPA through the guided reference course:
Refactor Java code safely — and automatically — with OpenRewrite.
Refactoring big codebases by hand is slow, risky, and easy to put off. That’s where OpenRewrite comes in. The open-source framework for large-scale, automated code transformations helps teams modernize safely and consistently.
Each month, the creators and maintainers of OpenRewrite at Moderne run live, hands-on training sessions — one for newcomers and one for experienced users. You’ll see how recipes work, how to apply them across projects, and how to modernize code with confidence.
Join the next session, bring your questions, and learn how to automate the kind of work that usually eats your sprint time.
1. Overview
The Buffer classes are the foundation upon which Java NIO is built. However, the ByteBuffer class is most preferred in these classes. That’s because the byte type is the most versatile one. For example, we can use bytes to compose other non-boolean primitive types in JVM and to transfer data between JVM and external I/O devices.
In this tutorial, we’ll inspect different aspects of the ByteBuffer class.
2. ByteBuffer Creation
The ByteBuffer is an abstract class, so we can’t construct a new instance directly. However, it provides static factory methods to facilitate instance creation. Briefly, there are two ways to create a ByteBuffer instance, either by allocation or wrapping:
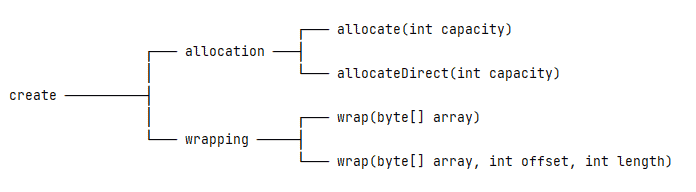
2.1. Allocation
Allocation will create an instance and allocate private space with a specific capacity. To be precise, the ByteBuffer class has two allocation methods: allocate and allocateDirect.
Using the allocate method, we’ll get a non-direct buffer – that is, a buffer instance with an underlying byte array:
ByteBuffer buffer = ByteBuffer.allocate(10);When we use the allocateDirect method, it generates a direct buffer:
ByteBuffer buffer = ByteBuffer.allocateDirect(10);For simplicity, let’s focus on the non-direct buffer and leave the direct buffer discussion for later.
2.2. Wrapping
Wrapping allows an instance to reuse an existing byte array:
byte[] bytes = new byte[10];
ByteBuffer buffer = ByteBuffer.wrap(bytes);
The above code is equivalent to:
ByteBuffer buffer = ByteBuffer.wrap(bytes, 0, bytes.length);Any changes made to the data elements in the existing byte array will be reflected in the buffer instance and vice versa.
2.3. Onion Model
Now, we know how to get a ByteBuffer instance. Next, let’s treat the ByteBuffer class as a three-layer onion model and understand it layer by layer from the inside out:
- Data and Indices Layer
- Transferring Data Layer
- View Layer

At the innermost layer, we regard the ByteBuffer class as a container for a byte array with extra indices. In the middle layer, we focus on using a ByteBuffer instance to transfer data from/to other data types. We inspect the same underlying data with different buffer-based views at the outermost layer.
3. ByteBuffer Indices
Conceptually, the ByteBuffer class is a byte array wrapped inside an object. It provides many convenient methods to facilitate reading or writing operations from/to underlying data. These methods are highly dependent on the indices maintained.
Now, let’s deliberately simplify the ByteBuffer class into a container of byte array with extra indices:
ByteBuffer = byte array + indexWith this concept in mind, we can classify index-related methods into four categories:
- Basic
- Mark and Reset
- Clear, Flip, Rewind, and Compact
- Remain
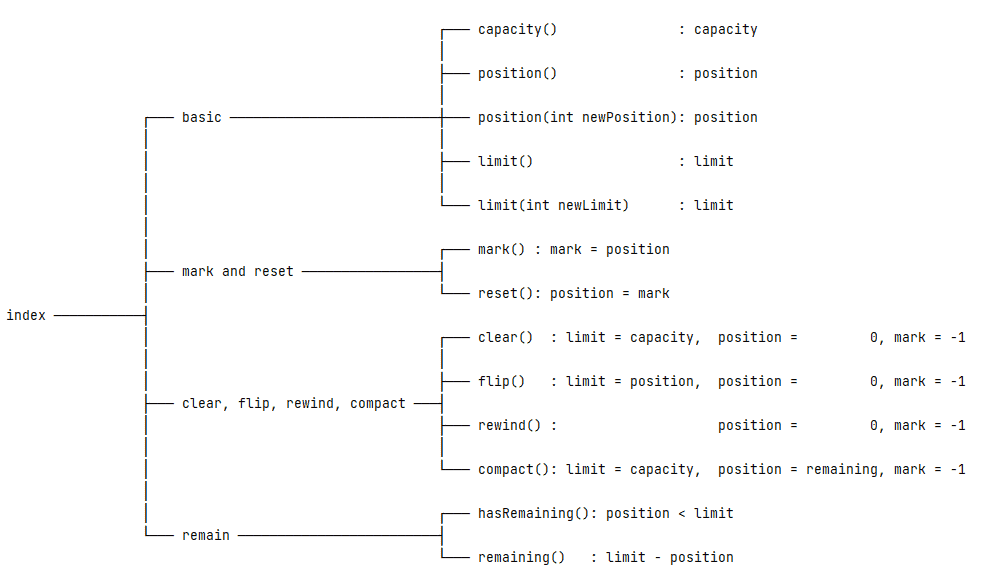
3.1. Four Basic Indices
There are four indices defined in the ByteBuffer class. These indices record the state of the underlying data elements:
- Capacity: the maximum number of data elements the buffer can hold
- Limit: an index to stop read or write
- Position: the current index to read or write
- Mark: a remembered position
Also, there is an invariant relationship between these indices:
mark <= position <= limit <= capacityIt’s worth noting that position, limit, and capacity won’t be negative. But the mark is a bit special. When the mark is undefined, it holds the value -1.
Additionally, we should note that all index-related methods revolve around these four indices. We’ll see some examples soon to understand how these four indices change.
When we create a new ByteBuffer instance, the mark is undefined (-1), the position holds 0, and the limit equals the capacity. For example, let’s allocate a ByteBuffer with 10 data elements:
ByteBuffer buffer = ByteBuffer.allocate(10);Or, let’s wrap an existing byte array with 10 data elements:
byte[] bytes = new byte[10];
ByteBuffer buffer = ByteBuffer.wrap(bytes);
As a result, the mark will be -1 (undefined), the position will be 0, and both the limit and capacity will be 10:
int position = buffer.position(); // 0
int limit = buffer.limit();       // 10
int capacity = buffer.capacity(); // 10
The capacity is read-only and can’t be changed. But, we can use the position(int) and limit(int) methods to change the corresponding position and limit:
buffer.position(2);
buffer.limit(5);
Then, the position will be 2, and the limit will be 5.
3.2. Mark and Reset
The mark() and reset() methods allow us to remember a particular position and return to it later.
When we first create a ByteBuffer instance, the mark is undefined. Then, we can call the mark() method, and the mark is set to the current position. After some operations, calling the reset() method will change the position back to the mark.
ByteBuffer buffer = ByteBuffer.allocate(10); // mark = -1, position = 0
buffer.position(2);                          // mark = -1, position = 2
buffer.mark();                               // mark = 2,  position = 2
buffer.position(5);                          // mark = 2,  position = 5
buffer.reset();                              // mark = 2,  position = 2
One thing to note: If the mark is undefined, calling the reset() method will lead to InvalidMarkException.
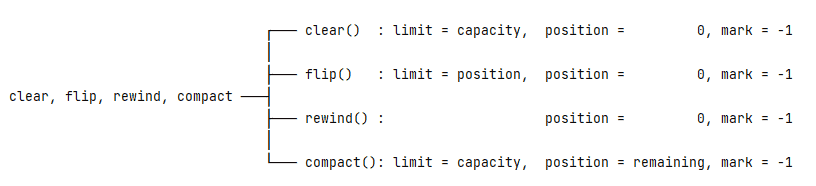
3.3. Clear, Flip, Rewind, and Compact
The clear(), flip(), rewind(), and compact() methods have some common parts and slight differences:
To compare these methods, let’s prepare a code snippet:
ByteBuffer buffer = ByteBuffer.allocate(10); // mark = -1, position = 0, limit = 10
buffer.position(2);                          // mark = -1, position = 2, limit = 10
buffer.mark();                               // mark = 2,  position = 2, limit = 10
buffer.position(5);                          // mark = 2,  position = 5, limit = 10
buffer.limit(8);                             // mark = 2,  position = 5, limit = 8
The clear() method will change the limit to the capacity, the position to 0, and the mark to -1:
buffer.clear(); // mark = -1, position = 0, limit = 10The flip() method will change the limit to the position, the position to 0, and the mark to -1:
buffer.flip(); // mark = -1, position = 0, limit = 5The rewind() method keeps the limit unchanged and changes the position to 0, and the mark to -1:
buffer.rewind(); // mark = -1, position = 0, limit = 8The compact() method will change the limit to the capacity, the position to remaining (limit – position), and the mark to -1:
buffer.compact(); // mark = -1, position = 3, limit = 10The above four methods have their own use cases:
- To reuse a buffer, the clear() method is handy. It will set the indices to the initial state and be ready for new writing operations.
- After calling the flip() method, the buffer instance switches from write-mode to read-mode. But, we should avoid calling the flip() method twice. That’s because a second call will set the limit to 0, and no data elements can be read.
- The rewind () method is handy if we want to read the underlying data more than once.
- The compact() method is suited for partial reuse of a buffer. For example, suppose we want to read some, but not all, of the underlying data, and then we want to write data to the buffer. The compact() method will copy the unread data to the beginning of the buffer and change the buffer indices to be ready for writing operations.
3.4. Remain
The hasRemaining() and remaining() methods calculate the relationship of the limit and the position:

When the limit is greater than the position, hasRemaining() will return true. Also, the remaining() method returns the difference between the limit and the position.
For example, if a buffer has a position of 2 and a limit of 8, then its remaining will be 6:
ByteBuffer buffer = ByteBuffer.allocate(10); // mark = -1, position = 0, limit = 10
buffer.position(2);                          // mark = -1, position = 2, limit = 10
buffer.limit(8);                             // mark = -1, position = 2, limit = 8
boolean flag = buffer.hasRemaining();        // true
int remaining = buffer.remaining();          // 6
4. Transfer Data
The second layer of the Onion Model is concerned with transferring data. Specifically, the ByteBuffer class provides methods to transfer data from/to other data types (byte, char, short, int, long, float, and double):
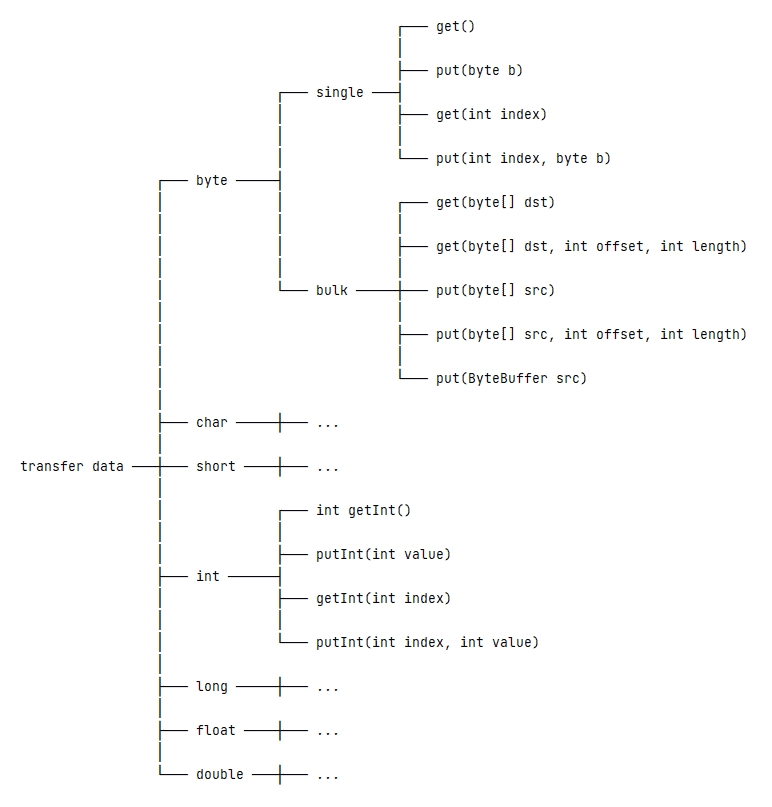
4.1. Transfer byte Data
To transfer byte data, the ByteBuffer class provides single and bulk operations.
We can read or write a single byte from/to the buffer’s underlying data in single operations. These operations include:
public abstract byte get();
public abstract ByteBuffer put(byte b);
public abstract byte get(int index);
public abstract ByteBuffer put(int index, byte b);
We may notice two versions of the get()/put() methods from the above methods: One has no parameters, and the other accepts an index. So, what’s the difference?
The one with no index is a relative operation, which operates on the data element in the current position and later increments the position by 1. However, the one with an index is a whole operation that operates on the data elements at the index and won’t change the position.
In contrast, the bulk operations can read or write multiple bytes from/to the buffer’s underlying data. These operations include:
public ByteBuffer get(byte[] dst);
public ByteBuffer get(byte[] dst, int offset, int length);
public ByteBuffer put(byte[] src);
public ByteBuffer put(byte[] src, int offset, int length);
The above methods all belong to relative operations. That is to say, they will read or write from/to the current position and change the position value, respectively.
There is also another put() method, which accepts a ByteBuffer parameter:
public ByteBuffer put(ByteBuffer src);4.2. Transfer int Data
Besides reading or writing byte data, the ByteBuffer class also supports the other primitive types except for the boolean type. Let’s take the int type as an example. The related methods include:
public abstract int getInt();
public abstract ByteBuffer putInt(int value);
public abstract int getInt(int index);
public abstract ByteBuffer putInt(int index, int value);
Similarly, the getInt() and putInt() methods with an index parameter are absolute operations, otherwise relative operations.
5. Different Views
The third layer of the Onion Model is about reading the same underlying data from different perspectives.

Each method in the above picture will generate a new view that shares the same underlying data with the original buffer. To understand a new view, we should be concerned about two problems:
- How will the new view parse the underlying data?
- How will the new view record its indices?
5.1. ByteBuffer View
There are three methods for reading a ByteBuffer instance as another ByteBuffer view: duplicate(), slice(), and asReadOnlyBuffer().
Let’s have a look at the illustration of those differences:
ByteBuffer buffer = ByteBuffer.allocate(10); // mark = -1, position = 0, limit = 10, capacity = 10
buffer.position(2);                          // mark = -1, position = 2, limit = 10, capacity = 10
buffer.mark();                               // mark = 2,  position = 2, limit = 10, capacity = 10
buffer.position(5);                          // mark = 2,  position = 5, limit = 10, capacity = 10
buffer.limit(8);                             // mark = 2,  position = 5, limit = 8,  capacity = 10
The duplicate() method creates a new ByteBuffer instance just like the original one. But, each of the two buffers will have its independent limit, position, and mark:
ByteBuffer view = buffer.duplicate(); // mark = 2, position = 5, limit = 8, capacity = 10The slice() method creates a shared sub-view of the underlying data. The view’s position will be 0, and its limit and capacity will be the remaining of the original buffer:
ByteBuffer view = buffer.slice(); // mark = -1, position = 0, limit = 3, capacity = 3Compared to the duplicate() method, the asReadOnlyBuffer() method works similarly but produces a read-only buffer. That means we can’t use this read-only view to change the underlying data:
ByteBuffer view = buffer.asReadOnlyBuffer(); // mark = 2, position = 5, limit = 8, capacity = 105.2. Other View
The ByteBuffer also provides other views: asCharBuffer(), asShortBuffer(), asIntBuffer(), asLongBuffer(), asFloatBuffer(), and asDoubleBuffer(). These methods are similar to the slice() method, i.e. they provide a sliced view corresponding to the underlying data’s current position and limit. The main difference between them is interpreting the underlying data into other primitive type values.
The questions we should care about are:
- How to interpret the underlying data
- Where to begin the interpretation
- How many elements will be presented in the newly generated view
The new view will compose multiple bytes into the target primitive type, and it starts the interpretation from the current position of the original buffer. The new view will have a capacity equal to the number of remaining elements in the original buffer divided by the number of bytes comprising the view’s primitive type. Any remaining bytes at the end will not be visible in the view.
Now, let’s take the asIntBuffer() as an example:
byte[] bytes = new byte[]{
  (byte) 0xCA, (byte) 0xFE, (byte) 0xBA, (byte) 0xBE, // CAFEBABE ---> cafebabe
  (byte) 0xF0, (byte) 0x07, (byte) 0xBA, (byte) 0x11, // F007BA11 ---> football
  (byte) 0x0F, (byte) 0xF1, (byte) 0xCE               // 0FF1CE   ---> office
};
ByteBuffer buffer = ByteBuffer.wrap(bytes);
IntBuffer intBuffer = buffer.asIntBuffer();
int capacity = intBuffer.capacity();                         // 2
In the above code snippet, the buffer has 11 data elements, and the int type takes 4 bytes. So, the intBuffer will have 2 data elements (11 / 4 = 2) and leave out the extra 3 bytes (11 % 4 = 3).
6. Direct Buffer
What is a direct buffer? A direct buffer refers to a buffer’s underlying data allocated on a memory area where OS functions can directly access it. A non-direct buffer refers to a buffer whose underlying data is a byte array that is allocated in the Java heap area.
Then, how can we create a direct buffer? A direct ByteBuffer is created by calling the allocateDirect() method with the desired capacity:
ByteBuffer buffer = ByteBuffer.allocateDirect(10);Why do we need a direct buffer? The answer is simple: a non-direct buffer always incurs unnecessary copying operations. When sending a non-direct buffer’s data to I/O devices, the native code has to “lock” the underlying byte array, copy it outside the Java heap, and then call the OS function to flush the data. However, the native code can access the underlying data directly and call OS functions to flush the data without any additional overhead by using a direct buffer.
In light of the above, is a direct buffer perfect? No. The main problem is that it’s expensive to allocate and deallocate a direct buffer. So, in reality, does a direct buffer always run faster than a non-direct buffer? Not necessarily. That’s because many factors are at play. And, the performance tradeoffs can vary widely by JVM, operating system, and code design.
Finally, there is a practical software maxim to follow: First, make it work, then, make it fast. That means, let’s first concentrate on code correctness. If the code doesn’t run fast enough, then let’s do the corresponding optimization.
7. Miscellaneous
The ByteBuffer class also provides some auxiliary methods:
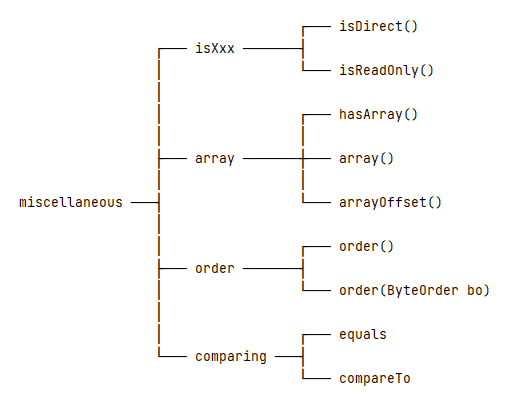
7.1. Is-Related Methods
The isDirect() method can tell us whether a buffer is a direct buffer or a non-direct buffer. Note that wrapped buffers – those created with the wrap() method – are always non-direct.
All buffers are readable, but not all are writable. The isReadOnly() method indicates whether we can write to the underlying data.
To compare these two methods, the isDirect() method cares about where the underlying data exists, in Java heap or memory area. However, the isReadOnly() method cares about whether the underlying data elements can be changed.
If an original buffer is direct or read-only, the new generated view will inherit those attributes.
7.2. Array-Related Methods
If a ByteBuffer instance is direct or read-only, we can’t get its underlying byte array. But, if a buffer is non-direct and not read-only, that doesn’t necessarily mean its underlying data is accessible.
To be precise, the hasArray() method can tell us if a buffer has an accessible backing array or not. If the hasArray() method returns true, then we can use the array() and arrayOffset() methods to get more relevant information.
7.3. Byte Order
By default, the ByteBuffer class’s byte order is always ByteOrder.BIG_ENDIAN. We can use the order() and order(ByteOrder) methods to get and set the current byte order, respectively.
The byte order influences how the underlying data is interpreted. For example, suppose we have a buffer instance:
byte[] bytes = new byte[]{(byte) 0xCA, (byte) 0xFE, (byte) 0xBA, (byte) 0xBE};
ByteBuffer buffer = ByteBuffer.wrap(bytes);
Using ByteOrder.BIG_ENDIAN, val will be -889275714 (0xCAFEBABE):
buffer.order(ByteOrder.BIG_ENDIAN);
int val = buffer.getInt();
However, using ByteOrder.LITTLE_ENDIAN, val will be -1095041334 (0xBEBAFECA):
buffer.order(ByteOrder.LITTLE_ENDIAN);
int val = buffer.getInt();
7.4. Comparing
The ByteBuffer class provides the equals() and compareTo() methods to compare two buffer instances. Both these methods compare based on the remaining data elements, which are in the range of [position, limit).
For example, two buffer instances with different underlying data and indices can be equal:
byte[] bytes1 = "World".getBytes(StandardCharsets.UTF_8);
byte[] bytes2 = "HelloWorld".getBytes(StandardCharsets.UTF_8);

ByteBuffer buffer1 = ByteBuffer.wrap(bytes1);
ByteBuffer buffer2 = ByteBuffer.wrap(bytes2);
buffer2.position(5);

boolean equal = buffer1.equals(buffer2); // true
int result = buffer1.compareTo(buffer2); // 0
8. Conclusion
In this article, we tried to treat the ByteBuffer class as an onion model. At first, we simplified it into a container of byte array with extra indices. Then, we talked about how to use the ByteBuffer class to transfer data from/to other data types.
Next, we looked at the same underlying data with different views. Finally, we discussed direct buffer and some various methods.